 |
| Pop Up Cards |
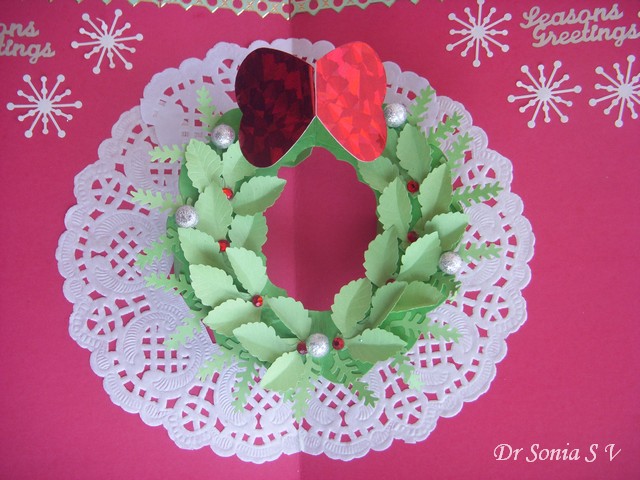
Here is the promised Pop Up wreath Card Tutorial.The earlier pop up wreath card was made with basic materials but I went all out and used a variety of my beloved punches for this fancier pop up Christmas card.
 |
| Pop Up Cards |
Materials required
Card stock- Sturdy card stock is required . I used a folded A 4 card to make the base and scraps to make the tabs and wreath
Scoring tool- Even though I use my beloved Scorpal as its so much easier and quicker, just a blunt knife or an old pen [whose ink has run out] will do.
Glue- white glue- I use fevicol MR
How to Make a Pop Up wreath card
Cut a circular shape, fold it in half and cut out the center - size it as you wish- mine is around 4 inches in diameter
 |
| Pop Up card Tutorial |
Make 4 supporting tabs from thick card stock by scoring 2 inch strips at 0.5and 1.5inches to give a tab which measures 1 inch in the middle and 0.5 inches at either end.Valley fold all the creases.
 |
| Pop up card tutorial |
Take one tab and apply glue as shown and stick it to the folded wreath as shown
 |
| Pop Up card Tutorial |
Take another tab ,apply glue and stick to the central upper part of the other half once a day your pop up wreath as shown.Note the direction of the supporting tabs and the area where the glue is applies on the lower supporting tab.
 |
| Pop Up card Tutorial |
Stick the lower tab flush with the central crease of the base card. Apply glue on the area shown on the upper tab and stick it to the other half of the base card again flush with the central crease as shown.
 |
| Pop Up card Tutorial |
Add 2 more supports at the 2 edges of your wreath in a similar fashion.Apply glue on the tab as shown,fold over your wreath and stick the glue tab.Apply glue on the other end of the tab as shown and close the base card and allow the tab to stick. In a similar fashion stick the tab on the other side of the pop up card .
 |
| Pop Up card Tutorial |
 |
| Pop Up Cards |
How to make a Pop Up bow
This is a super simple pop up mechanism and you can use this pop up bow on a box, wreath or maybe a baby's head!
You can hand cut a bow shape as I did in my first pop up wreath card or
create a quick bow from 2 punched hearts as shown here.
 |
| Pop Up card Tutorial |
I scored the edges of 2 hearts as shown, cut off the edge of one heart and stuck it to the folded edge of the other heart to make a folded bow for the pop up card.
This bow even looks like a butterfly so this mechanism can be adapted to make a pop up butterfly!
Score and fold 2 supporting tabs.The size depends on the size of your bow- My tabs are 0.5 inches at either end and 0.75 inches wide in the center.
Pop up card making Tip:Slope the corners of tabs for a smoother sticking and pop up mechanism ease
 |
| Pop Up card Tutorial |
Stick the tabs as shown on the underside of your bow.Fold over the bow and apply glue to the tabs as shown above.
 |
| Pop Up card Tutorial |
 |
| Pop Up Cards |
The Pop Up wreath card techniques can be adapted to a variety of pop up objects - like maybe a tiara, a doughnut, a ring ,a table, a cake...
 |
| Pop Up Cards |
Warning: Making pop up cards does require a bit of concentration but I guess that is just what we need sometimes to distract over selves from life's stresses!
This one is especially for you my friend Jessica since you love wreaths so much!
This is inspired by Jessica's beautiful wreath card
Here are links to more pop up card tutorials
If you prefer to make less technically challenging cards here is a compilation of card making tutorials
Here are links to more pop up card tutorials
If you prefer to make less technically challenging cards here is a compilation of card making tutorials


wow another Brilliant tutorial ...love it
ReplyDeleteLisa x
this one looks even more amazing .. you have placed the doily so nicely .. you are making me fall in love with the pop up cards its mechanism is amazing .. also loved the way u used the punch stars .. such complicated tutorials u do with so much ease .. amazing !
ReplyDeleteAyesha its actually not complicated but the number of pictures can end up making it a scary project to attempt!
DeleteWOW!! This is Fantastic Sonia.. You are very good with pop-up cards..Loz
ReplyDeleteBee-utifully created. Like the pop-up style. May have to give this a try and hope that mine looks 1/2 as nice as yours.
ReplyDeleteMelissa
"Sunshine HoneyBee"
Wonderful tutorial...I will have to try it out soon. Really like the doily around the edge. Another terrific entry for our Moving Parts challenge at Unstampabelles. Thanks so much.
ReplyDeleteWonderfully creative and a great tutorial and A LOT OF WORK! amazing!
ReplyDeleteVery cute!
ReplyDeleteThe wonderful design!
Pretty indeed...love the color combo!
ReplyDeleteThank You so much dear friends !
ReplyDeletevery pretty!!i must tell you that my 12 year old daughter is absolutely in love with your space.....whenever she see's me on the laptop,her first ques is about your blog!she loves to try out some of the things.....some turn out nice and some not so nice!(but that would be her fault!)
ReplyDeleteSimran if you daughter likes pop up cards do try the Robert Sabuda site it has pop up cards categorized by difficulty levels.
DeleteTHank you for the wonderful tutorial!
ReplyDeleteWOW.. I love it.. The doilies and the leaves ring is so cool. :)
ReplyDeletewow....what a wonderful imaginations you have.I'm gonna try it just now... :)
ReplyDeleteAnother beautiful pop up card doctor!! Thanks for the tutorial.
ReplyDeleteWonderful tutorial and the wreath is so pretty!
ReplyDeleteBeautiful card
ReplyDeleteGorgeous, gorgeous!! And thank you for another wonderful tutorial...you are so generous to share your amazing creativity with us, Sonia :)
ReplyDeleteLisa
A Mermaid's Crafts
Another great card! thank you such a great tutorial ;-) Thank you for joining in UnstampaBelles Challenge this month.
ReplyDeleteAnother great card, and a tutorial to go with it, how excellent is that? well done you Dr Sonia.
ReplyDeleteGreat tutorial and great card! Thanks for joining us at UnstampaBelles.
ReplyDeleteGreat tututorial and beautiful project! Thanks so much for sharing. I found you at MIM!
ReplyDeleteHugz,
Chana
Lovely pop up card and such clear and precise tutorial . Thanks for sharing on Make it Monday
ReplyDeleteI must try this one also....it is lovely! I saw your card at MIM!
ReplyDelete