31.5.11

Easy Circle Flower Tutorial and Punched Flower Tutorial

Circle Flowers
Circle Flower Tutorial

This card is a recycling project -the golden paper in this card has been cut out from a wedding invitation card which I recycled.The wedding invitation cards in India are so gorgeous .
This card is inspired by the ICR 3 challenge photo inspiration - I have used the rich golden color and the perfectly Indian design on the golden paper to depict the theme.
I will share the tutorials for 2 of the flowers used in this card
Circle Punch Flowers
The central Flowers are made of circles.These are one of my favorite type of flowers .If you need lots of flowers these are a good option as they are easy to make and lovely
Materials Required
  • Circles: 5 + 1
  • Circle punch
  • Glue
  • Embellishment for center: pearls, beads,flower stamens
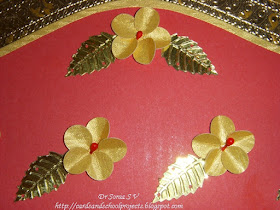
Punch craft Circle Flowers
How to make the Circle Punch Flower
Punch 5 circles.The base of your flower can be a circle, a sun punch or even a bit of scrap paper.I have used a circle as the base also
Gently fold the circles .You can emboss too but folding gives as good a result and saves a lot of time!
Apply a generous blob of glue to the base 
Circle Flower Tutorial

Layer the circular flower petals overlapping each other.
The last two petals may need a little bit of glue on the tip to help adhere better
Embellish the center of your flower : If you are using beads or pearls avoid the flat base ones as the center of your flower is not flat.
Circle Flower Tutorial

Embellishing using flower stamens/pistils:Cut close to the bulbous portion and glue to the center of the flower.You can hide the narrow end within the flower petals so that the center seems to emerge from deep in the flower.

Circle Flower Tutorial
The Punch Flower Tutorial is fairly a simple technique
Punch Flower Craft

If you have a flower punch - try this technique- It makes your flowers come alive!
Craft Punch Flower Tutorial

  • Punch the flowers
  • Place them on an embossing mat or on the backside of your mouse pad
  • Use a blunt tooth pick / inkless ballpoint pen or embossing tool to run from the center to the tip of the flower petals.
Craft Punch Flower Tutorial
  • Your flat flowers will become 3 D and all the more lovely
  • Apply a dot of glue to the center of your flower and embellish the center with a bead or pearl
  • Layer this flower over another to create more exquisite flowers
Circle Flower Tutorial
Here are the links to some cards with Circle Punch flowers 
Edited: This card won the Top  3 at  ICR 3 challenge

27.5.11

Spiral Roses Arch Shaped Card and Pop Up Card Honeycomb Flower


Spiral Roses Shaped Card
This card has lots of spiral Roses on a lattice work .Here are some Photos of the making of this card.

You can find card templates at unusual places just be on the look out! Here I have used my chopping board to make the template for this Archway shaped card.
Card Template
The holes are for insertion of the ribbon.Corrugated paper strips are stuck on the card as shown.I have used double sided foam sticky tape for the second layer of bars to give the added 3 D effect.
Lattice Card Making tutorial
Complete the flower bed with a strip of corrugated paper at the bottom of the archway
Corrugated Paper Card Making
Glue in Spiral roses and the pearls and pearl garland.The pink ribbon like border is actually a paper strip- I didn't have the right ribbon to match the flowers so I used a matching paper strip.
Spiral Roses
Flower Bed Card 
I have embossed the leaves using a ball headed embossing tool on an embossing mat. You don't need these stuff to emboss - a blunt toothpick should do fine and use the under surface of the mouse pad as your embossing pad.However having the embossing tools makes it super easy.[I got mine as part of a Parchment craft kit]
Leaf Embossing
Here is the inside of the card.Its a honeycomb pop up flower- this time I have made the center pink
Honey Comb Flower Pop Up Card
Here is the link  to make the Honey comb Flower Pop Up Card Tutorial.

Mseal Art -Altered Project- Puppy and Tortoise

Mseal art
This is another Mseal Art Project.The puppy was easy to make and was inspired by our cocker spaniel hence the long ears but my daughter wanted him to be  a Dalmatian so the spots!
This is the tissue holder which we altered for this project.
Mseal Art Altered Project
The tortoise shell and head are just 2 squashed ball .The feet are small cylinders.The shell was marked out with a kitchen knife.My little one put in a googly eye for the tortoise's eyes.
Mseal Art Tortoise

Mseal Art Puppy and Ball
For the grass I layered 2 sheets of Mseal and made indentations with a kitchen knife and then painted with Pearl green. 
Mseal Art Puppy
Check out the  Mseal Art Tutorial in the earlier post.
Do try out fun projects with Mseal and do leave me a link to any project you have done or do.

Mseal Art Altered Project- Lady birds and Mseal Art Tutorial

Mseal Art Ladybirds
Mseal Art is fun ,inexpensive and super easy.  When I started with Mseal art I knew nothing about it .It was an impulse buy from a stationery shop!I read the instructions on the packet to get started and learnt by trial and error.I am posting this tutorial to help anyone like me who likes to experiment with new crafts.
What is Mseal? 
Mseal is epoxy resin.It is actually a substance used by plumbers to seal leaks! Its manufactured as white mseal for hobby crafts.It is not expensive and the standard packet 50g packet costs just rupees 15.
How to do Mseal Art and Craft
Materials Required
  • Mseal:For a small project you just need 1or 2 packets.I have used less than a packet for this ladybirds project
  • Paint- Acrylic paint gives a lovely shine
  • Kitchen knife- optional
1.On opening the packet you will find 2 substances.
Mseal 
2.Pinch or cut out some as shown below.If your Mseal is a little old there might be a hard layer at the junction of the 2 colors- remove this hard strip as I have found that this strip of Mseal  remains hard and can interfere with the texture of your finished work.
Mseal 
3.Knead thoroughly with your fingers.No need to add any water or oil


Mseal
4.Once the 2 parts of the Mseal are thoroughly mixed it changes color to white and becomes soft and pliable.You are ready to sculpt now.It hardens in 60-90 minutes so plan your project accordingly.
Mseal
How to make the Lady birds Mseal Art
Take a small amount of the kneaded Mseal and shape it into a leaf
Mseal Art Leaf
Paint the leaves.Here is my 5 year old helping to paint the leaf.We used Acrylic Pearl Green
Mseal Art and Craft
Roll a long strip for the stem and small balls for the lady birds.
Mseal adheres well to wood,metal,plastic,glass and no gluing is required!Just press them onto the surface and it sticks.Only do so before it hardens[ do within 60 mins of making  the Mseal] 
Here is the box which we altered for this Mseal Art.We used a similar one for the Shell Craft
Recycling crafts

Make veins for the leaves with a regular kitchen knife.
Mseal Art and Craft- ladybirds
Paint the lady bird body red and head black. Once the red paint dries paint spots with black paint.

Mseal Lady bird
Mseal Leaves
Here is the finished Mseal art


Mseal Lady birds
Mseal art is fun and easy. Oh and unlike salt dough craft  you don't have to varnish it. It stays the same for a long long time.
Here are the links to some other Mseal Art Projects

26.5.11

Ice cream Stick Crafts - Puppet/Bookmark


Stick puppets
Crafts using Ice cream Sticks or Lolly Sticks are super fun crafts to do with kids. My daughter really enjoyed this one.Its quick and takes less than 5 minutes ,so do try them with your little ones
Materials Required
Ice cream Sticks / Lolly Sticks
Glue or Glue drops
Paint
Stickers or anything else you fancy
Embellishments- optional

Candy Stick Craft
How to make the Ice cream  stick Puppet or Book mark
Its a pretty simple craft but lets make it simpler with instruction!
1.Choose how much of the candy stick you want the sticker to cover.When working with little ones its nice to mark and tell them to paint below that line.
2.Paint the stick.The color in favor at home right now is pink so here is my little one painting her candy stick pink for the pink princess sticker.
Homemade stick puppet
Stick Puppet
3.Stick the sticker on stiff card to give it some strength and cut it out.If you are using puffy stickers like we did here keep them on the original sheet and cut out.Glue the sticker on the stick with white glue,sticky tape or glue drops.Whenever I craft with my little one I find glue drops invaluable. They are fast and non messy.
Stick Puppets
4.Embellish your puppet.Here my little one is using small "bindhis "[ a popular fashion accessory for Indian women].The princess below has stars on her Ice cream stick.

Candy Stick Craft
For this one we used a the flower from a hair accessory which had broken. I added a felt leaf
Flower Bookmark
Princess Puppets
Here are links to more Ice cream stick crafts

25.5.11

Shell Art and Craft- Altered Project

Shell Crafts
We had a lovely wooden box which my daughter and I painted and did some shell craft.We made a Pair of Koalas sitting on branches!
 Materials Required for Shell Craft
  • Shells -assorted all sizes and shapes are useful
  • White glue
  • Base- Cardboard,wood,plastic- literally anything which can take the weight of your shells.Here is the box which we used for the shell craft
    Altered Project- Shell Craft
  • Paint-optional. I love the natural beauty of the shells and used only a teeny bit on the nose of the Koalas.The pink flowers in the Koala Bears hands is natural shell!
Shell Animals
Think of a design and start gluing! Work from the center outwards.
Shell Animals
White PVA glue is enough to stick the shells but if you want to really defy gravity as we did for the Koala's ears and you are using white glue you need to hold the pieces in place for quite a few minutes. My daughter is fairly patient but if she is really fond of the work we are doing, she will keep on asking " Is it dry yet?" So we used Mseal for the ears.Mseal is quick and strong and super easy.
The shells are from Kochi which is a seaport in Kerala [A Southern State in India] my homeland .They were sent to my daughter from my father, her grandfather with loads of love!
Shell Craft I have found is great fun to do with kids!

24.5.11

Quilled Flower Blooms on Recycled Clock

Quilled Flowers
This is my first major quilling work.It is a recycling work as the quilling is done on a clock which had broken down . I removed the clockwork mechanism and lined the inside with blue corrugated paper for the background.The major part of the paper used is recycled from magazine covers, medication pamphlets, old wedding cards etc.
Spiral Roses
The spiral roses are made from a recycled wedding card
Quilled eccentric flower
I am just learning to make eccentric coils and this is a sort of maiden attempt at an eccentric coil flower.The orange paper was hand cut from a medication pamphlet.
Heart Punch flower
One of my favorite heart punch flowers.Check out the tutorial how to make the heart punch flat folding flower.
Quilled Butterfly
The pink flower is made out of multiple sun punched tiny suns.The quilled butterfly is adorned with a favorite heart shaped pearl which I got from a local shop.
Punch Craft flowers
These pink flowers are a personal favorite.They are made out of 5 circles overlapped and glued on a small paper base.
Eccentric Coil Quilled Flower
This orange flower is an eccentric col with heart shaped pearls
Quilled Fringed Flower
I have again recycled the lovely orange medication pamphlet to create this shiny fringed flower
Punched Flowers
The punch craft flower has been punched out from a wedding card.I always keep wedding cards to recycle.
Quilled Leaves
I tried out the technique of combing while making the leaves.They were the first quilled strips I had bought[ so far I was hand cutting everything!]

Quilled Leaves
Different shades of greenery all from recycled cards,magazine covers ,packages what not!I have inserted the leaves and stems into the cream colored corrugated paper at the base.

This project is the first major quilling work I have done. Do post your comments would love to hear from you.