21.2.12

Recycling Craft- Doll Making

Recycling Craft
Recycling Craft
Recycling crafts are a passion of mine  but boy did I struggle for ideas recently when I had to come up with a kids recycled craft ! My 5 year old has a week long exhibition in school on recycling crafts-- sounds easy ??? Well the catch is the kids have to take the material from home and  assemble it themselves in the school in the time given to them !
I shuddered at the thought of sending scissors and glue to school . What if she smeared glue all over her project or worse what if she hurt herself with the scissors ??[like many mothers I am a bit paranoid where my precious bundle is concerned!].
My daughter herself solved my problem- she invented her own recycled craft !
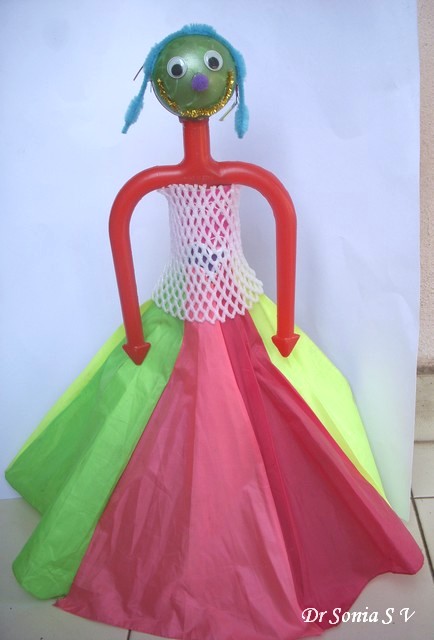
I saw her balancing a ball atop a broken toy part which she had inserted inside the cardboard tube of an used party popper - she had made a dancing doll!
I helped make a frock for her doll and we had a cute recycled dancing doll!
Sharing how we made this doll [To help any mums out there who might have to invent similar stuffs for their kiddos!]
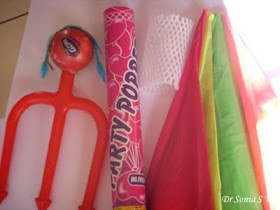
These are the materials we recycled to make our recycled doll.
Recycling Craft
  • Gems Ball Container- Useful ball shaped one that is so good for recycling crafts.
  • Broken Umbrella - I have quite a few broken umbrellas at home!
  • Fruit cover netting - Apples and pears have these lovely thermocol/styrofoam net covers these days.
  • Broken toy part - originally  a trident toy
  • Party popper -a used one .I wondered myself why I was crazy enough to have saved it!
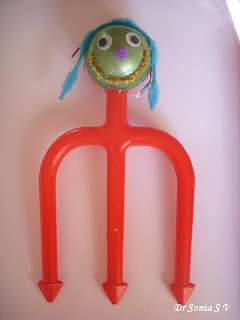
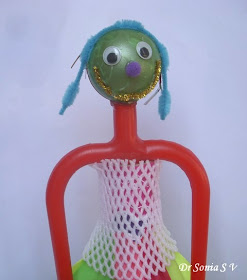
I stuck the gems ball on the top of her broken trident using the glue gun [the glue gun is the best tool a mom could have!!].My little one designed the face and hair-- kids have weird color ideas and she wanted her doll to have a green face, blue hair and a purple nose! The blue hair is a pipe stem cleaner [ chenille stick].I plan to send this top part as such for her recycling craft.
Recycling Craft
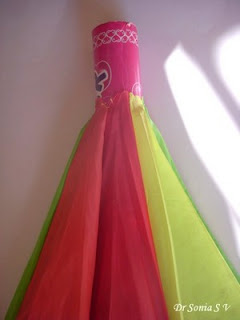
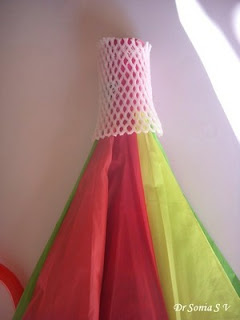
I cut off the fabric from the umbrella and it left just a small hole in the top part.Taught my little one to slide it down the party popper cardboard tube to help make the skirt of her recycled craft doll.
Recycling Craft
Next she just had to slide down the fruit cover net to make the blouse of the doll.The fruit cover net is so springy that it stays snugly in place like a real blouse!Here is the dress of our recycled craft doll.
Recycling Craft
Next just insert the middle prong of the trident into the cardboard tube of the party popper and you have a doll which dances as the top part is not fixed but is free to swing to and fro!
Recycling Craft
The party popper we used has a weighted base so if you are making a similar doll with a bottle  or other container weigh down the bottom as otherwise your doll will topple over when she dances.I hope you enjoyed reading about this kids recycling craft!
Recycling Craft
I have dismantled this doll and packed the  parts for my little one to take to school tomorrow . As this was simple for her to make, I am also sending her a cardboard box  castle to make.Will share pics of that later.Keeping my fingers crossed all goes well tomorrow at her recycling exhibition.
Do share your thoughts on this recycling craft.

19.2.12

Blog post photo tips

Blogger photo Tips
These Blog post Photo tips are not photography  tips as I take average photos only but sharing some blogging photo tips as photos are such an important part of a blog post and help popularize your blog!
Name your photos well. 
When  you download photos from your camera they will have meaningless names .Before you upload/post your photos rename your photos manually or more easily using a batch rename software . This helps search engines such as Google to identify your photos and can increase your blog traffic.This is a very basic and easy to follow blogging photo tip!
Blogger Photo Tips

Re-size your Photos
When you take photos on your camera the size is very large. Before you post them on your blog you have to re-size these photos and make them smaller.
Why bother?
Most of us use free photo sharing sites such as picasa, photobucket, flikr etc. Picasa is a popular photo storage site for blogger and it has a limit on the photos based on the total size. If you kept uploading large megapixel photos- you would soon run out of your free quota on the free site!
Large photos take a long time to load on your blog page.
Re-sizing your photos too small has a tremendous downside as they loose clarity and details are compromised.  I generally use approx 400x 300 pixels for photos I post medium size and 640 x 480 pixels for photos I post as original size [the large ones]. 
Blogger Photo Tips
You can quickly resize your blog post photos using the batch re-size function of a photo-editing freeware.
Blog post Photo Size
Whether to post the photos in small/medium/large etc is an individual preference...I like to post the lovelier photos as large or original size! Closeup shots and tutorial steps can be posted as medium which is the default blogger photo size
Blogger Photo Tips
Many a times if the photo is posted small you have to click on it to see things better.Since blog surfing isnt at a leisurely pace always , the pundits say having to go an extra step to click on a photo to view it better puts people off !
Large photos look nicer but have a down side- they take longer to load on your page ! So no consensus on this point -do what you like!!
Protect your photos
It leaves a very unsavory feeling if people may post work inspired by you and don't give credit or even worse sometimes post your photos and claim them as their work. It has happened to quite a few of my blogger pals. To decrease incidence of such heartache- 
Watermark your Photos
Do watermark your photos-This helps you in 2 ways – 
1) Anyone who saves your craft photo for inspiration and later creates a project based on it can more easily credit it to you. 
2)The other way watermarking helps is it deters unscrupulous people from stealing your images and claiming them as their work to some extent. 
Popular photo-editing freeware can easily help you to even batch watermark your photos.
Positioning it across the center or in the background makes it difficult for anyone to crop it off or erase it and is one of the best watermarking positions.I personally dont like the watermark in the center as I feel it is distracting for the viewer.
The watermark should not be so large as to dominate your photo and spoil the beauty of your creation.
Disable right click
Disabling right click is a huge deterrent to anyone saving your picture. I don’t like doing that cos I feel it is an honor that a person is saving my photos to inspire them! Just because someone saves your picture doesn’t mean they will misuse it! And if someone wants, they are many ways to still capture the image despite the disabled right click!

Blogger Photo Tips
Photo Enhancement
Most of us are casual photographers and it will help our photos tremendously if we can use some simple photo enhancing tricks! The simplest tricks are playing with the brightness and contrast of your photos using a software.
What photoediting software to use?
The "boss" is Photoshop but I didnt have the patience to master it and have played around with quite a few freeware. Now settled on 2 freeware Photoscape [ helps add lines and shapes on tutorial photos] and Fast stone image viewer[ helps me batch edit fast]. Why I like these are they are easy to learn and not too complicated to understand!A caution about auto enhance feature on photo editing software-- most of the time your photo looks odd if you use it! So better adjust the brightness, then the contrast etc one by one.
Tricky Craft photos to take
Embossing- take several shots from different angles and you might get lucky! 
Shiny papers- A big pain to capture. Anyone worked out a solution do let me know!
Photos at night- A big majority of us are night bloggers and even nocturnal crafters so mastering night time photography would be quite a boon! U can use the flash or the Party/ Indoor mode of your camera. You can use a lightbox like the professionals Or you can heavily play around with your photo-editing software. However I always find it easiest and in the long run quicker to take pictures in daylight outdoors[ only drawback- have to wait for free time in the day!].
Close up shots – most digital cameras will have an option for close-up mode. Since most of us are amateur photographers it pays to use this easy option of your camera.
White craft projects/cards- very difficult to capture the beauty of white- place a dark chart paper or back ground against your project while taking the photo and the contrast just may do the trick!
Easy Craft photo tip- The easiest way to get " good " pics is to take a white chart paper outdoors , prop it behind  your craft project. Snap in normal or closeup mode in natural daylight and 95 % of the time you will get a good photo!
Add Captions to your blog photos
This blog post photo tip again helps search engines find your photos.This photo shows a screen shot of a blog post editing window. Click on the photo in your blog post draft and an "Add caption" will show up.Click on it and type in a descriptive photo caption.

Blogger Photo Tips
If you feel its too much of a chore ,you can take the lazier easier way out like I do and put in the same caption for all your photos! [Just a matter of pressing "Ctrl  and V" !]
The first photo of your blog post
Choose the first photo of your blog post wisely as this is the photo which shows up on the reading list of the blogger dashboard of your readers .This photo along with the blog post title  will be instrumental in making your follower decide whether to visit your blog to check out your post! 
So the most beautiful photo should be at the top of your post! 
Not everyone will be inclined to visit if on the dashboard they see a blog hop’s blinky or a challenge Bingo table but will surely be more tempted to click on to your blog if they see your lovely creation!
Check your blog dashboard reading list and tell me if its true!
Post a photo towards the top of your blog post write up.
Sometimes no photo from your blog post shows up on the reading list of the dashboard- this happens if you post the photo quite lower down. As an example I have taken a screen shot of my reading list which shows a blog post by my dear friend Patti.. no photo ...
Blogger Photo Tips

Do I click ??? Yes I do since she is my friend and I know how creative she is .I dropped by her blog and was greeted with a stunning project.. the gorgeous photo hadn't shown up on my reading list as she had posted it lower down her blog post and not at the top.  Do drop by Patti's blog and see her awesome card!
So if its a friends blog you will go over no matter whether the heading is catchy or whether a photo is there or not but not all your followers will do that-- to tempt the casual reader to drop over to your blog ,you need a photo to show up on their reading list!
For bloggers who use google reader to track the blogs they follow, this whole issue doesn't arise at all!
Dont make a blog post with only photos
We all love photos but dont be tempted to make a blog post with only photos. This is a mistake many budding bloggers make including me. Many of my early posts are photo only posts! Either I didnt have the time to write about the project or was hesitant or I didnt know what to write!
Why should you not post a photo only blog post?
1.Google search engines cant see the photos- they need a word description- so put in at least captions!
2.Most of your readers would like to know something about your photos- So do pen down a few descriptive words as it keeps the post interesting and more interactive.
Post multiple photos
If you are blogging about a project you are particularly proud of -- do take multiple photos from different angles and some closeup shots. It draws your readers attention to the different facets of your project and is visually more satisfying!
Preview Preview Preview
This is the last blogging photo tip --- always preview your blog post before you publish it!
You will realize yourself which photo needs to be published in a larger size , which photos need tweaking and you may even decide not to post a blurry picture altogether!
Dear friends I am no photography expert or a computer wiz- these tips are what I have managed to imbibe in this crafting blogging journey and sharing in the hope it is of some help to my bloggy buddies!
Do add your experience, tips and suggestions so that we can all learn from our experiences.
Here are more Blogging Tips


17.2.12

Pop Up card Making Tip

Pop Up card Making
Pop Up card Santa
Pop Up card making is fun and not that complicated once you master a few tricks.Sharing a small tip or trick to make a pop up card more gorgeous !
This Santa Claus Card is a recycled card. The Santa on the front of the card has been pieced together from paper scraps ,felt and  tissue paper!

Pop Up card Santa
I made Santa Claus pop up from a chimney on the inside of the Pop Up Card.
Pop Up card Santa
I recycled a Santa Claus image to create my pop up card.
Pop Up card Santa
The simplest way to make an image pop up in a vertical V fashion is by folding it in half  and folding the lower part to form glue tabs.In the Santa Claus image shown ,the black dotted line would be mountain folded and the white dotted lines mountain or valley folded depending on whether you want the lower parts which will also form glue tabs hidden or visible
Pop Up card Making
The problem with this simple pop up card construction is it would make the central fold line run through Santa's face and poor Santa would look a bit cramped!
I am sharing a simple tip to make Santa or any other similar image look more gorgeous in your pop up card 
Pop Up card Santa
Decide on your central fold line [shown as a black dotted line] but dont crease it just yet.
Use a craft knife or scissors to cut along one side of the face to reach the central fold line [shown by the dotted white line]
If you want you can also avoid the central crease in another part of the image [as I have done here with Santa's belt]by using the craft knife to cut around to meet the central fold -- [Dotted white line]
Now score and mountain fold your central fold [ black dotted line], valley fold the lower part and glue the lower part .You have a fun Santa Pop Up card!
Pop Up card Tutorial
You can adapt this trick to make any pop up card more special! Do tell me how you like this fun card.
Here are more Christmas Pop up cards
Links to Pop Card tutorials

1.2.12

Paper flowers on Handmade Photoframe

Handmade Photoframe with Paper Flowers
Handmade Photoframe
I made a handmade photoframe by recycling a cardboard piece from a box.I love making paper flowers- they are so easy to make and add so much beauty to your projects. Here is the link to how to make a DIY Handmade Photoframe.
Handmade Photoframe
I love to transform mundane objects and if it involves recycling it makes it all the more exciting! This photo shows the cardboard and papers I used to make the photoframe and paper flowers.
Closeup of my quilled butterfly inspired my my blogger pal Mihaela. The white daisies are punchcraft paper flowers.
Paper Flowers
 I used punched balloon shaped petals to make the large pink paper flowers on the cardboard photoframe.

Handmade Photoframe
All the paper flowers in this photoframe are easy to make but I always feel that if you see the steps to make something,making it gets even more simple.So sharing some simple steps and tips to make the paper flower.
This Paper flower can be made with the circle,oval ,tear drop or balloon shape. I used the balloon punch to make these punchcraft paper flowers.
Paper Flower Tutorial
Lightly emboss a circle,sun ,small flower or even a scrap of paper to form a cup shaped base for your paper flower.
Paper Flower Tutorial
Pinch your petal between your thumb and index finger

Paper Flower Tutorial
You need just 5-6 petals to make your paper flower.
Paper Flower Tutorial
You can apply glue to the folded tip of your petal or onto the cupped base as I did here on my paper flower.
Paper Flower Tutorial
Overlap subsequent petals and position the petals as you desire.I found using a thin tipped object like my tweezers tip so much faster than using fingers [I have fat finger tips!!]

Paper Flower Tutorial
Here is the finished paper flower.
Paper Flower Tutorial
The smaller pink paper flower is made from circles.Here is the tutorial link : how to  make Circle Paper flowers.
Handmade Photoframe
I stuck some quilled leaf shapes to make a large leaf for my paper daisy.Here is the link to :how I made the quilled leaf shape.Added some Pie Lane glitter balls to glamorize the white punched flower.
I recycled  some cord and an old button by threading the gold cord through the button and attaching it to my photoframe.
Handmade Photoframe
If you are a beginner to punchcraft here are links to some Easy Punchcraft flower tutorials
If you want to try some Advanced Punchcraft flowers here are some tutorials
Edited: This DIY Photoframe was featured on Inspire me Friday and ICR

Brochure