 |
| Teachers Day Card |
Wondering why I am making Teachers day cards in July...? Well in India we celebrate Teachers day in September and my daughter has so many favorite teachers that I think I will need to make at least a dozen special Thank You style Teachers Day cards .
 |
| Teachers Day Card |
I had a ball using beads on this project and made a beaded butterfly [similar one here : Beaded Flowers tutorial]
Crafted a 3 D decoupaged fairy who swings, spins and literally soars into the sky in this kinetic card!
 |
| Kinetic card |
In this photo you can see how the butterfly charm dangles when the fairy spins up.My fairy has 6 layers popped up on foam and boy was she time consuming to make!!
 |
| Spinning Card |
Here is the aerial view of the spinning kinetic card
 |
| Spinning Card |
Since its a self standing spinning card I embellished the other side too.Added more 3 D decoupaged fairies,a glittery Thank U,silver peacock feather die cuts and lots of butterflies and punchcraft flowers on the other side of the Teachers Day Card
 |
| Teachers Day Card |
This design is one of my most popular card designs on this blog and here is the original spinning card. Some of my blog friends said they found my first spinning card tutorial a bit difficult so I thought I would tweak the tutorial a bit in this spinning card tutorial.
Materials Required
- Card stock - An A 4 for the base card and 2 roughly 4 x 5.5 inches pieces for the central spinner.Thick Card stock is preferred - The base card which forms your stand for the spinner needs to be particularly strong as it is a stand for your card and has to support the weight of your wooden stick and spinner card.The spinner card also should not be thin as otherwise it will be floppy and unsightly.
- Scissors
- Glue
- Double sided tape or glue dots - makes life easier while making the central spinner.
- Wooden skewer or anything else you can think of which can take the weight of the central spinning part of your spinner card
 |
| Spinning Card Tutorial |
I used Spellbinder Die cuts [measures 4 x 5.5 inches]as my central spinner.But you dont actually need any fancy tools to make a spinner card as shown in my first spinning card tutorial
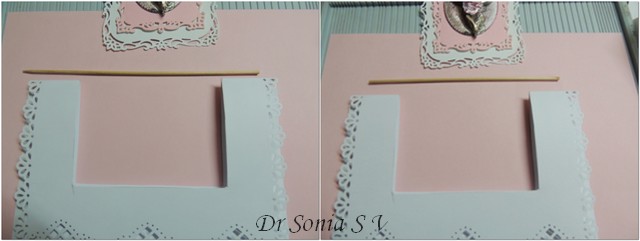
I trimmed an A 4 card into 8 x 11 inches and folded it in half to make my base card.
Positioned the lower half of the Central spinner in the middle of the folded edge and marked around it leaving enough gap [1/4 inch on sides and 1/2 inch below]all around .This central rectangle is 1 3/4 inches from each edge [as shown by the scoreboard markings].
Cut out this marked area [folded it measures 4.5 x 3.25 inches]from both halves of your folded base card
 |
| Spinning Card Tutorial |
Punch a border on your base card if you wish.Take a wooden skewer and trim off the excess so that it fits well within the width of your base card as shown in the picture above of the spinning card tutorial
 |
| Spinning Card Tutorial |
To Make the central spinner : Take 2 die cut/hand cut shapes [approx 4 x 5.5 inches]and center the skewer on one die cut as shown.Apply double sided sticky tape or glue dots above and below and stick on the other die cut/hand cut piece and you have made your spinner!
 |
| Spinning Card Tutorial |
Position your spinner inside your base card and see if it has space to swing freely [ you can do some trimming on the aperture made in your base card if your spinner is not spinning well]
 |
| Spinning Card Tutorial |
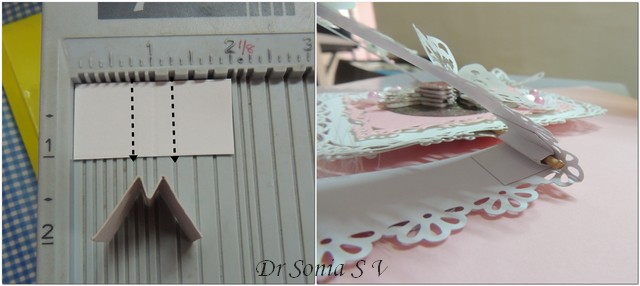
Make the supports for your spinning mechanism: from thick card stock cut out two 2 x 1 inch strips and score at 3/4 inch , 1 and 1 1/4 inch .Fold this into an M as shown above.The gutters of the M support the skewer on either side of the central spinner.Stick the long legs of the M inside the folded top edge of base card.I stuck the M legs of both strips [on either side of spinner aperture] on the inside of the back half of the base card first, then placed the skewer in the gutter and glued on the other leg to the inside of the front half of the base card.
 |
| Spinning Card Tutorial |
Your spinner card is actually done but it may have a tendency to fall especially if your spinner is heavy.
In that case make a stand for your spinner card like I did.Take 2 strips of card stock 2 x 6 inches and score at 1 3/4, 3 , and 4 1/4 inches.Punch borders if you wish and fold into an M as shown.Align it to line the lower corners of the front and back layers of your base card and you have made a sturdy stand for your spinning card
In that case make a stand for your spinner card like I did.Take 2 strips of card stock 2 x 6 inches and score at 1 3/4, 3 , and 4 1/4 inches.Punch borders if you wish and fold into an M as shown.Align it to line the lower corners of the front and back layers of your base card and you have made a sturdy stand for your spinning card
 |
| Spinning Card |
 |
| Teachers Day Card |
And here is the front view with a fairy child soaring up into the sky in this Teachers Day card!!!
 |
| Teachers Day Card |
Supplies : Fairies decoupage sheets ,Punches : Martha Stewart,Jef Butterfly,Jef flower and daisy,Dies : Spellbinders Rectangle,Spellbinders Peacock,Couture creation Oval, Cheery Lynn Butterflies
Edited :
This project was winner at Itsy Bitsy Sizzix tutorial challenge
This project was Top 3 at Whoopsy Daisy things with wings theme challenge
 |


.jpg)
.jpg)
.jpg)
.jpg)
.jpg)
.jpg)


