25.11.14

Easy Paper Rose Tutorial

easy flower tutorial
Paper Rose tutorial 
Hi friends Thank you so much for all the appreciation you showered on my Sospeso Transparente Bouquet tutorial ..I was thrilled to know I had introduced a new craft to many of my readers! Sharing a simple side step card with an embossed "Thank you" and handmade paper roses.
paper flower tutorial
Paper Rose tutorial
           Many of you liked the roses in the Decoupaged Stationary set and wanted me to share a tutorial so made another project with the same type of roses though they didn't turn out quite as beautiful even though both were made using the same technique -----well that's handmade isn't it...wows sometimes and is "so so"  at other times!
paper rose tutorial
Paper Rose tutorial
         Roses are one of the most difficult paper flowers to make and I have shared a couple of tutorials earlier on how to make roses with Punches [see thumbnails at end of this post]. The peach pink roses and buds in this card and all the roses in the projects below were made with the Spellbinders Rose creations die.

Altered Tin can - with a 3 D decoupaged fairy and handmade roses
easy rose tutorial
Paper rose tutorial 
Decoupaged Pen Stand - check out the link for tips on how to decoupage on plastic.
rose flower tutorial
Rose Flower tutorial 
Handmade Photoframe - a DIY photoframe made by recycling a desktop calendar and adding lots of paper roses!
flower making tutorial
Handmade Rose tutorial 
"Hot glue" Embellishment tutorial  - this post also has a tutorial on how to make your own "Faux Porcelain" embellishments at home using hot glue!
flower making tutorial
Rose flower tutorial 

How to make Paper Roses

Gabriella Pollaco has a beautiful tutorial on how to make roses with the Spellbinders die....but I have struggled in making the conical center as well as shaping the petals of the paper rose as my hands are not as nimble as hers!!
Sharing a method I sort of invented and started using recently which makes "rose making" so much easier!

Materials for paper rose making

  1. Ear Buds
  2. Paper Flowers
  3. Ink Pads
  4. Glue
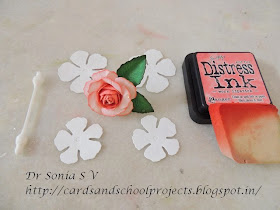
  • Ear buds [Q tips] -- yes you read that right!! In fact I got the idea for this rose after seeing these funny looking ear buds in a local supermarket as it looked just like a rosebud! If you don't get these you can fluff up a regular ear bud and try but if you see these funny shaped ones in your chemist shop or local supermarket...grab them with both hands!!
    rose making tutorial
    Rose flower tutorial 
  • Paper flowers- though I have used the Spellbinders rose creations die, you can use any die cut, punched or hand cut flower [here is a hand-cut flower tutorial]  which can wrap your ear bud within it! I used the 2nd and 3rd largest flowers from the die set as marked by the blue arrows.
Spellbinders tutorial
Spellbinders Rose Creations Die
  • Ink pads- optional- if you want to make 2 tones flowers or ink the edges of your flowers like I did here.You can paint your flowers too but using ink pads is easier and faster.
rose tutorial
Paper Rose tutorial 
  • Glue - I strongly recommend using a hot glue gun unless you  have tons of patience !

Steps to make your Paper Rose

I captured photos of all the steps in making the paper rose and since there were quite a few photos have made a video slideshow of the Paper rose tutorial - Its less than 2 mins so do have a look at it to see all the steps in detail but here are the key points.
  • To make a Rosebud you just need a single flower and a ear- bud! -- Yes  its that easy!
  • You can make a Rose using 2  small and 2 to 3 large flowers
paper rose tutorial
Add caption
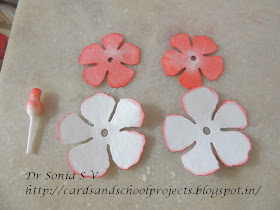
  • Inking : This step is completely optional- you can skip it and dive into the rose making!
    • Ink the Ear Bud : Cut the Ear bud in half  and ink its top so that even if a little is visible in your completed flower its camouflaged nicely
    • Completely ink the inner flowers
    • Ink the edges of your outer flowers
paper rosebud tutorial
Paper Rose Tutorial 
Why this  rose making tutorial  so easy is you are using the ear-bud to make the center of your rosebud or rose ! Wrap the petals of your flower around the ear bud and glue as you go! Because the ear bud has a stick, holding the flower while hot gluing it is easy and less likely to give you burns from the hot glue!
I hope I have piqued your interest...so sit back and watch this short video tutorial which is less than 2 mins! [Please do watch in HD to see the written captions clearly]

paper rosebud tutorial
Paper Rose tutorial
You can add a calyx to your rose bud and wrap floral tape or green paper around the ear bud stem to make a floral bouquet for your cards or scrapbooks.
paper rosebud tutorial
Paper Rose Tutorial 
  • If you want a fuller rosebud ..make it with 2 small flowers.
  • If you want to make the rose.....insert the 2 flower- bud into the larger  flower and glue the petals around it!
easy flower tutorial
Paper Rose tutorial

  • You can add more flowers to your rose to make a fuller rose!
Paper roses tutorial
Paper Rose Tutorial 
Other options to use instead of ear buds : bead, cotton ball, Styrofoam/thermocol ball, scrunched up paper ball or clay ball in the center.
handmade roses tutorial
Paper Rose tutorial
I hope you enjoyed my easy rose making tutorial .Do tell me how it is.
Here are links to more tutorials to make your own Paper Roses using Punches.

Pear Petal Rose

Heart Punch Rose

Punchcraft Rose

5 petal Rose

Supplies: Dies : Spellbinders Rose creations die, Heartfelt creations Spellbinders Classic leaf, Spellbinders Shapeabilities Decorative labels 28,Poppy stamps swirly curl,Poppy stamps Meso background , Marianne Anja leaves, Cheery Lynn  butterfly. Embossing folder : Sizzix Thank you,Stamps :  Itsy Bitsy lace stamp, Heartfelt creations leaf
Edited : This card was chosen top winner at Poppy Stamps

20.11.14

Sospeso Transparente Bouquet Tutorial

Sospeso Transparente 
      Hi friends many of you may be already familiar with the  beautiful craft of Sospeso Transparente but if you are hearing about it for the first time...Sospeso Transparente is a 3D Volume Decoupage craft invented and patented by Italian artist Monica Allegro .It basically involves heating and shaping  flat designs into gorgeous 3 dimensional beauties!
Sospeso Transparente 
     These Sunflowers are my first attempt at Sospeso Transparente and I had so much fun arranging the them in all sorts of places in my house- the picture above is of our Passion fruit Vine adorned with Sospeso Transparente Sunflowers!
Glass Cabochon
I could make a matching "Sunflower" Glass Cabochon pendant for my flower basket using some DCWV paper. Click here for the Glass Cabochon tutorial
Sospeso Transparente
Sospeso Transparente is one of the most magical crafts I have come across...it is indeed sheer magic to be able to convert a printed film of Sospeso Transparente into a magnificent 3 dimensional object!
Sospeso Transparente Printed film
There are different techniques in Sospeso Transparente and the simplest is using printed films. I have shared a very detailed tutorial about the materials and techniques at my Sospeso Transparente tutorial post at Crafters Corner .But to simplify it there are actually just 3 steps involved in Sospeso Transparente with printed films : 
  1. Cut the design
  2. Heat the design
  3. Emboss
Sospeso Transparente tutorial 
           The flowers look gorgeous just as they are but you can go ahead and add fancy flower centers such as rhinestones, pearls, glitter balls etc. I had once used chunky glitter on Felt Sunflowers and loved the effect so this time too I used chunky glitter but gave a domed center to my Sospeso Transparente sunflowers
Sospeso Transparente 

How to make a domed Flower Center

Sharing a mini tutorial on how to make the domed center of the sunflower. You can use the technique not only on Sospeso Transparente flowers but also on felt, foam and paper flowers.
Sospeso Transparente 

Materials Required

  • Glitter , glitter balls or even tiny beads - to put on top of the dome
  • Clay -To make the dome lightweight air drying clay is preferable so that your flowers dont become heavy. You can use brands such as Amos, Super clay etc-- these clays are a bit sticky when you use them but dry lightweight and dont crack. Use clay in the color which will match the glitter you plan to use on top
  • Glue - your glue needs to be one which dries clear and is not too runny
Flower center tutorial 
  1. Make Clay domes : Roll clay into a ball and flatten it so that the base will be easy to stick to your flower center. I made several sized balls as  my sunflowers were all different sizes
    Flower center tutorial 
  2. Coat domes with glue :Put your clay dome on a plastic sheet/ lid  etc[ so that your flower center wont stick to it!] and generously pour or paint the dome with glue.
    Flower center tutorial 
  3. Pour glitter onto your clay dome: Get a good covering and shake off the excess after giving enough time to dry-- DONT BE Impatient and touch your flower center before its fully dry or you'll end up with sticky glitter all over your fingers! 
Sospeso Transparente 
Stick the centers to your flower : I stuck the glittery centers to my Sunflowers using regular white PVA glue but you can also use the glue gun but be careful as heat can alter the shape of your formed Sospeso Transparente flowers

How to make a floral bouquet

Again this mini tutorial is not just for Sospeso Trasparente flowers but can be adapted to make a bouquet of felt, foam or paper flowers. 
Flower bouquet tutorial 
Materials required
  1. Clay -to make flower calyxes- you can use the soft types of children's clay in the market  [like Amos, Super clay etc]which dries lightweight without cracking or more expensive air drying clay or if you are from India Mseal like I have used here.
  2. Sticks, skewers, wires etc - to make stems
  3. Floral tape - to wrap around your stems
If you are using Mseal : Mix in a little green oil color into your mseal dough while you are mixing it [ like I did for my Altered Bottle art] .Also another important point while working with mseal is you have to work fast to take advantage of the sticky nature of the mseal.
Flower bouquet tutorial 
  • Pinch off some clay and shape it into a cone as shown in the pictorial
  • Insert a skewer/ wire into it. Mseal is sticky so you dont have to use glue. If you are using clay you can dip the end of your skewer in glue before inserting it into your clay
Flower bouquet tutorial 
  • Slightly flatten the top of your "clay calyx" 
  • Stick your clay calyx to the under-surface of your flower using glue. Again if you are using mseal ,you dont have to use any other adhesive if you stick it to your flower while the mseal is still soft and pliable [ once it dries and hardens it become non sticky]
Flower bouquet tutorial 
  • Allow the flower stems to dry
Flower bouquet tutorial 
  • Apply a bit of glue on your floral tape and wrap around your flower stem
  • Add leaves if you wish
Here is the link to another Handmade bouquet tutorial  variation with  the  flower calyx  made by quilling .
Sospeso Trasparente 
I hope you enjoyed my mini tutorials to making the flower center and the flower bouquet . All the little pearl branches are handmade too [ will share how I made them soon!]
You can add Sospeso Trasparente flowers to cards, scarpbook layouts[ big advantage is they dont squish!], home decor glassware, frames, jewelry, photoframes etc
I hope you liked my little "Bouquet of Sunshine" to warm your day this season! Do tell me how it is.

Supplies :All courtesy Shalini Mittal of Crafters Corner

16.11.14

How to Decoupage Plastic with Mod Podge


Decoupaged Set

          Hi friends Thank you so much for the supportive comments about my blog tutorial post being copied.....it was such a  depressing incident but I think I have to jump right back into sharing and not let a handful of unsavory people affect me as there are so many wonderful people who drop in on my blog ,who take time to write encouraging comments and who mail me thanking me for the crafty tutorials.

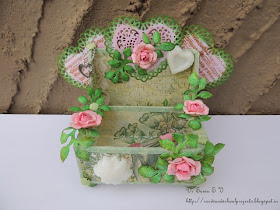
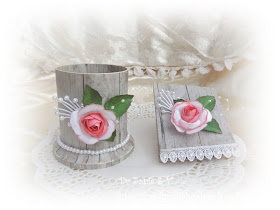
This is a decoupaged Stationary Set with handmade roses

Plastic Decoupage
           My regular readers know that I love to make my own flowers and believe me roses are the toughest handmade flowers to make! Recently I  experimented at simplifying rose flower making and could make these paper roses!
Handmade roses
 Here is the link to making your own handmade roses: Easy Paper Rose tutorial ! And sharing a few tips on how to decoupage plastic material.
            If you are familiar with decoupage techniques you will know plastic is the most difficult surface to "mod podge" as it is so smooth and slippery ! If you want to know about Mod podge and all the little tricks and secrets on how to use it to decoupage read this post : Mod Podge Tips
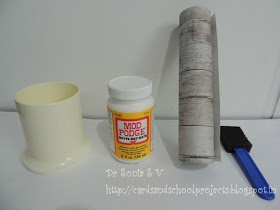
decoupage plastic
Decoupage on plastic
          This was the plastic pen-stand I altered by decoupaging. 

Materials Required to Mod Podge Plastic 

  1. Decoupage glue : Mod Podge Matte - I prefer Mod podge to watered down Fevicol[PVA glue] as it has the perfect consistency and stickiness property!
  2. Tissue paper or Pattern Paper 
  3. Foam Brush or a plain brush - read more about brushes for  decoupage here : Mod Podge Tips
  4. Lots of Patience!
If you are a beginner at decoupaging the best starter project is a wooden object and MDF is the ideal material to Mod Podge! Attempt plastic only after you have got a hang of decoupaging techniques.The reason why plastic is difficult to decoupage is because its surface is non porous and your paper can keep sliding off! 

Tricks to Decoupage Plastic

  • Sandpaper it : To help decoupage an extremely smooth plastic surface  you can actually sand it with sandpaper to roughen it up a bit.I didn't have to do it in this project as my pen-stand was not too smooth .
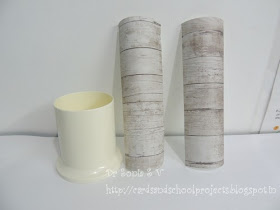
plastic decoupage
How to decoupage plastic
  • Mod podge smaller bits at a time to avoid wrinkly decoupaged surfaces! Here I have cut my decoupage paper to size to line the inner and outer surfaces of the plastic pen-stand.Mod Podge curves by using small bits of paper
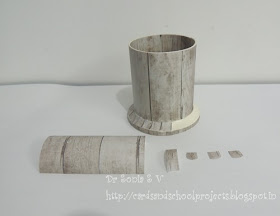
    Modpodge tips
    Decoupage tutorial 
  • Be very very patient - give enough time for your paper to stick to the base-coat of Mod podge before applying your top coat or your paper will just lift up and make you frustrated!
 Decoupaged Pen-stand
 A little bit of my plastic does show through but I think it adds to the charm of the final decoupaged object in this case!
decoupage tutorial
Decoupage
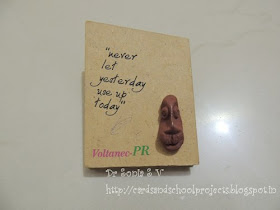
This was how my paper holder looked before I altered it ...the saying was cool but I think I prefer roses to "ear-less tribal head" any day...what do you say?Oh forgot to tell you...I also made the pearl swirl leaf on my paper rose
Handmade Roses
For  more inspiration on Mod Podge be sure to visit my friend Khadija [ whom I have also featured on this blog in this Guest Post ] ...her whole website is a treasure trove of Mod Podge projects
Also do tell me how you like my altered Stationary set

Supplies : Mod Podge, DCWV Decoupage Paper [Itsy Bitsy], Dies : Spellbinders Rose creations, Heartfelt creations leaf, Marianne leaf. Stamps : Heatfelt creations leaf. Inks : Distress Ink peeled paint , worn lipstick, Ranger Archival Ink Coffee