27.7.11

Swinging Spinning Card Tutorial - Quilled Flora

This Swinging card can also be called a spinning card as the quilled central circle can spin 360 degrees! I saw this type of swinging card at a commercial card selling site [cant remember which site] and was so fascinated that I tried to work out the mechanism of this interactive card.This is a friendship card for all my blogger friends who inspire ,support and encourage me constantly.
This is one side of the swinging card which spins on a wooden skewer on top of the card stand.
Swinging Card
I made the red flower and its leaves by looping paper strips by hand. I found that though not as perfect as the proper husking technique using pins on a board to form the loops its much faster and more fun!
Quilled Flowers
This is the closeup of the quilled flower bud again looped by hand.
Quilled Flower
The quilled rosebud is made by forming a tight coil and pushing its center out.
Quilled Flowers
The golden butterfly is also made by looping paper strips held in the hand.
Quilled Butterfly
The red flower is technically made by looping the paper strip around a comb[combing technique].I actually found making it by hand simpler and faster and not as perfect as in the proper combing! [ We have to compromise somewhere!]
Quilled Flowers
The other side of the swinging card also needs to be embellished as this swings 360 degrees and comes onto the other side.So while making it ,its nice to have images that look ok upside down too!
Spinning Card
The central Swinging card part is embellished with eccentric coil quilled flowers.
Quilled Flowers
These quilled flowers are eccentric coils.
Quilled Flowers
The eccentric coil flowers are made with paper strips having 2 color tones.
I reversed the direction of coiling to make the white in the center for the lower quilled flowers.
Quilled Flowers
This gorgeous embossed paper was a paper bag I cut up and recycled! The pearl leaves and pearl hearts are from a local fancy store.
Embossed Card
Materials Required to make a Swinging Spinning card
  • Thick Card stock- The base card which forms your stand for the spinner needs to be particularly strong as it is a stand for your card and has to support the weight of your wooden stick and spinner card.The spinner card also should not be thin as otherwise it will be floppy and unsightly.
  • Glue
  • Glue dots or any other adhesive of your choice to stick the skewer to the spinning card.
  • Wooden/plastic/ metallic stick to form the basis of your spinner card mechanism.- I used a wooden skewer. Use any long thin stick.
How to make a swinging spinning card
Fold your card stock in half. I have used an A4 sized card.
Cut out a shape  at the folded edge- you can cut out a semicircle,rectangle,half of an octagon etc.I cut out a semicircle marked with the help of a compass.
Spinning Card Tutorial
Use the shape you cut out and make it smaller by a centimeter or so.Here I made it smaller by a 1/2 a centimeter only and discovered  its better if you make it smaller slightly more so that it can swing and spin freely once attached to the card stand.
Spinning Card Tutorial

You need 2 similar sized  circles for the swinging part. Embellish the circles before you stick them .Use an adhesive of your choice to stick the skewer or stick to the center of your swinging card.Here I used glue drops to stick a wooden skewer. Apply glue and stick the 2 circles together.
Spinning Card Tutorial
Make the support for the swinging card:The support for the swinging stick with your card is 2 small folded card  strips with a gutter for the stick to swing.The width should be such that when stuck inside the card base it is hidden. I used a strip around 3 cm long and folded it. If the central groove of this folded strip is more deep the skewer will be at a lower position. Experiment a little before you glue it on place
Spinning Card Tutorial
Make a stand for the lower part of card base.Take 2 strips of strong card. I used a strip as long as height of by base card.Fold in half
Spinning Card Tutorial
Fold up each end as shown. These folded ends form the tabs where you will stick it to your base card

Spinning Card Tutorial
Stick this card strip to the bottom of your base card as shown


Spinning Card Tutorial
The photograph below shows the mechanism of the swinging card and how the card strips are stuck in position.
Spinning card Tutorial
Your swinging card mechanism is ready!Here is the swinging card in action viewed when it is spinning and has swung up!
Swinging Card Mechanism
I was crazily busy the last couple of days professionally with a couple of international patients requiring surgery and extra care. I was on a deadline to make a friendship card for the Guest DT post at Crafty JC [my Ocean Diorama Pop up card had become top 3  at Crafty JC] and perhaps due to exhaustion I just couldn't think creatively and struggled for ideas. The swinging card is technically easy to make but Oh Boy did I struggle for ideas to embellish it! Please do tell me what you think of it and do try the swinging card mechanism as its a fun interactive card.
Here is a even more simplified version of the spinner card tutorial using dies : Spinner card tutorial 

22.7.11

Popsicle Stick Craft - DIY Flower Vase

Ice cream Stick Flower Vase
Lets use up those lolly sticks to make a DIY flower vase!
Ice cream stick crafts are fun to do with kids and you can  make something to use around the home like a flower vase.
Materials Required
Ice cream Sticks
White Glue
Ice cream stick Craft
Make a cross with 4 ice cream sticks as shown.

Lolly stick Craft
Lay the next layer a few millimeters away towards the outside as shown

Lolly stick Craft
Here is my little crafter at work

Lolly stick Craft
She thoroughly enjoyed making this flower vase!

Lolly stick Craft
Layer popsicle sticks in the same fashion till you reach the end of the sticks
Lolly stick Craft
Now you have a Popsicle mini vase- You can use it as such but as it is quite shallow make one more

Lolly stick Craft
Invert and stick one on top of the other an you have a lovely Popsicle stick flower vase.

Lolly stick Craft
Here is how the design looks from the side

Popsicle stick craft
You can layer more such vases and stick them together to make a tall vase.have fun with this simple craft idea. Do leave me your comments.
Ice cream Stick Flower Vase
Here are links to some simple ice cream stick crafts

19.7.11

Squash Book Tutorial

Squash Book Tutorial
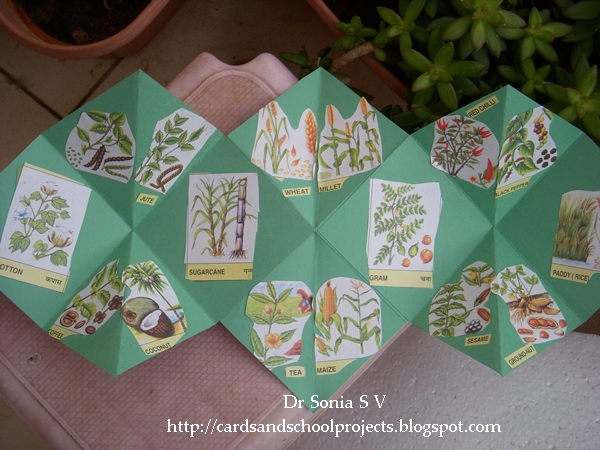
Right now I am in the middle of Plants![ Daughters school theme this month is on various subtopics on plants!]When I saw a squash book at Loris blog I knew this was just right for a school project with numerous pictures.If you make one I assure you you will fall in love with it just like I did. My daughter loved it too!The squash book can be made to fit into your palm and open up to a large spread!
Squash Book Tutorial
We made this project to incorporate some pictures for the theme "Uses of plants"
Squash Book Tutorial
You can adapt it to use in a scrapbook or use it as a card you can embellish away!
Materials Required to make a squash book

  • 3 Squares of paper- of the same size
Size of the squares- Your folded squash book will be half the width of your square
Thickness of paper- as thin or as thick as you want!

  • Glue
  • Ribbon/Magnet or Velcro or anything else you can think of to hold your squash book folded
How to make a Squash Book
Fold the 3 squares in half vertically and horizontally and along one diagonal.Use the template picture below as a guide to the folds.[Its easy -don't get fooled by the terminology to think its difficult]
Squash book template
Align the squares as  shown.
Squash book template
The outer two squares should have their folds in the same way while the central square should have the folds in the opposite way while you lay them on top of each other.
Squash Book Template
Stick on both the end squares on top of the central square at the place they overlap.
Squash Book Tutorial
Fold as shown. If your folds are correct you wont have any problem to squash it otherwise you can rework your folds as I have shown in the steps below and still get a gorgeous Squash book!
Fold in the lower inner panel of your outer square towards the center  square as shown
Squash Book Folding 1
Fold in the upper inner panel of the outer square towards the central square like you did above
Squash Book Folding 2
Fold the other outer square in the same way and now you have a shape as shown
Squash Book Folding 3
Fold in the lower and upper central folds of your central square and your Squash book is ready!
Squash Book Folding 4
You can hold the squash book folded with a ribbon[like we did], magnet or a Velcro strip.The  lovely strawberry ribbon is from my blogger friend Romina - Thank You Romina!
Squash Book Tutorial
My little one was thrilled with her squash book and stuck all her plant pictures on the panels of the squash book which fitted easily into her school bag. You can stick on both sides of the squash book so there is room for lots of pictures! Make a special card or a scrapbook project with the squash book!Do try it !
Awaiting your comments on our little project.
Here are more ways to present a school project
Interactive School Project -using slider cards and pop up flaps
Neverending card- can fit in lots of pictures in this one
Diorama
Interactive Chart -with waterfall mechanisms and slider interactions
Sun,Earth and Moon

14.7.11

Purse Card with Fancy Fold Insert Tutorial

Purse Card
Most of the cards I make are for my daughter's friends and this Pink card is I bet you can guess for a little girl!
Purse Card
This flower was made by layering punched paper flowers and adding a plastic flower in the center. I used dark pink glitter gel pen to add a design to the flower petals.
Punch Flower
My Butterfly Tag has a 2 layers held with a brad which was originally grey in color painted with pearl pink acrylic . The tag is attached to the purse handle with a ribbon and button.
Butterfly Tag
The top layer of the butterfly tag slides up to reveal the sentiment.
Butterfly Tag
This is the inside of the purse with a fancy folded insert which is embossed with hearts.
Purse Card
The inside of the purse card has embossing,flowers, paper lace ,gems and butterflies!
Purse Card
I embossed the inner lining paper of the purse with hearts and flowers using a Jef embosser.

Purse Card
Purse Card
How to Make a Purse Card
There are many examples and templates of the purse card on the net.Templates are in a way easy and in some ways difficult to work with ,so here I will share how to make your Purse card without any tracing or printing of a template. It will measure and look just the way you want it!
  • Take a sheet of paper and fold it leaving some over for the flap of your purse--size of the flap depends on you!
    Purse Card Tutorial
  • Measure equal distances from the ends of the top edge and drop a line to the lower corners.Cut through both layers of the folded card.
  • Make the top flap in whatever shape you want.I used a compass to make a simple semicircle flap for this purse card.
  • You can finish off your card at this stage or if you are like me and love to dress up the inside of a card- lets make a fancy fold card insert.
For this purse card I cut the pale pink paper some millimeters smaller than the card base and layered a smaller glittered foam sheet over it to create a party purse!
    How to make the inside of a Fancy Folded Card Insert
    This is called by various names including explosion fold at many sites on the net .Its a very useful mechanism to know as its so easy and can quickly transform the inside of your card !
    Take a square of size 2 times the size of  the Insert you want .I measured the width near the top of my purse card and doubled this for my square size
    Fold diagonally as shown.
    Fancy Fold Card Insert Tutorial
    Push the points marked by the boxing gloves to wards each other.
    This will give you a triangular folded shape as shown
    Fancy Fold Card Insert Tutorial
    Fold the corners of each flap towards the center as shown
    Fancy Fold Card Insert Tutorial
    Tuck in all 4 folded corner flaps  as shown
    Fancy Fold Card Insert Tutorial
    Your insert is ready.
    I embossed the insert after folding to get my positions right. Since I don't have an embossing machine here is what I did to emboss a large heart.Place the shape you want to emboss [ mine is a cardboard heart] below the paper and gently trace its outline with a smooth flat tool! Your paper should be sturdy otherwise it will tear.
    Embossing by hand
    Once you have embellished your card insert, apply glue on the 5 sided area as shown and stick on one half of your card with the pointed tip touching the central fold of the card.Apply glue on the other side and firmly close your card.
    Fancy Fold Card Insert Tutorial
      How to make a Lacy Scallop Border without a Scallop punch!
      If you are like me and long to make those beautiful scallops yet don't own a scallop punch - lets improvise!
      All you need a scallop scissors and a single hole punch.
      Scallop Tutorial
      Cut the strip of paper and punch holes. Glue the strip to your card paper and you have a lacy scalloped border!
      Lacy Scallop Tutorial
      Lacy Scallop Tutorial
      This is the closeup of the quilled flower with a pink foam and glitter foam sheet center
      Quilled Flower
      I layered 2 punched butterflies and added flower stamens for the antennae.
      Punched Butterflies
      I hope the outcome is OK as this Pink Card  will be for my daughters dearest best friend who loves Pink!Do leave me your comments!
      Purse Card

      Related Posts Plugin for WordPress, Blogger...