Showing posts with label Pop up cards. Show all posts

15.2.23

Tunnel Card

Tunnel Card
Hi friends  ....sharing a Tunnel Card which is the magical abode of   little birds and butterflies . The little birds frolic amongst cute teacup stacks , cupcakes and a  lovely  glittering dream catcher !
Tunnel Card
In this view you can see the shimmering magical bird house and more little birds on teacups!  

Tunnel Card
Some projects are super fun to make and this Tunnel card was a delight to put together. Hope you liked it too.
Here is the video from my instagram account

11.2.23

Interactive Slider Pop Up Card

Hi friends sharing a fun interactive card made with the  huge word die " Happy " from Crealies . It it quite similar to the  Party slider pop up card I shared earlier.
The card folds flat for mailing

And on pulling up the  tab you have a window where you can write a message...I just added a cute image inside the  window


The  Happy  is made from glitter foam and has a white outline cut with the  same die set.

Added lots of floating clouds and happy balloons full of hearts.


The little horses float over the  Happy along with the  balloons , hearts and clouds.


The Happy word has stitch lines and is pretty on its own....but I added a simple layered flower  for added interest.


Here is the  side view when you open the  slider and the  card stands  up on its own for display.

Supplies used: Dies :  from Crealies. Paper : Dress My craft


9.2.23

Tunnel Card


Tunnel Card
Hi friends sharing a Pop Up Tunnel card with lots of hearts. I love tunnel cards as they look awesome when displayed yet can be folded flat for mailing.
Tunnel Card

I love adding hearts to my projects and I really went to town with the hearts on this one! I have pop up hearts, heart flowers, hanging hearts and crystal hearts!

Tunnel Card
The rose at the back is a 3 D decoupaged image. I had made it years back but didn't quite find the right project to use it on! Does that happen to you? 


Supplies used: Dies from Crealies, Cheery Lynn,Memory Box . 

Papers: DMC,Little Birdie.

23.1.23

Easy 4 Panel Pop Up Card

Pop Up Card
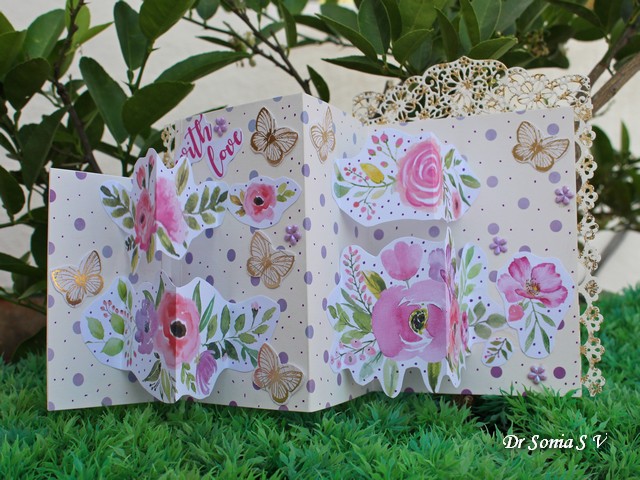
Thanks to Mrs A's Butterfly Challenge I found a new card fold to play with! This is such a perfect design to use up pattern paper. In fact I didnt even use cardstock to make this card as I could get a sturdy card by sticking 2 pattern papers back to  back. [The polka dot background paper was fairly thick]
Pop Up Card
My background paper has purple polka dots which were widely spaced so I spruced it up by using a sharpie to  add more purple dots ! For a more cohesive look I also added purple dots on the fussy cut pop up flowers !
Pop Up Card

This card fold is perfect to make simple pop ups as you have two hinges to add pop ups to! I cut the flowers from pattern paper and in the picture below you can see how I created the tabs for the pop up using the paper design itself.

Pop Up Card

And here is the back with more dots galore and the same colour scheme of rose, purple,green and straw. All the gorgeous butterflies you see in this card were ones I had won in Mrs A's Butterfly Challenge many moons back.....they are my favourite !Thank you Mrs A for your generosity .
Pop Up Card

Supplies used: Dies :  Crafters Companion Blossoming Borders, Martha Stewart Punch. Pattern Paper : Little Birdie Watercolour floral ballet.
Linking to  
1.Butterfly Challenge  .I have used all elements of the wheel:   4 Panel Card shape  , Theme: Flowers, Colours : Forest Green, Flax[straw] , French Rose,Fuschia [purple] and Butterflies
2. All Sorts Challenge week 712...I have used pattern paper with dots and also added lots of dots with a sharpie.

20.1.23

Four Panel Pop Up Card


Its been so long since I participated in challenges.......Mrs A's Butterfly challenge is one of my favourites I love butterflies and the fun add on themes she urges us to use to spur your creativity on!

4 Panel Card
I made a 4 Panel Card with butterflies galore. The butterflies were made using one of my oldest craft supplies-- a Sizzix stamp and die set.

I added simple pop up mechanism on the card folds and made the butterflies dangle! And here is how my rose garden looks with a garden gate and fluttering butterflies!
And here is the back side..with beautiful roses.
Linking to  
1. Butterfly Challenge  . I am entering this card in Category 2 using  4 Panel Card shape  , Theme: Flowers, Colours : Forest Green, Flax and French Rose and Butterflies
2.   Darnell's NBUS challenge. NBUS item is the Elegant Swirl Gateway die from Heartfelt Creations


18.2.20

Birthday Gift set


Hi friends...sharing a card and gift set I made for a crafter friend for her birthday . I made a satchel bag shaped Pop Up Card , shaker book and a matching shaker bookmark

The bag shaped card was made using Crealies  Cardzz die and lovely papers from the  Indian brand Dress My Craft . It is the  same die I used to make the  Stationery set in this post: DIY Stationery Set

On opening the  card Birthday balloons pop up to wish my friend a Happy Birthday ...and I wrote her name too!

Here is the  back side of the  card


Here is the   matching shaker book I made using my new Fuse tool.


Here is the  video
Papers : Dress My Craft Vintage Saga from Crafters Corner
Crealies Dies/Stansen :

10.2.20

Slider Pop Up Card


Hi friends, excited to share a project with the  new Word die from Crealies  "PARTY". This is one huge die with 3 layers...a shadow outline and 2 individual letter layers. I used the  innermost and the  outline dies to create this interactive slider Pop Up Card .

Above the  "Party" are lots of balloons and cute puffy clouds to set a celebratory mood!

I used papers from 2 Indian companies...the  blue polka dot design is from Papericious and the  Unicorns are from Dress My Craft

The clouds and balloons float above the  "Party" as they are attached to acetate strips.

Here is how the  card looks when you pull up the  slider .

You can see a hidden panel where you can add a message ...it would be great to add details of an invitation for a party , a new year greeting or a birthday message. I just added a cue unicorn theme paper inside.


The slider mechanism is so designed that the  card stands up like an easel and folds flat for mailing and storage.    

I hope you like this fun interactive card idea.

2.2.20

Slider Box Tutorial


Hi friends I love interactive mechanism and in this post I am sharing an Interactive box....a sliding box along with a matching Pop Up Card and a Post it note holder all made with nesting dies from Crealies  

I used fairy themed papers and add matching handmade foam flowers on the  front of the  box

I used one of my favourite Crealies  dies to make the   simple flowers from foamiran


The lid of the  box is special....it has a slider opening and on pulling up the  slider you can see an image inside!


I kept the  inside fairly simple as I plan to use it as a gift box...you can add cute scenic elements inside if you want to use it as a shadow box.


Tutorial 
Here is a generalized Tutorial to make the  slider mechanism . I am not giving any exact measurements as you can adapt the  techniques to any die in your stash
The sliding mechanism is in the  lid of the  box and is a modified slider card.
Materials
  • Nesting Dies. In this post I have used Crealies  dies : Crea Nest Lies XXL No 96 Ticket.
  • Card stock : thick good quality to make the  base so that you have a sturdy slider
  • Pattern Paper
  • Good adhesive
Make a box of dimensions such that  is smaller than the  largest nesting die you are going to use.
Leave a 1/2 inch flap extra at the  top of the  box on all sides [ see the  picture lower down the post to understand what I mean]

Tape 2 nesting dies together to get a wide frame- my new glass mat was really helpful in getting the  centering right!

Die cut 2 frames from card stock and one frame from pattern paper

I also die cut the  larger of the  die from cardstock and pattern paper to form a an optional base for the  box[ see picture lower down]

Make a slider piece so that its  dimensions are slightly larger than the  inner aperture of the  frame
To allow the  slider to move in and out of the  lid you need to create a pocket in the  lid for it using double sided foam tape or cardstock like I did here. The advantage of using cardstock is that is looks more polished and there is no danger of it becoming unstuck over time which is a risk with foam tape!

The card pieces are as long as the sides of the  box. 
The lower one measures 1 and 1/8 inches and is scored 1/2 inch from either side of its width leaving a 1/8 inch in the  middle as shown above
The side pieces measure 2 inches and are scored at 1/2 inch from either end of the  width and then 1/8 inch from this 1/2 inch score line


 The side pieces are stuck in such a way that the  1/2 inch sides are on the  frame and placed such that the  slider piece can move freely.

The lower one is stuck in such a way that the half inch part is on the  base and the  rest is free as shown below

This is how it will look with the  slider  in situ


Once you are happy with the  sliding ...you can add the top frame lid consisting of pattern paper frame stuck to the  cardstock frame.


Apply glue and stick


This is how you slider lid will look


Apply glue to the  box which you had made with an extra half inch free flap on the  top on all sides as shown


 Stick the box under your slider lid and press firmly


Optionally add another base layer to the  box and decorate as you please

I made a matching card for the  box by layering die cuts.


On the  inside I tried a new type of Pop Up Card design and it turned out super cool!I used the  nesting diecuts to create pop up layers one in front of the  other.


The "live laugh love life" is from a new Crealies  stamp set and is perfect for small cards and tags.

Here is the  side view showing the layered pop up mechanism

 Here is the  backside of the  box and card which is simple to give enough space to write a personal message.

To complete the  gift set, I made a matching shaker  Post- it note holder too.

I love how versatile nesting dies are and I hope you liked these ideas on how to use them in different ways
Linking to  Simon Says Stamp Wednesday Challenge - Anything goes
Related Posts Plugin for WordPress, Blogger...