19.12.12

Fancy Fold Pop up Card Tutorial

Fancy Fold card
I had a ball incorporating pop up elements into this fancy fold card.
Fancy Fold card
This is how the card looks closed.This card is inspired by my friend Merry's zig zag card.Hers has more folds,a belt and is much more elegant than my fancy fold pop up card.
Fancy Fold card
 Fancy Fold Card Tutorial
This is a super easy type of card to make and for those who make elegant cards..this has such a lot of potential. I unfortunately dont make good elegant cards perhaps because my assistant and critique is 6 years and almost all the cards we make are for her friends or teachers!!
Fancy Fold card tutorial
Choose a rectangular piece of card stock..mine is 6 x 12 inches
Any length  you fancy will work...easier if its a multiple of 3 as you will have to divide it into 3 equal parts!
Since mine is 12 inches long...I  first divided [scored] it into 4 inch segments.
Then score a line to halve the outer 2 segments as shown above.
This translates into Score at 2,4,8 and 10 inches if you have a scorepal
Fancy Fold card tutorial
Measure around 2- 2.25 inches above the lower border of the card at either end and join to the top of the 4 and 8 inch score lines as shown by the white arrows.Chop off the  outer triangles as shown.
Fancy Fold card
Accordion fold as shown in the picture to make your Fancy Fold card !
Fancy Fold card
I added a Santa and a truck on each of the inner folds of the card to make a double pop up card.
Blogger pals are the best and some such as Merry, Loz ,Helen and Hussena keep inspiring me again and again and I keep wishing to replicate everything they make!!.Thank you so much ladies!
Also a special Thank you to all my blogger pals for dropping by and constantly encouraging me by leaving wonderful comments.
Supplies :Punches: Martha Stewart, Dies : Itsy Bitsy Deckle Border.Graphics: Stickers bought locally Cardstock :Staples.Paper -White  floral pattern paper Itsy Bitsy

17.12.12

Pop Up Christmas Card Tutorial

Pop Up Christmas Card
This year my 6 year old has 10 teachers and I am making special cards for each of them! I had lots of fun [and a bit of hair pulling moments !!] designing this pop up Christmas card.
Pop Up Christmas Card
This card has a variety of pop up mechanism[V folds, Box designs and Spring pop up mechanisms]
I designed the pop up house with my Scorpal using ideas from Birmingham's book "pop up".[This pop up house is a slightly complicated design so sharing the link to my simpler Pop up house card tutorial]
Pop Up Christmas Card
The Xmas trees behind and in front of the house are simple V fold pop up mechanisms.The reindeer sleigh and snowman also pop up by a V fold pop up mechanisms.
Pop Up Christmas Card
The V fold is described as an easy pop up but its not my favorite as it often gives me hair pulling sessions !! I often make mistakes in its angulation [and my pop up doesnt pop nicely] or height and placement [and my pop up juts out of the card]
Pop Up Christmas Card Tutorial
For pop up enthusiasts who face similar issues :Experiment with the position and angulation of the folded pop up element on the card before any gluing.Once happy...ie folded element is well within the closed card...glue the tab of one half and then apply glue on the other tab and fold the card over...this way you have a smarter V fold Pop up card!

Now lets put aside the difficult pop up mechanisms for a fun and easy pop up card tutorial
The star,bunnies,xmas robin and Xmas tree near the robin all pop up by a Spring pop up mechanism
Pop Up Christmas Card Tutorial
The spring pop up mechanism is super easy to make.
Take a strip of sturdy thick card stock .Score and fold or simply accordion fold a strip of card .My score lines are at 1/2 inch intervals
  • width of paper strip = less than the width of your pop up element 
  • length of paper strip = depends of how much spring you want to give your pop up.
Pop Up Card Tutorial
Attach the folded spring as shown to your pop up element.Gluing position of the spring on the pop up element is important.I wanted just a gentle up ward pop for my star so glued the spring near the center of the star.
This is how the star springs up in the  pop up Christmas card!
Pop Up Christmas Card
On the Robin I added more accordion folds and attached it towards the base of the Christmas robin so as to make it stand more upright on the pop up card.
Pop Up Christmas Card
The Xmas tree near the robin also is popping up by the spring pop up mechanism
Pop Up Christmas Card
Since the V fold pop ups were so taxing I generously used the spring pop up mechanisms to make up my scenic Pop up Christmas card.
Pop Up Christmas Card 
I know many people are daunted by the prospect of making pop up cards but I am sure you would have loved this spring pop up!Do tell me what you think!
Supplies : Graphics : Navneet Publishers Punches used on Pop up house : Martha Stewart.Paper of house roof top [Itsy Bitsy] Dies : Sizzix star [Itsy Bitsy] Blue Stamp pad used to distress edges of star and V fold for snowy scene[Itsy BItsy] Stickers: Santa and Snowman [ unknown company][Sahakaranagar,Bangalore Fancy Store],Sentiment and corner flourish[Shilpi] [Devi & Co Ebrahim Street]
Edited:This project came Tops 3 at ICRC 24 and earned me a Guest DT post.Yippee!

Photobucket
This project also came top 3 at Winter Wonderland Christmas tree

12.12.12

Interactive Card and Photoframe tutorial

Handmade photoframe
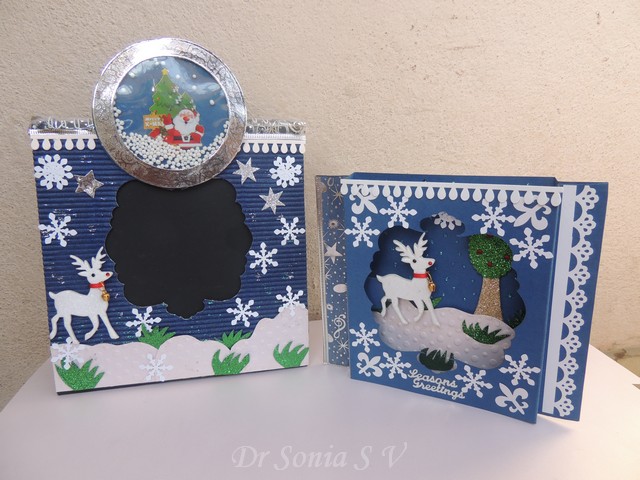
This is a gift set [for my daughter's teacher] of an Interactive Photoframe[has a shaker snow-globe] and an interactive window card.
Interactive card
The little reindeer slides to and fro across the snowy scene on pulling and pushing the side wings of the interactive card.
Interactive window card
I first saw this type of card by Jennifer on you tube [yes now that my computer is behaving I can see You tube videos though i cant sit through most of them!][Thank you Chrissy for the link...you are the best!]
Materials required
This is a super fun and easy card to make.
  • Sturdy Card stock: Your card will be subjected to quite a lot of pushing and pulling so good sturdy card stock is a must! You need 2 pieces of same size. I used 2 cards of 6 x 8 inches in this interactive card tutorial
  • Something to measure and score : You can use a scale and blunt used pen .I have used a scorpal. This is one card where you need to be accurate to get the fold right!
  • To cut a window : Its perhaps easiest to use a Xacto knife  to cut out an aperture .I used dies and a big shot[one is obliged to play with new toys!]. 
  • Good strong adhesive : I found white glue[Fevicol MR] the best as it doesnt dry too fast and you can play around with the position of your interactive elements and correctly position the 2 parts of your interactive card.
How to make an Interactive Window Card
Take 2 pieces of same size card stock [mine 8 x 6 inches].Score 2 ends at 1 inch from the edge and then at 1/2 inch from this score line you made as shown.For those with a scorpal this translates to score at 1, 1 1/2,6 1/2 and  7 inch.You can play around with your measurements according to your card dimensions and what depth you want to give the window card.
Interactive Window Card Tutorial
Cut out an aperture on one of the card pieces positioning your aperture well within the inner score lines of your window card.
Interactive Window Card Tutorial
After cutting the window,valley fold the outer score lines and mountain fold the inner score lines as shown in the interactive card tutorial

Interactive Window Card Tutorial
Both card pieces are actually folded the same way...you just have to flip over one so as to be able to lay them on each other as in the photos of the interactive card tutorial
Interactive Window Card Tutorial
Build a 3 D or flat scene on the uncut card panel and choose an interactive element.Stick your interactive element on a long piece of sturdy cardstock
Interactive Window Card Tutorial
Experiment with the positioning of your interactive element and how it looks through the window of your interactive card.
Interactive Window Card Tutorial
Once you are happy with the position ,apply glue on the outer edges[your 1 inch panels],stick on your interactive element and the window cut part of your interactive window card.
Interactive Window Card 
Dont add heavy embellishments on the top panel of your window card.
Since I was gifting all the teachers photoframes this year, made a matching photoframe with a an interactive snow globe shaker.
Interactive Photoframe
To make a snowglobe shaker you need Card stock, a thick transparency[or acetate], double sided foam tape ,an image[stamp , sticker etc] and a shaker element [you can use beads,sequins or tiny thermocol balls like i did here]
Snowglobe shaker
Cut 2 similar sized circles from card stock.
Cut out an aperture from the center of one circle. Cutting out circles is a bit tricky with the xacto knife so you may "cheat" and cut a square!
Cut a transparency slightly larger than the aperture and stick it on the reverse of this window card using double sided foam tape[you can stick it in such a way that it overlaps the transparency and the cardstock]
Snowglobe shaker card
Add your shaker element and stick onto  the other circle in which you made a snowy scene.[The toughest part for me was to get the thermocol balls to stay in place and not fly all over the room!]
Making the snowglobe was so fun...I confess I will miss playing with it when we gift the snowglobe!
Snowglobe shaker card
I dont know if this type of interactive card and frame will appeal to an adult but my daughter [just 6 yrs] likes it so much she wants to gift it to her favorite teacher!
Here is the Tutorial to another type of Diorama Card : Easy Diorama Card Tutorial 
Supplies : Dies: Couture Creations frame[Itsy Bitsy],Itsy Bitsy Circle,Itsy Bitsy Deckle die,Sizzix scallop oval[Priya]Embossing Folder[Itsy Bitsy],Foam Reindeer[Itsy Bitsy] Punches: Jef Snowflake,Jef Fleur di lis,MS deco Ribbon : Gift from Khalindi.Thermocol balls:Big Market Sahakaranagar[local supermarket]
Edited: This project came Top 3 at BGC
Beyond Grey Challenges

8.12.12

Handmade Photoframe and Gift Box

Handmade Photoframe
This handmade photoframe and gift box is yet  one more addition to the series of Christmas gifts I am making this year for my daughter's teachers.
Recycled a desktop calendar to make the handmade photoframe adorned with punchcraft flowers
Handmade Photoframe
Here is the closeup of the quilled flower.

Quilled Flower
I dont usually make stuff in "orange" but somehow used all orange colored punchcraft flowers. 
Handmade Photoframe
Made a simple matching oval shaped gift box
Oval shaped box
Kept the box fairly simple using just a few elements to match my photoframe
Oval shaped Box
I didnt take photos while making it,  but it was fairly simple to make the oval shaped box.
Oval shaped Box
Do tell me whether you liked this matching gift set of a gift box and handmade photoframe 
Handmade Photoframe
Supplies: Dies: Couture creations oval[Itsy Bitsy],Itsy Bitsy Deckle Lace,Marianne Fence [Priya],Marianne Leaves[Priya]Punches : Punchbunch Sun, Jef cosmos,Jef 6 petal pointed medium,Jef leaves,Misc:White flowers gift from Jovita, Hearts [Pie Lane]

Edited : This Project was winner [Top 2] at Itsy Bitsy

3.12.12

Paper Rose and Rosebud tutorial

Punchcraft flowers
As a Christmas gift for my daughter's teacher we made a handmade recycled photoframe and matching star shaped gift box .
Punchcraft flowers
We decorated our photoframe with handmade paper rosebuds and punchcraft roses
Punchcraft flowers
The golden dots on the house ,fence and lacey hearts are bindis [fashion accessories!].Wrapped half a punched flower on flower pollens to make the tiny flower buds.
Punchcraft roses
The photoframe is a recycled craft[Click here for photoframe tutorial]
Handmade photoframe
To jazz it up a bit in the festive spirit added glitter glue on the leaves and vines of the punchcraft roses.
Punchcraft flowers
Making the mulberry type punchcraft roses used in these projects are a bit tricky and I didnt want to flood this blog post with the pictorial photos so made a slideshow tutorial .Please click on the little triangles to advance to the next slide of the punch craft rose and rosebud tutorials.
Tips to make a good rose and rosebud[This applies to the flowers in this tutorial only]
Paper: Paper chosen is of the utmost importance here.I found thin punch craft paper gave better results than cardstock as you need a bit of malleability.Some punchcraft paper  does not stick easily...such papers will be a nightmare to work with ..experiment.
Glue: I used Fevicol MR. 
Dont use runny glue...it should be a bit thick...if your glue is fresh and runny...put a big blob on a plastic/other surface and let it thicken for some time before you use it.
Glue gun will scorch your hands[I tried ..so beware of shortcuts in this particualr punchraft rose!].
Your glue should not be very fast drying as you need a bit of time to mould and arrange the petals.
Use the bare minimum of glue or your bud will be a squishy ball!
Here is the closeup of the matching star shaped box
Star shaped box
Used the new Itsy Bitsy dies [love them] to make the hanging drop border on my star box
Star shaped box
Added the same flourish vine ,MS lacey heart and silver die cut butterfly on the lid of the star shaped box.
Star shaped box

Star Shaped Box tutorial 

Here is the Star Box Tutorial 
Star Box tutorial 
The star shaped box is easy to make and needs 2- 4 stars [handcut or  die cut]and 2 strips of card stock accordion folded.
Star Box tutorial 
Here you can see my little girl using the Scorepal to help make the star shaped box. And here is the link to the complere Star Box Tutorial 
Supplies: Dies: Cheery Lynn Butterflies ,Cheery Lynn Fanciful flourish ,Couture creations oval,Sizzix Star,Itsy Bitsy Deckle Lace,Marianne Fence & bird house Punches : Martha Stewart deep edge heart, Jef 5 petal medium retro,Jef 5 petal pointed medium,Jef medium daisy,
Related Posts Plugin for WordPress, Blogger...