17.12.13

Star Shaped Box Tutorial

Star shaped box 1
Star Shaped Boxes
Dear friends Thank you so much for the support on the Beaded Christmas Tree  diorama.Thrilled to say it came top 3 in 3 separate challenges! This is yet another handmade Christmas tree project!
This stacked Star shaped boxes Christmas tree is my Guest DT project for Lulupu's bloghop [Recipe :pattern paper,die cuts,punches,embellishments]
I had earlier posted a DIY photo frame set with a star shaped box.So many of you asked for a tutorial to the star box…that was nearly a year ago!!Well finally I got around to writing up a tutorial for the star shaped box!
I stacked  5 star shaped boxes  [packed with little gifts of course!]to make a Christmas tree.
Star Box 9
Star Shaped Boxes

How to make a Star shaped Box

Star shaped box 1
Star Shaped Box tutorial 
  • Stars-You need a star template – Hand cut,Punch or Die cut 4 stars.
    • You can either make all 4 stars the same size or cut out 2 stars to be slightly larger in size [will show you why soon].
    • Cut out the star shapes from thick card stock to make sturdy boxes
    • My smallest star has a side only  slightly more than 1/2 inch
      Star shaped box 2
      Star Shaped Box tutorial 
  • Card Strip- Cut from thick card stock
    • You need 2 card strips to make the base and lid of your star box.
    • The length of your card strip will be 10 times the side length of your star + 1/2 inch.
    • Width depends on how high you want your star boxes to be.I kept mine 1 inch high and so my card strip was 1 inch + 1/4 inch for tabs.
  • Optional Decorative strip – optionally use pattern paper,ribbon,lace or washi tape to decorate your boxes. I used a strip of pattern paper  1 inch wide to wrap around my star box.
Star shaped box 3
Star Shaped Box Tutorial
Score your card strip lengthwise at 1 inch leaving 1/4 inches to create tabs.For larger stars you can keep your tab width at 1/2 inch [that is use a card strip of 1.5 inches wide]
Star shaped box 4
Star Shaped Box Tutorial
Score [mark deeply with a blunt pen or bone folder] and accordion fold your card strip as shown above at intervals equal to the length of your star side.You’ll need to make 10 “sides” plus a 1/2 inch tab for gluing.
Star shaped box 5
Star Shaped Box Tutorial
At the accordion fold lines on the 1/4 inch part of the strip you had earlier scored off ,snip off triangles.You will create gluing tabs to help adhere the card strip to your star .
Star shaped box 6
Star Shaped Box Tutorial
Fold these gluing tab wedges at 90 degrees.
Star shaped box 7
Star Shaped Box Tutorial
Apply glue on the gluing tabs one by one and stick under a star to snugly fit along the side of a star.
When you are gluing the tabs you may notice a jutting portion of your glue tab as shown above..snip that off so that your next glue tab can snugly hug your star![Just a little trick to get a neater star!]
Star shaped box 8
Star Shaped Box Tutorial
Keep gluing all your tabs one by one.Spend some time to make sure each tab adheres well to your star otherwise your box will fall apart and you’ll be cursing  in despair!
The final 1/2 inch glue tab on your card strip can be stuck either inside or outside the star box.If you are going to use pattern paper to line the outside of your star box stick the tab outside as the pattern paper will hide it.
Star shaped box 9
Star Shaped Box Tutorial
This is how the under surface of your star box will look once all the tabs are glued.You can adhere a same size or a slightly bigger star atop it.
Star shaped box 10
Star Shaped Box Tutorial
To line your star base with pattern paper simply apply glue and wrap it around creasing along the points as you go along with your nails to keep the star points sharp and crisp!
Here are  the 3 sizes of star shaped boxes and their lids.Well how do you make the lid you may be wondering! That is the best part…you can make it in exactly the same way using the same dimensions!
Star box 8
Star Shaped Boxes 
The star shape allows a lot of leeway and you can manipulate 2 similar sized star bases to make one the base and one the lid of your star box.
So you don't actually have to break your head calculating how many millimetres more to make the lid!
You can of course make your lid to be shorter as I had made in my first Star shaped box project
Star box 5
Star Shaped Box 
Here is a close-up photo of  the lid of my star shaped box.In these boxes I glued a star of slightly larger size  on the basic star box.Using a larger size star adds a bit of extra dimension and also serve the practical purpose of making your boxes easier to open!
If you want to handcut your stars you can  use this stacked stars template.
In the picture below you can see the smallest star box serving as the base of my Star Box Christmas tree.
Star box 1
Star Shaped Box 
I used lots of tiny star shaped brass beads on my boxes in keeping with the starry festive theme!I placed my Christmas tree on lacy heart Spellbinder die cuts [I love this die and you can see more in my Foam jewellery tutorial ]and also placed a lacy heart atop my Star Box christmas tree .
Star box 2
Star Shaped Box 
Made the wooden bead -cloth doll into a fairy by gluing on feather wings and a shimmery flower and pearl beads to her waist.
Star box 7
Star Shaped Box 
I hope you liked this tutorial to make a star shaped box.Apart from serving as a gift box and decor piece you can use your star box as a shadow box [use an OHP to make the lid ]or even personalise it to showcase a favorite photo.
Star box 4
Star Shaped Box
Dont forget to participate in the  Lulupu Bloghop — 2 lucky people who leave comments along the hop  will win some amazing prizes + 1 lucky hopper can win a Martha Stewart punch from Lulupu! Thank you so much Karuna for inviting me to be part of your awesome celebration.

Supplies:Dies : Sizzix stars,Spellbinder lacy hearts-Itsy Bitsy.Punches -MS heart-Mansi,Pattern Paper- DCWV botanical ,Feathers,Butterflies-Itsy Bitsy.Beaded Lace and star beads- local Fancy store Sahakaranagar

9.12.13

How to make Foam Jewellery

Foam rose
Foam jewellery
Dear friends Thank you so much for the wonderful support on my beaded trees diorama.I love to work with foam and foam crafts seem to be very popular nowadays .

The best thing about foam is you can crush it ,bend it and even squish it without damaging it! Its washable too and so easy to cut.
Sharing how I made some fun jewellery using foam .

How to make a foam rose pendant

Add caption
Make your foam rose with thin foam using either Foam rose tutorial 1 or Foam rose tutorial 2.Make a calyx from thin green foam and attach it to your foam rose.
Foam crafts 1
Foam crafts
Use thick foam of any shape [I die cut a star shape ] to form the base of your foam craft pedant or earring
Foam crafts 4
Foam jewellery
Use something [I used a metal wire stick] to pierce a hole a few millimetres from the edge of your foam shape. Insert a jewellery ring into the hole.
Use the glue gun to stick your foam rose to the base and your Foam rose pendant is ready. I added a generous layer of glossy accents to give a plastic like shine to my foam pendant!
DIY foam jewellery
Foam jewelry

How to make  foam rose earrings

Foam crafts 2
Foam jewellery
Make a foam rose pendant as above and attach to an earring finding using more rings.I added pearly leaf danglers using head pins.
I added “diamond dust” to the tips of the star base of the  Foam rose earrings.
foam crafts
Foam accessories

How to make a Foam –Lace bracelet

Cut a strip of foam [use thick variety foam] as long as you want your bracelet to be [find the length by wrapping loosely around your/ daughter’s wrist] .
Foam crafts 3
Lace bracelet
Cut a piece of lace 2 inches longer than your foam strip.Stick the foam strip to the centre of the lace using the glue gun.Turn over and glue the excess lace to the back of the foam.
Foam crafts 5
Lace bracelet
Pierce the edge of the foam strips and add jump ring to one end and a clasp to the other end. If you wish you can use modpodge to get a seal over your lace bracelet.
Since this foam jewelry set is a handmade gift -for a bit of added glamour I hung the earrings on lacy hearts cut with Spellbinder dies.
diy foam jewellery
Foam jewellery
I hope you liked this easy foam jewelry tutorial.
Supplies Foam-Big market Sahakaranagar,Itsy Bitsy,Jewelry findings-Itsy Bitsy,Lace-Commercial street Bangalore,Sizzix star die-Itsy Bitsy.Spellbindres Lacy hearts-Itsy Bitsy
Edited : This project was finalist[Top 3] at Itsy Bitsy Jewelry challenge


7.12.13

Beaded ChristmasTrees Diorama

Christmas diorama
Christmas Trees Diorama
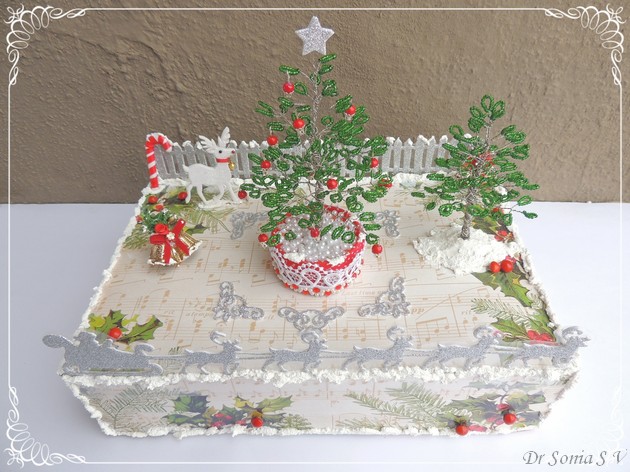
Dear friends Thank you so much for the wonderfully uplifting comments on my Beaded tree tutorial.I used the beaded trees to make a  Christmas diorama by recycling an old cardboard box.Wrapped the box in festive papers and added  a glittery Santa in a sleigh pulled by reindeer ploughing through snow!
Beaded tree 1
Foam crafts
Made a snow laden silver fence [cut from foam and mounted on acetate] with a candy cane and a shimmery white reindeer who even has a golden bell around his neck!Created a snow laden  Christmas landscape with snowtex
Beaded tree 14
Foam crafts
The red berries on the holly leaves strewn all over my Christmas diorama are called “manjadi kuru” in my native malayalam language.A little bit of snow really jazzed up this old Christmas bell ornament I had.
handmade christmas ornaments
Christmas diorama
Kept the smaller beaded tree simple and planted it in snow[ white playdough covered with snowtex!]Framed the Christmas tree with silver scrolls cut from foam
beaded trees
Beaded Christmas Tree 
Many friends commented in my earlier post that the beaded trees must have taken time to make ..actually I was surprised that they took much less time than some cards!!
Beaded tree 10
Christmas diorama
The photo above captures the shimmering magical glitter of Santa and his reindeer!
Beaded Christmas Tree 
I hope you liked this Christmas Diorama Decor piece with easy to make beaded trees.Here is the link to the  Beaded tree tutorial and " pinnable "image on how the beaded tree was made
Beaded tree tutorial
Supplies : Dies: Spellbinder Lacy heart,Sizzix Santa and reindeer,Sizzix star ,Beads, Wire , wire cutter,head pins, flower caps,White foam reindeer,Pattern Paper- from Itsy Bitsy;Marriane fenceDie -Priya’s Craft shop; Snowtex –Lulupu.

Edited : This project was chosen Winner at Fab n Funky Frost theme
Challenge Winner's Blinkie

This beaded tree diorama was also handpicked Top 3 at Inky Impressions Winter/Snow theme

This project was also chosen Top 3 at Dream Valley Challenges Anything but  a card theme

This project was also Winner at Itsy Bitsy picture inspiration challenge

6.12.13

Beaded Tree Tutorial

Christmas Diorama
          Dear friends, my 7 year old daughter is rather taken with beads these days and is forever making necklaces and bracelets [see her Beaded Necklace]..I caught the beading fever from her and tried to make a beaded tree using some seed beads I have had like since forever!
Beaded christmas tree
Beaded Tree Tutorial

My beaded tree is rather amateurish so professional beading experts do forgive me but I was so  thrilled my experiment turned out ok that I am sharing the tutorial so that a novice with no beading experience whatsoever can make a beaded tree
How to make a beaded tree
This beaded tree  is quite simple and quick to put together ! Some of the leafy branches were made by my 7 year old and it took just approximately 1 hour to make the unadorned beaded tree!

Materials required for your DIY beaded tree

Beaded tree tutorial 2
Beaded Tree Tutorial
  • Seed Beads –whatever colour you want your tree to be
  • Wire -24 G or even thicker ones [of less gauge]– I worked with 24 G and it was quite easy to twist and bend.
  • Wire cutter or scissors.
Beaded tree tutorial 3
Beaded Tree Tutorial
Cut a piece of wire  16- 20 inches long[I didn't measure … I just cut wire of length from my fingers to my shoulder!] and  bend it in half
Beaded tree tutorial 4
Beaded Tree Tutorial
Thread 10 to 12 seed beads on the wire.. you don't have to count  but eyeball the length of the beaded area.The commonly available seed beads [unless you buy high quality expensive ones] generally vary in length in one packet and if you thread the same number of beads the length will vary .
Beaded tree tutorial 5
Beaded Tree Tutorial
Push the beads to the bent center of the wire
Beaded tree tutorial 10
Beaded Tree Tutorial
Cross the wires and twist to form a loop of the seed beads.Keep twisting to give the beaded “leaf” a stem. Make your stem as long as you want.
Tip: To quickly and easily twist -hold the beads and twist  rather than holding the wire and twisting
Beaded tree tutorial 6
Beaded Tree Tutorial
Thread beads in the same way on one arm of the wire
Beaded tree tutorial 11
Beaded Leaf Tutorial
Bend the wire at the length you want the leaf to branch out and holding the beads in your hand twist to form a looped leaf like before.Keep twisting till the wire reaches the earlier leaf’s stem.
Beaded tree tutorial 12
Beaded Leaf Tutorial
Thread beads on the other half of the wire in the same way and twist to make one more beaded leaf
Beaded tree tutorial 7
Beaded Leaf Tutorial
Twist the 2 arms of the wire to a length you want . If you want add more leaves on each arm of the wire as before.
Beaded tree tutorial 8
Beaded Leaf Tutorial
You can make a conical “Christmas tree” type of tree by adding leafy branches of different stem lengths and having different number of leaves.You can make  three or four “2 leaf” branches and add them to your 3 leaved top branch.
Beaded tree tutorial 13
Beaded tree Tutorial
Decide how much down the top branch you want the next layer of branches and twist on the leafy branches one by one .
Beaded tree tutorial 9
Beaded Tree Tutorial
So your tree is already shaping up! Add branches with more leaves or longer stems as you go down the tree trunk.There is no hard and fast rule on lengths and number of leaves on how to make your tree..I experimented  quite a bit and my tree turned out different every time and it was fun!
Beaded tree tutorial 1
Beaded Christmas Tree 
You can make a loopy base for your tree with wire [rather tricky !] or insert your tree trunk in play dough/clay  like I have done here.
Beaded tree tutorial 16
Beaded Christmas Tree 
The base of my beaded tree is a plastic play dough container which I dressed up with washi tape, lace and rhinestones.To cover up the play dough I poured a generous amount of white glue over it and covered it with pearls.Can you see the "snow" on the rim of my tree base?
Beaded Christmas tree
Threaded a flower head and a red bead on a pin head and looped them on my beaded tree.I don't know if they look like cherries or Christmas tree ornaments!
Beaded tree tutorial 17
Beaded Christmas tree
Die cut 2 stars from silver glittery foam and stuck a loop of  wire between them.Twisted the star atop the beaded Christmas tree.
DIY Beaded Tree
Click here for the full view and details  of the snowy Christmas Diorama I used the beaded trees on .
Beaded tree tutorial 
These easy to make Trees would look fabulous as home decor and if you sell your crafts  I bet these would be a big hit [but caution you need to pack them well and maybe use thicker wire otherwise the branches can get squished!]
Do tell me how this simple tutorial was.
Supplies :Beads, Wire , wire cutter,head pins, flower caps,pearls,Rhinestones-Itsy Bitsy.

Edited : This beaded tree tutorial was featured at Totally Tutorials!


This beaded tree also got Top honor at Decorate to Celebrate Christmas tree theme
Decorate To Celebrate! Top Honors
Related Posts Plugin for WordPress, Blogger...