Showing posts with label Pop up card Flower. Show all posts

23.1.23

Easy 4 Panel Pop Up Card

Pop Up Card
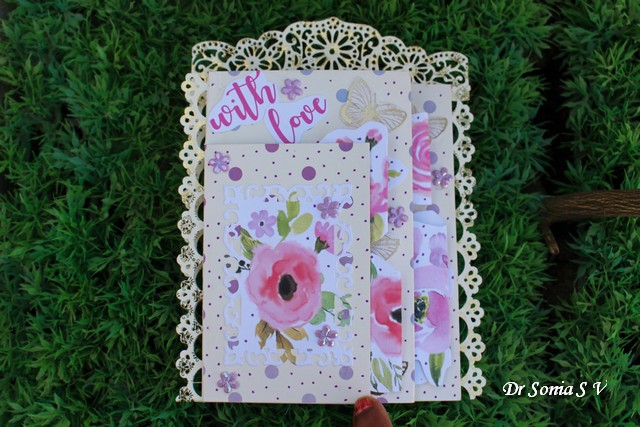
Thanks to Mrs A's Butterfly Challenge I found a new card fold to play with! This is such a perfect design to use up pattern paper. In fact I didnt even use cardstock to make this card as I could get a sturdy card by sticking 2 pattern papers back to  back. [The polka dot background paper was fairly thick]
Pop Up Card
My background paper has purple polka dots which were widely spaced so I spruced it up by using a sharpie to  add more purple dots ! For a more cohesive look I also added purple dots on the fussy cut pop up flowers !

Pop Up Card

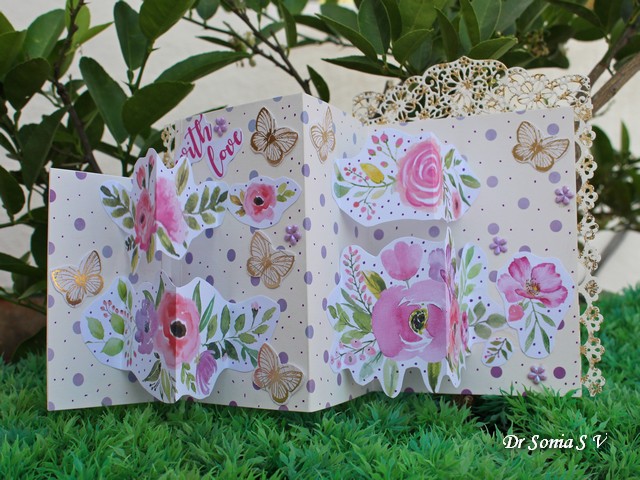
This card fold is perfect to make simple pop ups as you have two hinges to add pop ups to! I cut the flowers from pattern paper and in the picture below you can see how I created the tabs for the pop up using the paper design itself.

Pop Up Card

And here is the back with more dots galore and the same colour scheme of rose, purple,green and straw. All the gorgeous butterflies you see in this card were ones I had won in Mrs A's Butterfly Challenge many moons back.....they are my favourite !Thank you Mrs A for your generosity .
Pop Up Card

Supplies used: Dies :  Crafters Companion Blossoming Borders, Martha Stewart Punch. Pattern Paper : Little Birdie Watercolour floral ballet.
Linking to  
1.Butterfly Challenge  .I have used all elements of the wheel:   4 Panel Card shape  , Theme: Flowers, Colours : Forest Green, Flax[straw] , French Rose,Fuschia [purple] and Butterflies
2. All Sorts Challenge week 712...I have used pattern paper with dots and also added lots of dots with a sharpie.

20.1.23

Four Panel Pop Up Card


Its been so long since I participated in challenges.......Mrs A's Butterfly challenge is one of my favourites I love butterflies and the fun add on themes she urges us to use to spur your creativity on!

4 Panel Card
I made a 4 Panel Card with butterflies galore. The butterflies were made using one of my oldest craft supplies-- a Sizzix stamp and die set.

I added simple pop up mechanism on the card folds and made the butterflies dangle! And here is how my rose garden looks with a garden gate and fluttering butterflies!
And here is the back side..with beautiful roses.
Linking to  
1. Butterfly Challenge  . I am entering this card in Category 2 using  4 Panel Card shape  , Theme: Flowers, Colours : Forest Green, Flax and French Rose and Butterflies
2.   Darnell's NBUS challenge. NBUS item is the Elegant Swirl Gateway die from Heartfelt Creations


2.2.20

Slider Box Tutorial


Hi friends I love interactive mechanism and in this post I am sharing an Interactive box....a sliding box along with a matching Pop Up Card and a Post it note holder all made with nesting dies from Crealies  

I used fairy themed papers and add matching handmade foam flowers on the  front of the  box

I used one of my favourite Crealies  dies to make the   simple flowers from foamiran


The lid of the  box is special....it has a slider opening and on pulling up the  slider you can see an image inside!


I kept the  inside fairly simple as I plan to use it as a gift box...you can add cute scenic elements inside if you want to use it as a shadow box.


Tutorial 
Here is a generalized Tutorial to make the  slider mechanism . I am not giving any exact measurements as you can adapt the  techniques to any die in your stash
The sliding mechanism is in the  lid of the  box and is a modified slider card.
Materials
  • Nesting Dies. In this post I have used Crealies  dies : Crea Nest Lies XXL No 96 Ticket.
  • Card stock : thick good quality to make the  base so that you have a sturdy slider
  • Pattern Paper
  • Good adhesive
Make a box of dimensions such that  is smaller than the  largest nesting die you are going to use.
Leave a 1/2 inch flap extra at the  top of the  box on all sides [ see the  picture lower down the post to understand what I mean]

Tape 2 nesting dies together to get a wide frame- my new glass mat was really helpful in getting the  centering right!

Die cut 2 frames from card stock and one frame from pattern paper

I also die cut the  larger of the  die from cardstock and pattern paper to form a an optional base for the  box[ see picture lower down]

Make a slider piece so that its  dimensions are slightly larger than the  inner aperture of the  frame
To allow the  slider to move in and out of the  lid you need to create a pocket in the  lid for it using double sided foam tape or cardstock like I did here. The advantage of using cardstock is that is looks more polished and there is no danger of it becoming unstuck over time which is a risk with foam tape!

The card pieces are as long as the sides of the  box. 
The lower one measures 1 and 1/8 inches and is scored 1/2 inch from either side of its width leaving a 1/8 inch in the  middle as shown above
The side pieces measure 2 inches and are scored at 1/2 inch from either end of the  width and then 1/8 inch from this 1/2 inch score line


 The side pieces are stuck in such a way that the  1/2 inch sides are on the  frame and placed such that the  slider piece can move freely.

The lower one is stuck in such a way that the half inch part is on the  base and the  rest is free as shown below

This is how it will look with the  slider  in situ


Once you are happy with the  sliding ...you can add the top frame lid consisting of pattern paper frame stuck to the  cardstock frame.


Apply glue and stick


This is how you slider lid will look


Apply glue to the  box which you had made with an extra half inch free flap on the  top on all sides as shown


 Stick the box under your slider lid and press firmly


Optionally add another base layer to the  box and decorate as you please

I made a matching card for the  box by layering die cuts.


On the  inside I tried a new type of Pop Up Card design and it turned out super cool!I used the  nesting diecuts to create pop up layers one in front of the  other.


The "live laugh love life" is from a new Crealies  stamp set and is perfect for small cards and tags.

Here is the  side view showing the layered pop up mechanism

 Here is the  backside of the  box and card which is simple to give enough space to write a personal message.

To complete the  gift set, I made a matching shaker  Post- it note holder too.

I love how versatile nesting dies are and I hope you liked these ideas on how to use them in different ways
Linking to  Simon Says Stamp Wednesday Challenge - Anything goes

4.2.19

Cute Pop Up Flower Card Tutorial

Pop Up Flower Card
Hi friends...hope you are having a fabulous day.  Life has been hectic for me and I seem to be either running around frantically or just flopping down in bed! So crafting and blogging took a backseat.But it does feel good to be back to blog land to share a cute handmade gift idea : Mini Pop Up Flower Cards.
Pop Up Flower Card
These mini cards feature beautiful floral designs with lovely sentiments made using dies from Dress My Craft . These  flower sentiment dies are so delicate and pretty and would look good on cards on your table, in scrapbooks and simply fabulous as bookmarks!
Pop Up Flower Card
To make these self standing Pop Up Cards  you can die cut the flower sentiment dies in white card stock and color them using your favorite coloring media to enhance the detailing. I just used Distress Inks  .
Pop Up Flower Card
The lovely papers you can see are from the Dress My Craft Magical Unicorns 6 x 6 paper pack. You just need a small 5 x 3 inch piece of pattern paper to make this Pop Up Card .
Pop Up Flower Card
The design I used from Magical Unicorns was so pretty I just used a few pearls to embellish the card!
Pop Up Flower Card
The flower die cuts have beautiful detailing on them but you can enhance the beauty with a sprinkling of Dress My Craft Sparkling dust to add a subtle shimmer to the flowers!
Pop Up Flower Card
These Pop Up Cards can be made with very little supplies.
Materials Used
Pop Up Flower Card Tutorial 
    • Cardstock-3 x 10 inch
    • Pattern paper - Dress My Craft Magical Unicorns : Only a 5 x 3 inch strip is required: Cut this into two 1 x 3 inch strips and one 3 x 3 inch square
      Pop Up Flower Card Tutorial
    • Acetate Sheet- 2 x 6 inches- trim on the 2 inch side slightly
    • Adhesive- Red Tacky Tape and Liquid Adhesive like glossy accents to help stick the die cuts to the acetate without a creating a mess!!
    • Dies : Dress My Craft Flower Sentiment Dies
    • Scoring Board
    • Bone Folders- from Dress My Craft 
    • Coloring Media: Distress Inks 
    • Glitter : Sparkling Dust
    I love how the sentiment acts as the stem of the pretty flower design!
    These mini cards would look cool as party props on the table...what do you say!!!
    Pop Up Flower Card
    Video Tutorial 
    Here is a quick  video Tutorial on the Dress My Craft channel to show you how to make these pretty and cute Pop Up Cards
    Pop Up Flower Card
    The "Love" Flower sentiment die is more intricately designed than the other two and is sooo beautiful !
    Pop Up Flower Card
    List of products used :
    For International buyers- Dress My Craft 
    For Craters from India - Crafters Corner  

    Dress My Craft Bone Folders- Bone folder 3 , Ergo 


    10.1.19

    Twist and Pop Up Card

    Twist and Pop Up Card
    Hi friends...sharing a Pop Up Card made with new Crealies dies. The front of the card is made using the Crealies  "patchwork" dies which is such a beautiful design from Crealies . I first used the Patchwork dies in this post : Simple Foamiran Flower Tutorial 
    Patchwork Card Design
    I used the Patchwork die on pattern paper and also cut out some pieces from blue craft foam so that I can pop up parts to give a nice 3 D look. Using matching colored craft foam instead of regular white foam adhesive tape gave a more unique look to the 3 D Jigsaw puzzle effect!
    Patchwork Card Design
    The little pieces do take time to put together but it is so gratifying ...like solving a mini puzzle! 
    The handmade foamiran flowers are made with Crealies  flower dies and are super easy and quick to make and here is the Tutorial 
    The twist and pop mechanism on the inside was made with the Crealies   Cardzz No.13A and Cardzz No 13 dies [ also featured in these posts : Paper Stars Tutorial and Squash Fold Mini album] and this is how it looked before  assembling.
    Twist and Pop Up Card
    Twist and Pop Up Cards though super fun are tricky to make and I am so glad Crealies  has come out with dies to make them.

    Twist and Pop Card
    Since the front of my card is floral I continued the floral theme inside too  but added fluttering butterflies on the Twist and Pop element!
    Twist and Pop Card
    The "Smile " is one of my favorite sentiments form Crealies  and is layered on the Crealies  banner dies.
    Twist and Pop Card
    I hope you liked my Twist and Pop up Card.
    Here are the supplies used: 


    Related Posts Plugin for WordPress, Blogger...