Showing posts with label Teacher's day. Show all posts

27.9.17

Bird Shaped Thank you Cards

Bird Shaped Thank you Cards
         Hi friends , here are some cute little birdies chirping by to say hi to my blogger friends and visitors! The birds are perching atop our bonsai orange tree.
Bird Shaped Thank you Cards
       I used a Sizzix BigZ bird die to make the bird shaped cards which are Thank you cards for my daughter's school teachers.
Bird Shaped Thank you Cards
          My daughter had been bogged down with exams but she did contribute by adding the very important googly eyes!! We cant have eyeless monster birdies now can we..?!! And to stand the birds have fun metal feet!!![ ahem binder clip feet]
Bird Shaped Thank you Cards
And yes we made 9 of them as she has 9 teachers this year!
Supplies : Dies :  Sizzix BigZ Beautiful Bird , Poppy Stamps Scribble Thank you
Papers : Papericious

7.9.16

Teachers Day Gifts- Paper Purse Tutorial

Teachers Day Gifts- Paper Purses
          Hi friends, in India we celebrate Teachers' Day on Sept 5th and though my daughter's school doesn't encourage gifts they do accept little handmade tokens.Over the years I have made post it note holders, photo frames, pen-stands and mini albums. This year we decided to make cute little paper purses !
Teachers Day Gifts- Paper Purses
The paper purses were made from sturdy cardstock using the Spellbinders Labels 8 die which was also featured in the Diorama Card Tutorial .This one has a handle of silver pearls and  a handmade rose.
Paper Purse  Tutorial 
Though you can make paper purses with any kind of supplies...I love to use my dies whenever I can so this Tutorial features a few die cutting tricks!
To Make the Back and Flap of the Purse
One technique anybody with a die cutting machine should explore is partial die cutting...you can really get value for money if you use this technique....for example you can extend a square die to cut a rectangle and more!
For this project I let the top part of the cutting plate reach only upto the center of my Spellbinders Labels die.You can use any die you think will work for a purse shape .
 Paper Purse Tutorial 
Partial die cutting can be tricky and frustrating in the first go so I will share some important tips which help me!

  • Partial die cutting Tip 1: Always keep a spare  pair of  cutting plates with you. Not only will it come in handy when your cutting plate breaks out of the blue but for techniques such as partial die cutting...it is so much easier if you have a nice flat cutting plate instead of your "super used" bent ones
  • Partial Die Cutting Tip 2 : Apply firm pressure on the end of the cutting plate- die sandwich with your fingers as you are rolling your sandwich into the machine so as to avoid shifting of the die/ cutting plate and paper.
 Paper Purse Tutorial 
The picture above shows the partial die cut obtained thence. Snip off the excess paper shown lifted up in the picture above.This part will form the closure flap of your purse.
Place the die cut snugly against the scoreboard and score at 2 inches and 2 and 3/4 inches. I wanted my purse to be 3/4 inch wide so only I used the 3/4inch measurement.
 Paper Purse Tutorial 
Now place the die with its end reaching slightly beyond the 2 and 3/4inch score line as shown below.Your top cutting plate should reach up to the scoreline
 Paper Purse Tutorial 
Partial die cutting Tip 3 : In partial die cutting , keep the part you don't want to cut  away from the  roller of your die cutting machine...this way there is less chance of the die / cutting plates to shift as you roll the machine.What I mean is dont put the part you want to partial die cut first into the machine as you roll....if you do it that way the sandwich  is more likely shift!
 Paper Purse Tutorial 
Snip off the excess and don't obsess about the slightly off alignment...believe me it will hardly be noticeable in your final outcome. 

Your  back , top and front flap of your purse is now ready....! And all from just one piece of card!!Isn't it cool
 Paper Purse Tutorial 
Make the front of your purse
To create the front of your purse, use the same die you used earlier and snip off 1/4 inch or so from the die cut so as to create a straight edge.
 Paper Purse Tutorial 
Punch or die cut a small opening  on this straight edge. This opening makes it easy to insert and take things from your purse. You can use partial die cutting techniques here too. In the picture below, I have used the Tim Holtz ruler to find the exact center of my die cut...you dont have to really take out a ruler and find the exact center but just eyeball it but sometimes I like to indulge my obsessive compulsive perfectionism nature!!LOL!!
 Paper Purse Tutorial 
Design the inside of your Purse

You need to make a box open at the top.
 Paper Purse Tutorial 
When constructing purses/boxes form diecuts/ hand cut shapes you can design the size by measuring the width and length of your die-cut and subtracting a margin of 1/4 inches .

Based on the shape of the Spellbinders Labels 8 , I designed a box measuring 5 x 2.5inches with a width of 3/4 inches[already decided earlier and reflected in the top flap I cut for the purse earlier too]
 Paper Purse Tutorial 
So that translated into a piece of card measuring 6 .5 x 5 and 3/4 inch scored 3/4 inch from either end on the 6.5inch side and scored at 2.5 and 3 and 1/4 at the  5 and 3/4 side.
 Paper Purse Tutorial 
Snip off  wedges on some of the flaps as shown to facilitate easy gluing and decorate the outside of the box before gluing.
Paper Purse Tutorial 
Now all 3 pieces are ready....just glue the box onto the back of  the purse and stick on your front piece
 Paper Purse Tutorial 
When making for the first time I would advise you to use liquid glue [rather than tacky tape] as it allows you to wiggle the parts a bit for perfect positioning!
 Paper Purse Tutorial
You can design fun closures using velcro or magnets.If using strong magnets ,stick one magnet inside your box and the other one on your flap so that there is a piece of card separating the 2 magnets.... as otherwise these magnets are super strong and difficult to pry apart!
Paper Purse
I punched holes on the top of the purse, inserted eyelets  and threaded pearl strings to create the handle of my Paper purse!
Teachers Day Gifts- Paper Purses
The  animal print purse has a handle made of ribbon folded in half and stitched for extra sturdiness!This ribbon handle was threaded through eyelets set in the top of the purse and secured inside.
Teachers Day Gift - Paper Purse
The purple one shown below is my daughter's favorite and has a lovely glittery paper which reflects the light so beautifully !
Teachers Day Gift- Paper Purse
We made a total of 7 purses!
Teachers Day Gifts
These little purses can hold small gifts such as sweets, notebooks, pens ,jewelry etc .
My daughter helped to make small mini books to add inside each purse
Mini Books
Each mini book is made using a single 12 x 12 inch paper
Mini Books
 We designed ours with 8 pockets and added tags into each pocket.
Mini Books
Used one of the smaller dies from the same Spellbinders set to create mini cards to add inside each purse!
Teachers Day Cards
My daughter has just started learning calligraphy  by watching youtube videos and took so much care to painstakingly  write " Happy Teacher's Day" inside each card!
Teacher's Day Card
What do you think my friends...?
Supplies : Mostly all are from Crafters Corner
Dies : Spellbinders Labels 8, Poppy Stamps Pinpoint Main Street Tags , Spellbinders Rose Creations,Spellbinders Elegant Ovals,Spellbinders Crown Ovals,Cheery Lynn  Rose Leaf Strip
Stamps : Studio G women silhouette

20.8.16

Teachers Day Card

Teachers Day Card
       Hi friends, in India we celebrate Teacher's Day on Sept 5th and every year I try to make something for my daughter's teachers. Most of my daughter's teachers are ladies and flowers are a popular theme so this year too I am going the floral way !
Stencilling
I am in love with the Step Pop Up Card design so this is yet another Step Card. I used a lovely pattern paper from Bob n Betty but I wanted to tone down the dark colors a bit so went about altering it using white paint and Carrbelle Studio's Geometry Stencil.
Stencilling
 Also fuzzy cut a few flowers from the same paper and used it on my Step Pop Up Card !
Step Pop Up Card 
 The vanilla butterflies have been in my stash since years and I dressed them up with glittery thermocol balls!
Step Pop Up Card 
I have butterflies galore on the borders and on the steps of my step card! I hope the teacher my daughter gifts this to likes it!
Supplies : Dies :  Joy Crafts 6002-0251[Butterfly Border],Winnie and Walter In a Word Thanks Cutaway,Spellbinders Fleur de Lis border die,Cheery Lynn  Rose Leaf Strip,Spellbinders Happy Days
Papers : Bob n Betty Floral Logs
Stencil : Carabelle Studio Geometrie 1
Edited : This card was featured as Top 3 at the Mod Squad Challenge - Use Dies theme

31.7.13

Teachers Days Cards - Spinning Card Tutorial

Teachers Day Card
Wondering why I am making Teachers day cards in July...? Well in India we celebrate Teachers day in September and my daughter has so many favorite teachers that I think I will need to make at least a dozen special Thank You style Teachers Day cards .
Teachers Day Card
I had a ball using beads on this project and made a beaded butterfly [similar one here : Beaded Flowers tutorial]
Crafted a 3 D decoupaged fairy who swings, spins and literally soars into the sky in this kinetic card! 
Kinetic card
In this photo you can see how the butterfly charm dangles when the fairy spins up.My fairy has 6 layers popped up on foam and boy was she time consuming to make!!
Spinning Card
Here is the aerial view of the spinning kinetic card
Spinning Card
Since its a self standing spinning card I embellished the other side too.Added more 3 D decoupaged fairies,a glittery Thank U,silver peacock feather die cuts and lots of butterflies and punchcraft flowers on the other side of the Teachers Day Card
Teachers Day Card
This design is one of my most popular card designs on this blog and here is the original spinning card. Some of my blog friends said they found my first spinning card tutorial a bit difficult so I thought I would tweak the tutorial a bit in this spinning card tutorial.
Materials Required
  • Card stock - An A 4 for the base card and 2 roughly 4 x 5.5 inches pieces for the central spinner.Thick Card stock is preferred - The base card which forms your stand for the spinner needs to be particularly strong as it is a stand for your card and has to support the weight of your wooden stick and spinner card.The spinner card also should not be thin as otherwise it will be floppy and unsightly.
  • Scissors
  • Glue
  • Double sided tape or glue dots - makes life easier while making the central spinner.
  • Wooden skewer or anything else you can think of which can take the weight of the central spinning part of your spinner card
Spinning Card Tutorial
I used  Spellbinder Die cuts [measures 4 x 5.5 inches]as my central spinner.But you dont actually need any fancy tools to make a spinner card as shown in my first spinning card tutorial
I trimmed an A 4 card into 8 x 11 inches and folded it in half to make my base card.
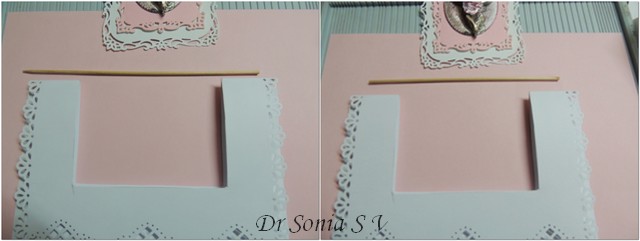
Positioned the lower half of the Central spinner in the middle of the folded edge and marked around it leaving enough gap [1/4 inch on sides and 1/2 inch below]all around .This central rectangle is 1 3/4 inches from each edge [as shown by the scoreboard markings].
Cut out this marked area [folded it measures 4.5 x 3.25 inches]from both halves of your folded base card
Spinning Card Tutorial
Punch a border on your base card if you wish.Take a wooden skewer and trim off the excess so that it fits well within the width of your base card as shown in the picture above of the spinning card tutorial
Spinning Card Tutorial
To Make the central spinner : Take 2 die cut/hand cut shapes [approx 4 x 5.5 inches]and center the skewer on one die cut as shown.Apply double sided sticky tape or glue dots above and below and stick on the other die cut/hand cut piece and you have made your spinner!
Spinning Card Tutorial
Position your spinner inside your base card and see if it has space to swing freely [ you can do some trimming on the aperture made in your base card if your spinner is not spinning well]
Spinning Card Tutorial
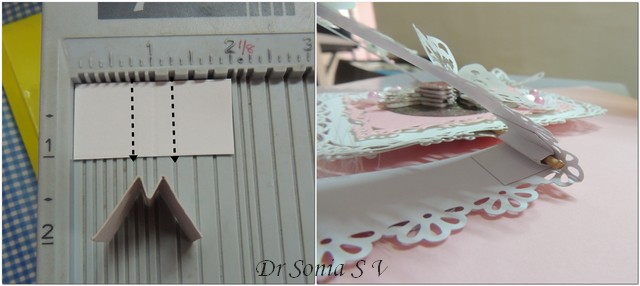
Make the supports for your spinning mechanism: from thick card stock cut out two 2 x 1 inch strips and score at 3/4 inch , 1 and 1 1/4 inch .Fold this into an M as shown above.The gutters of the M support the skewer on either side of the central spinner.Stick the long legs of the M inside the folded top edge of  base card.I stuck the M legs of both strips [on either side of spinner aperture] on the inside of the back half of the base card first, then placed the skewer in the gutter and glued on the other leg to the inside of the front half of the base card.
Spinning Card Tutorial
Your spinner card is actually done but it may have a tendency to fall especially if your spinner is heavy.
In that case make a stand for your spinner card like I did.Take 2 strips of card stock 2 x 6 inches and score at 1 3/4, 3 , and 4 1/4 inches.Punch borders if you wish and fold into an M as shown.Align it to line the lower corners of the front and back layers of your base card and you have made a sturdy stand for your spinning card
Spinning Card
Here is the back view of my spinning Teachers Day card

Teachers Day Card
And here is the front view with a fairy child soaring up into the sky in this Teachers Day card!!!
Teachers Day Card
Thank you for sitting through this long tutorial. Since its a technically tricky card design I wanted to give as many details as possible. Do tell me how you like it.
Supplies : Fairies decoupage sheets ,Punches : Martha Stewart,Jef Butterfly,Jef flower and daisy,Dies : Spellbinders Rectangle,Spellbinders Peacock,Couture creation Oval, Cheery Lynn Butterflies 
Edited : 
This project was winner at Itsy Bitsy Sizzix tutorial challenge
This project was Top 3 at Whoopsy Daisy things with wings theme challenge
TOP THREE BANNER

Also got an honorable mention at Catchy Challenges

Related Posts Plugin for WordPress, Blogger...