Showing posts with label Note Holder. Show all posts

12.2.14

Stamping Basics and Beyond

          Dear friends even though I have been crafting and blogging since 2010, I must confess I have never really got the hang of or understood the charm of stamping!
Stamping Tips
          My initial experiments with stamping were highly unsatisfactory—I got blurry  outlines, bleeding or smudged images and I even made a mess of simple sentiment stamps [see Chariot shaped card]! So I gave up and declared “I am not good at this!!” and didn’t bother to even try further!![Have you ever done that with a new craft or technique?]
           So you can imagine how I felt when Rashmi the owner of Itsy Bitsy suggested I try out newly launched Itsy Bitsy clear stamps. I envisioned all my crafty friends cringing and running away seeing my atrocious stamping!!
Heart shaped box 1
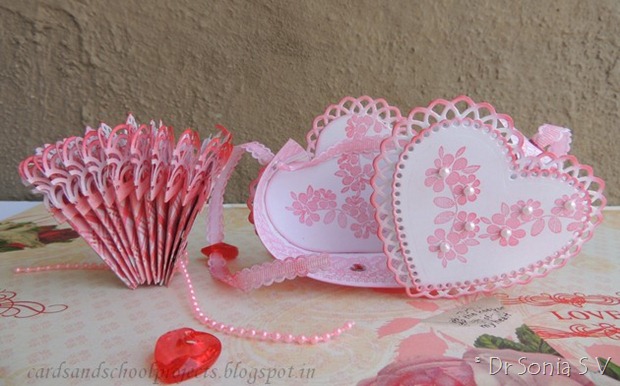
Heart Shaped Box Card
       After hours of worrying, researching, and filling up my dustbin with imperfect stamped images I managed to make a stamped swinging Heart shaped box-card.This “all stamped” project is a huge crafty step for me and this write up  on Stamping basics is to help other novice stampers!!!

Choosing what stamps to buy – Stamp Types

Rubber stamps

    Stamping tips 8
    Rubber Stamps
  • They come as mounted [stuck to wooden blocks] and unmounted [easier to store if you have many but extra hassle of having to mount them!].
  • Fantastic for beginners as crisp images are easier to get
Clear StampsRubber Stamps
More pocket friendlyMore expensive
Easier to storeMore storage space
Easier to cleanMore difficult to clean
Use water to cleanCleaning- baby wipes,stamp cleaner
Transparent -so can see where you stamp!Opaque –so you have to guess where you stamp!
Have to mount on acrylic blocksWood mounted ones are ready to use!
Can stick several stamps on a block and stamp in one go!Have to stamp one after the other
Finesse needed to stamp perfectly !Fantastic for beginners!
Can deteriorate over timeCan literally last a lifetime

Clear stamps

Clear stamps are all the rage nowadays with a huge range of beautiful designs often packaged as sets.
clear stamp
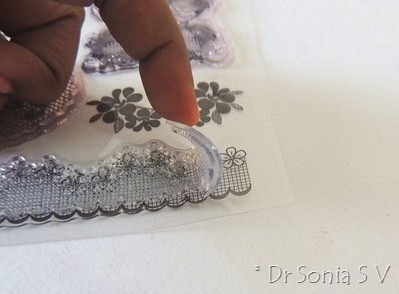
Clear Stamp
I  chose this intricate beautiful lace design stamp from Itsy Bitsy to make a heart shaped interactive 3 D card [see earlier heart shaped box] which swings open sideways to reveal a fan fold tag holder

Heart shaped box 3
Heart Shaped Box Card
For an amateur stamper like me it was a huge challenge to stamp the continuous lace border on the heart box!
Heart shaped box 2
Heart Shaped Box Card
Since the design showcases the inside too, I used matching stamps on the base  and inner walls of the  heart shaped box-card.
Heart shaped box 4
Heart Shaped Box Card
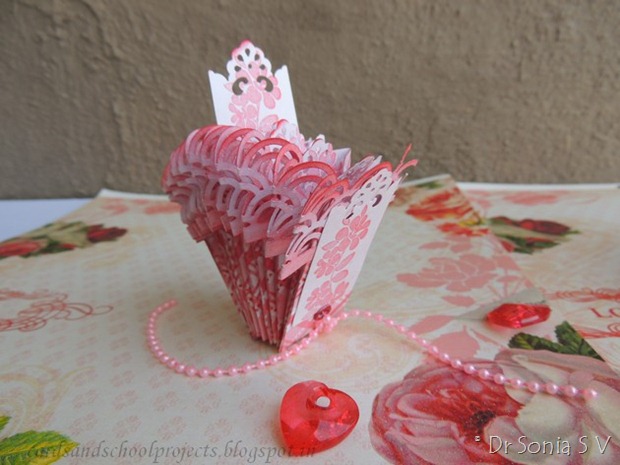
The fan fold tag holder made with pattern paper has multiple pockets each holding a matching tag to write lovey dovey messages [maybe 20 reasons why I love you sort of thing!!]
Heart shaped box 5
Fan fold tags

How to use clear stamps

Stamping tips 10
Stamping Basics
Peel the stamp off the protective plastic
Mount it on an Acrylic blocks
That means just place the flat surface of the stamp on the block and it will stick to it!The acrylic block allows you to stamp with even pressure and allows you to see where exactly you are stamping
Choosing Stamping/Acrylic  blocks
  • Choose an acrylic block slightly larger than your stamp
  • Stamping tips 11
    Acrylic Blocks
  • If you find you enjoy stamping ,invest in a set of acrylic blocks as it will be cheaper than buying individual sizes. 
  • Some blocks have guide lines for placing your clear stamp
  • Some have rounded corners – I love this variety as they feel more comfortable to handle.
  • Recently saw a stamp holder set with handles  at Itsy Bitsy- they look quite tempting and must be even easier to stamp courtesy the handles but I have no experience with them [will let you know how they are if I give in to temptation and buy it!]
Frugal options- paper weight,flat bottom glass
When I started stamping I used a paper weight[see picture above] —You may get the same image quality as while using acrylic blocks but the big disadvantage is you cant see where you are stamping
Special –Fiskars Stamp press –It’s a large acrylic plate with guidelines. Might be useful if you want to mass produce stamped images using more than one stamp as you can position multiple stamps on it, ink and stamp.
Choosing Ink Pads
Stamping tips 1
Ink Pads
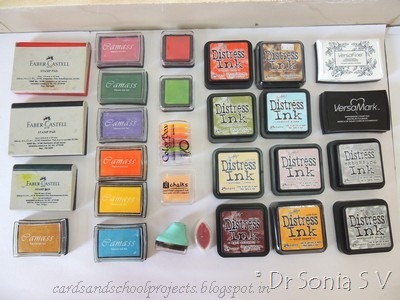
There is a HUGE variety of ink pads so it can get very confusing!!!
Stamping tips 2
Ink Pads
For starters the Indian crafter can use the easily available Faber Castel ink pads– they do give vibrant crisp images .The main limitations are there are only limited colors [red,green,black] and the ink pad surface is depressed unlike the raised surface in other inkpads so inking your stamps is not so easy.
Stamping tips 3
Ink Pads
You can read an exhaustive write up by Ellen on Ink pads. 
I made a table comparing some features of the main Ink pad types which are Dye Inks and Pigment Inks

Dye Inks Pigment Inks
Dries fast [ Dye Dries]Dries slower
except Versafine
Can stamp on glossy paperSince slow drying you need to heat set on glossy paper
Cannot be used for embossing
except- Distress Inks
Can be used for embossing
Some clear stamps dont work well with themWorks well with all clear stamps
Fades over time
except- Memento,Distress
Fade resistant
Cannot use watercolors to color with
except –Archival
Store upside down to keep ink pad surface juicyStore normally
Memento,Adirondack, Archival,Hero Arts,DistressItsyBitsy ,Damas,Versafine,Colorbox,Versacolor

Here is another table I compiled on the best inkpads for a particular purpose based on various online forum reviews.

For Embossing Versamark
For Copics coloringAdirondack,Memento.
Dont use Staz on
For Water coloringArchival,Versafine,Stazon
For fine detail stampingVersafine
For Fabric stampingVersacraft,Archival,Stazon,Versafine
For wood,plastic, metal,glass,ceramic, clay,leather and glossy paper Staz on

Lace stamp 1
Ink Comparison
           Its always best to experiment what suits your project, tastes and budget the most ! For example even though Versafine is popularly said to be the best ink pad for detail stamping-For the intricate lace design Itsy Bitsy stamp in this project I found I liked the more muted stamped image got with the Itsy Bitsy red pigment inkpad [first image] more than the sharp image I got with Versafine [2nd image in black]!
Heart shaped box 7
3 D Heart Box card

Inking  the mounted stamp


  • Stamps that are larger than your ink pad can be inked by tapping the inkpad on top of the stamp, while stamps that are smaller than your ink pad can be inked by tapping  the mounted stamp on the ink pad itself.
    Stamping tips 13
    Inking a stamp
  • Dont rub or press too much,just tap uniformly to cover the whole stamp.

    Choosing what to stamp on

  • Beginners should start with card stock
  • Avoid glossy paper,photo-paper,pearlescent paper, handmade paper, textured paper and vellum or acetate till you get the hang of stamping!

    Stamping

  • Place your paper on a firm surface not on the bed or a wobbly table!! [Believe me I have done it ,got awful images and declared I hated stamping!!]
  • Apply firm pressure on your acrylic block from above.Dont apply too much force  while stamping or you’ll squash the stamp and get blurred images

  • Stamping tip 1
    Stamping Errors
    • Dont rock your acrylic block or you’ll get smudged edges- this is the commonest mistake beginners make and you can mess up images stamped even with rubber stamps if you rock your stamps!!
    Stamping Problems


  • Some new clear stamps dont stamp well and need to be “conditioned” to accept ink. Just keep on inking and stamping on scraps of paper or gently rub an eraser /fine sandpaper/nail file over the stamping surface and your stamp will work wonderfully
  • Some clear stamps [cheaper varieties] are quite choosy about the type of inks they accept so experiment with different ink pads before your give up!
    Stamping tip 2
    Distress Ink stamping
  • You just got the Distress ink pads everyone is singing laurels about…your stamped images are so blurry and unattractive!Ha Ha happened to me too! Actually distress inks are not the best inks for crisp stamping as they are meant to get a fuzzy image,inking edges,shading ! I used distress ink to shade the lacy edges of my fan fold tags and swinging box
  • If you are not getting crisp images try placing your paper on a stamping pad/mouse pad or foam pad and then stamp over it…the cushioning effect helps to tremendously improve the quality of the stamped image!
    Stamping tips 18
    Stamping Pad
  • If your image bleeds or is not crisp enough try changing the paper you are stamping on.
  • And yes clear stamp quality varies and some cheaper varieties just wont stamp as well !

    Stamp Care  and Maintenance

    • Avoid using strong detergents to clean your stamps
    • Avoid direct sunlight exposure
    • If you have washed with water let the stamps dry before storing away
    • Using inks like Stazon and the Staz on stamp cleaner can over time damage your clear stamp and many manufacturers caution against that
    • Clear stamps can lose stickiness over time- remedy- mild soap water wash
    All my crafty friends seems to be accomplished stampers and I was uncertain about the usefulness of this post but then I will always remember what my blogger friend Jaya told me on this Easy flower tutorial post – that everyday a new crafter is born and nothing is too simple to share!! Thank you so much Jaya!!
    Heart shaped box 6
    Heart Box Card
    I hope my stamper friends "okay" this stamping attempt and newbie crafters like the tips...please comment!![Big morale boost required !!]

  • Supplies: Ivory Card stock[ Pawan Bookstore RT nagar],Clear stamps,Distress Ink,Pigment Ink,eyelets,Heart shaped crystal beads,Spellbinder lacy hearts die,DCWV pattern paper,Big Shot-all Itsy Bitsy
    Linking to Kraftzone [3 D card in pink,red,white]
    Edited : this Heart Shaped Box card came top 3 at Kraftzone

    6.9.13

    Recycling Crafts -CD case notebooks again!

    CD case Notebooks
    Dear friends I am sure you are by now bored of my CD case recycled notebooks.My God I am bored of this series myself!! I wonder how professional crafters manage to churn up multiple orders for their clients!!
    CD case recycling

    Well the cover of this CD case has foam flowers and fabric flowers- both from the local market and not very expensive but being a crafter I dont relish ready made embellishments...I have to spend hours trying to see if I can make it!! [Do you do that??]

    For new visitors ..I did manage to make my own foam flowers and you can make your own too :
    I still have to figure out how to make the fabric flower though....fabric and me dont get along much!!!

    24.8.13

    How to recycle CD cases

    CD Case recycling
    Here is the promised mini tutorial on how to recycle CD cases into notebook holders [this years Teachers Day gifts]. 
    Since I am a big fan of recycling crafts I am always on the look out for recycling ideas..I'd seen DVD case notebooks and post it note holders but googling up instructions for how to recycle CD cases specifically yielded nothing much so sharing how we went about recycling CD cases.
    CD Case notebook
    To make note book holders like I have shared in this post on Teachers day gifts you need a CD case which has a bit of room inside it.I found  2 types of CD cases with enough depth to hold a notebook -
    1.opaque black plastic type
    2. transparent glass look type 
    The  glass type does  not have very sturdy hinges and one broke while I was embellishing it so I would urge you to try out the hinges before you embark on recycling it.
    Embellishing the glass type is a bit different and in this post I'll share on how to recycle the opaque plastic CD cases
    CD case recycling
    1.Test the hinges -discard those that look suspiciously likely to fall apart!!
    2.Check the inside and use a craft knife /scissors to cut off protruding center of plastic from the inside as shown in the pic above .
    CD Case recycling
    3.No need to chop off all the protruding bits of plastic from the inside-just the center is enough![see pic above-I have left the rim in the 2nd half of the collage]
    CD case recycling
    4.If the inside has a bit of bumpy surface use card stock[thick paper] to line it otherwise thin paper will look unsightly and tear too!.Double sided tape [not foam tape] is the easiest adhesive I found for this .
    Washi lovers can have a ball too as washi /fabric tape is great to deck up plastic surfaces [as shared in this post on Recycling with washi]Thank you Priya for sending me the yummy Washi.
    5.Choose a notebook /Post it notepad which is not too bulky and will let your CD case close without much mishap!!
    CD case recycling
    6.In the collage above you can see my little crafter covering the notepad with pattern paper she had chosen and matching die cuts.
    CD Case recycling
    7.Once your notebook is ready adhere it to the inside of your CD case.We used double sided tape again [I love this adhesive-so quick, easy and mess free especially important factors while crafting with kids]
    CD Case recycling
    8.Embellish the front of your CD case and you are done! We used double sided tape to help stick pattern paper on the cover of our recycled CD case
    CD Case recycling
    Added stickers[a gift from Priya Sondhi--Thank you Priya],fabric flowers, punched flowers and some die cut foam and paper leaves on our recycled CD case.
    CD Case recycling
    In another variation , added chip board  embellishes ,pearls and rhinestones to make a simpler CD case notebook
    CD Case recycling
    Here is a closeup of the gorgeous shimmery glittery chipboard embellishes which are a gift from the awesome generous Shalini of Crafters corner
    CD Case recycling
    I hope I have you with me till now. So that's 3 down on my list of Teachers Day gifts!! 7 more to go..wish me luck!!!
    My husband had suggested making minialbums with the CD cases but the thought of making 10 albums for Teachers Day was too scary for me.Need input from you guys about experience with mini album making--how much time would a basic one entail ?
    This tutorial was featured on Totally Tutorials

    20.8.13

    Teachers Day Gifts

    CD case recycling
    Thank you so much dear friends for such loving comments on my Strawberry card! Sharing a recycling craft-  a CD case recycled into a Teachers Day gift
    Teachers day gifts
    I had been hoarding some empty Cd cases for some time now and finally put some to use!Prettied up a plastic CD case and inserted a note pad and matching pen inside to make this simple gift for my daughter's teachers on teachers day. 
    Recycling Crafts
    Here is the close up of the punchcraft flowers and die cut paper flowers.
    Paper flowers
     I used thermocol balls on the center of the die cut paper flower.
    Paper flowers
    My daughter chose the pattern paper of this recycling project and we went to town adding matching handmade paper flowers.
    Paper flowers
    My kiddo has 10 favorite teachers this year and we have already made 6 CD Case notebooks so far...four more to go!!! Its a simple project but will share a mini tutorial with tips in my next post on this series of Teachers Day gifts
    CD case recycling
    Do share how this has turned out... its a first time attempt!!
    Here are links to Teachers Day Cards
    And here is the simple tutorial on How to Recycle CD cases

    30.9.12

    Waterfall Card tutorial -from a single A 4

    Waterfall Card and Post it note holder
    Waterfall Card
    Waterfall cards are super fun interactive cards and recently I made quite a few with matching post it note holders.The photos show the flipping panels of our waterfall card.
    Waterfall Card
    Waterfall Card
     I had fun using butterfly stickers on the 2 inch square flipping panels of this waterfall card.


    Waterfall Card
    The photo shows the matching 3 x 3 inch  pen with post it note holder.
    Post it note holder
    Post it note holder

    Waterfall card tutorial

    Though I love making all kinds of interactive cards ,waterfall cards seemed complicated.I couldnt quite understand  the tutorials on the net and I  couldn't even fathom the name waterfall as the panels actually flip up on pulling the tab [how crazy it would be if a waterfall defied gravity like that!].Also the tutorials on the net seemed to require a lot of card stock!
    As paper-crafters we all love to "save" our precious card stock don't we? So the fun "paper saving" aspect about this tutorial is you can make a waterfall card using just a single sheet of A 4 card-stock and once you get the hang of it ,it saves time too!

    What is a waterfall card?

    For my crafting friends who are not familiar with a waterfall card its a beautiful interactive card which looks way more complicated than it is!!
    The waterfall mechanism needs 4 paper parts
    1.Base card
    2.Interactive strip
    3.Flipping Card Panels
    4.Restraining Belt strip
    Stick card panels on to a folded card strip and your waterfall strip is ready. Use a belt type card strip to anchor it to a card base and your waterfall is ready to flip!
    To cut these waterfall card parts from an A 4 card

    1. Cut off 2 inches from one end of an A 4 strip-gives the panel strip
    2. Cut off 1.75 inches of the remaining piece as shown- gives the interactive strip
    3. Cut off 8.5 inches of the last piece- gives the base card and the belt

    Waterfall card Tutorial
    For those who love measurements [Base card: 8.5 x 6.5 which when folded is 4.25 x 6.5 ; Interactive strip:1.75 x approx 9.5;Panel strip:8.25 x 2 which when cut gives 3 panels of 2 x 2 inch and one panel 2.25 x 2 inch;Belt strip 6.5 x 1 and 1/8th which should be trimmed to 4.25 length]

    Waterfall card Tutorial
    Score and fold the interactive strip .Cut the panel strip into 4 panels at approx 2 inch intervals[the Panel strip is 8.25 x 2 which when cut gives 3 panels of 2 x 2 inch and one last panel 2.25 x 2 inch..if you want you can shorten this odd one to 2 x 2 or leave it as such ].By this method you utilize just one A 4 card to make the waterfall and only waste a small strip of card marked "cut off" from the belt strip.
    Waterfall card Tutorial
    Take the interactive strip [9.5 x 1.75 inches] and score at 2 inches,2.75,3.5 and 4.25 [ie 0.75 inches gap]. Fold both ways at the creases to loosen the score lines. Fold over the strip as shown[ at the last score line towards the center of the strip].
    Waterfall card Tutorial
    Apply glue on the 2 inch wide area of the interactive strip as shown.Glue one card panel [I choose my odd size one which is longer than the rest] on it aligning the top of the panel to the score line.
    Waterfall card Tutorial
    Apply glue to the area before the next score line and glue on the next panel again aligning the top of the panel with the scoreline.Similarly glue on the other 2 panels of the waterfall card.

    Waterfall card Tutorial
    Now you have your folded waterfall mechanism with the overlapping panels stuck on, the folded base card and the belt strip which you have cut short to a length of 4.25[ the width of your folded base card]
    Waterfall card Tutorial
    Attach the belt strip to the lower part of your base card using strong white glue at the edges[ around 0.5 inches area] or brads or eyelets.The belt attachment needs to be sturdy yet loose to allow easy flipping of your waterfall  card.
    Waterfall card Tutorial
    Slip in the folded waterfall strip under the belt keeping the part with the panels above the belt. Apply glue on the central part of the strip which will be covered by the panels.Stick on the panel which overlaps the belt aligning the lower border of the panel to the lower border of the belt.Allow it to dry well and pull the interactive strip to see your flipping waterfall card.
    Waterfall Card
    Waterfall Card
    Well for those of you who have never made a  water falI card it may sound complicated..but do give it a shot and I bet you will be hooked ! And I  do hope this crazy tutorial is of help..to my fellow crafters in some way.
    Here are some more waterfall cards
    Related Posts Plugin for WordPress, Blogger...