Showing posts with label Ribbon Flowers. Show all posts

25.11.13

Thermocol Crafts- Lotus tutorial


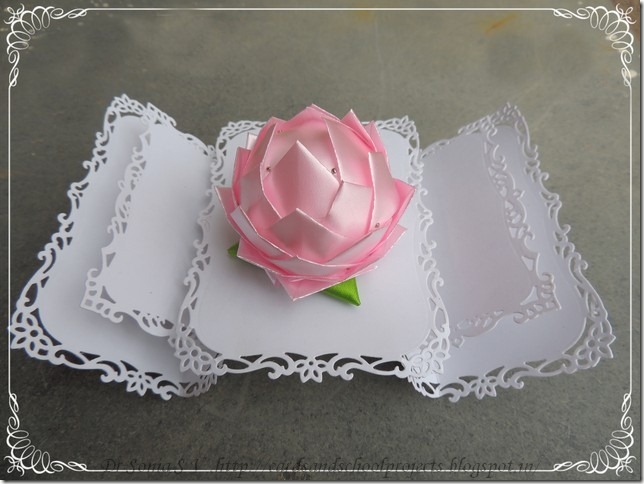
Thermocol craft lotus
For quite some time now I have been fascinated by thermocol /styrofoam ball ornaments .
You can dress up thermocol balls with ribbons,fabric scraps,pretty paper ,sequins or beads [lots of ideas!!]
I had a bit of a tough time following some of the pine cone tutorials on the net and finally decided to make my own version…it turned out looking like a lotus!!

Thermocol craft lotus
So sharing how we made our thermocol lotus ball!

Materials Required for the Thermocol Ball craft
Lotus flower tutorial
  • Thermocol balls – we used 2 inch sized ones. If you are not able to get a thermocol ball dont worry you can still make your lotus using a plastic ball but instead of pinning you will have to do a lot of gluing !
  • Ribbon ,fabric or paper -I used 1 inch width pink ribbon.Use sizes and colors you want.
  • Pins
  • Scissors
From the pink ribbon Cut one square[ 1 x 1 inch] and many 1 x 2 inch rectangles [cut rectangles double the width of your ribbon/paper]
Lotus tutorial
Fold the rectangles into triangles by folding up the lower corners to meet the upper edge.
Ribbon flowers
My ribbon is kinda satiny and stiff like paper so I could fold and the creases remained
Ribbon flower tutorial
If you are using fabric or normal ribbon you will have to  hold the fold with your fingers
Ribbon flower tutorial
When you have folded up the other corner you will get a nice triangle.Doesnt matter if you get imperfect overlapping edges!
Ribbon flower tutorial
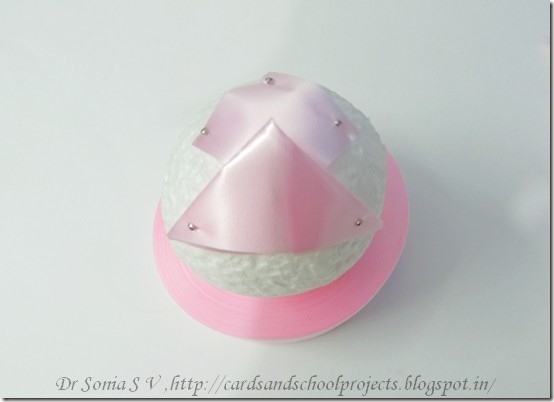
Pin the square onto the thermocol ball
Ribbon flower tutorial
Take the triangle you had folded and Pin the lower 2 corners of the triangle on to the corners of the square as shown keeping the flaps hidden inside.
Ribbon crafts
Keep pinning triangles to cover adjacent corners of the square keeping the lower edges of the triangles in a line on the thermocol ball
Thermocol Ball crafts
You can even use one pin to hold 2 adjacent triangle corners as you get used to pinning on the thermocol ball!
Thermocol Ball crafts
On completing a layer of triangles atop the square start pinning the next layer lower down .
Thermocol Ball crafts
My next layer also had just 4 triangles. Here is the side view showing how the triangles are overlapped on the thermocol ball
Thermocol crafts
Complete the thermocol ball lotus by pinning more triangles and finishing off with green ribbon leaves!
Do tell me how you like this thermocol - ribbon Lotus!!
I think it would look cool as a home decor and for religious souls I guess it would be lovely as a  Pooja  decoration for goddess Lakshmi!
PS: the stand for the lotus may be familiar to some of you.Here is how I made it : Fancy fold card tutorial
Where to buy Thermocol Balls ?: Try your local fancy store.If you are in Bangalore its available cheaply in many sizes at a Packing Material Supply shop in Ebrahim street[ parallel to Commercial street].Also available at Itsy Bitsy. You can also check out my compilation of Craft Supply Stores in India

Edited :this project got Honorable mention at Crafter corner Festive theme

12.7.13

Recycling crafts with Washi tape

Recycling Crafts with Washi tape
Recycling crafts
Dear friends it feels wonderful to be back to blogland! I was so thrilled that so many of you missed me enough to email ,comment ,message and even call me up to see if I was alright !Thank you so much ....I was so touched!!
Well we had bought a huge new house and all my time went into caring for it so I couldn't craft or blog!!Now things are settling down and hopefully I will get snatches of crafting time!
My blog friend Priya owns an awesome craft shop and she sent me some Washi tape to use in a recycling craft.This is the first time I tried washi tape and boy it was so quick and easy to use washi to recycle some plastic containers into what else but a DIY washi tape/ ribbon holder!
Recycling crafts
My ribbon/tape holder looks like a little lamp shade [My inspiration is the gorgeous wine glass lamp shade made by the super talented Daksha] .The hood comes off and you can place the ribbon/washi tape on the shaft [which is actually an used pen wrapped in washi tape] of this DIY ribbon holder.
Recycling crafts
The picture below shows the washi tape on the shaft and the under surface of the hood with a central plastic rim which snugly fits the shaft of the DIY ribbon holder
Recycling crafts
The pic shows all the washi tape I own but even if you have a huge collection you can easily and quickly make any number of these ribbon holders as its a super simple inexpensive recycling craft.
Recycling crafts

DIY Ribbon/Washi Tape holder tutorial
Here are the items I used to make my Lampshade Ribbon/Tape holder

  • Gems container- I used one hemispherical half of it.Alternately use a jar lid or even a Styrofoam hemisphere
  • Goodnight mosquito repellent bottle- or any small glass/plastic bottle with a small neck
  • Used pen- wrap in washi tape
  • Washi tape--makes beautifying plastic super easy and quick as the pretty tape as its own strong adhesive!
  • Glue gun - optional-I used it to stick the pom pom lace and the plastic rim on the hood of the DIY washi tape holder

Recycling crafts
  1. Make the Base of the Lampshade-I recycled a mosquito repellent bottle to form the base of the lampshade. I removed the pink stick and rinsed the bottle to get rid of all the residual insecticide.The plastic rim inside this bottle snugly fits a pen or pencil.You can use any small necked bottle as an alternative and if your bottle neck is large ,make it small enough to fit your pen with clay/sponge/paper/any other crazy thing you can think of!
    Recycling crafts
  2. Make the Shaft of the lampshade-Use an used pen or any rod like structure you wish to recycle and cover it with washi tape
  3. Make the Dome of the lampshade-Cover the hemispherical dome of the plastic container with washi tape.Stick the inner plastic rim from another goodnight bottle on the center of the inside of the dome using a glue gun /double sided foam tape /other strong adhesive.Alternately fashion this central stopper using clay or mseal wrapped around your shaft so as to form a snugly fitting stopper for your DIY Ribbon holder.
Recycling crafts
I used sticker rhinestones,plastic butterflies,glitter strips, pom pom lace,pearls ,feathers and a ribbon flower to embellish my DIY Ribbon/Washi tape organizer.
Recycling crafts
I made this ribbon/tape holder as a Guest DT project for Priya's "recycling with washi tape" challenge this month .If you have some gorgeous washi tape do drop by the color conceptions challenge blog and for my Indian readers who want to get their hands on washi tape do drop by Priya's shop The Craft Shop.In
Eagerly awaiting your comments on how you like this super easy project.
If you like this recycling craft do have a look at my compilation on Recycling Crafts

20.7.12

Handmade Photo frame- Beaded Photo frame

Handmade Photo frame
Photo frames have held such a special attraction for me even before I started crafting and making my own ! Recently  I picked up a Photo frame kit for my daughter from my local craft shop[Itsy Bitsy]. My kiddo had fun sticking the parts of the frame together and sticking the beads on the photo frame. 
Beaded Photoframe
The kit yielded a simple beaded frame and of course we had to add our own special touches! 
The shiny look is courtesy a generous coating of modpodge over the beads and this helped to really stick the beads which had a nasty tendency to keep falling off!
Also a bit of silver glitter glue here and there gave it a bit of sparkle and glamour!
The hearts border was made using my new Martha Stewart hearts punch [this MS punch is super new but giving me problems as its giving ragged edges which I have to snip off with scissors - a big disappointment and am heart broken !- any suggestions friends?]
Beaded Handmade photoframe
On a happier note ,I made my first ribbon rose !![So happy as fabric crafts and me dont get along usually!] Also made my first fancy pin by recycling beads from a broken bracelet .
Ribbon Rose on Beaded Photo frame
Our photo frame has a hearts theme so added a  heart charm on another handmade pin using the trusty glue gun.
Hearts Pin
Have seen so many lovely pins in blog land and it was thrilling for me to finally make my own for our photo frame
Beaded Photoframe
I hope you liked this glitzy photo frame..do share your views.
If you want to make your own Photoframe : Photoframe Tutorial 1,Photoframe tutorial 2

1.9.11

Pop up card - Pedestal Lord Ganesha Card

Quilled Flowers and Ribbon Flower
This is another celebration card celebrating the festival of Lord Ganesha.Living in Bangalore this time of the year, there are beautiful idols of Lord Ganesha everywhere on the streets and the Ganesha festival is celebrated with such fervor and festivities.
Here is a closeup of the quilled daisy flower and hand looped leaf [ though I have the comb or onion holder as it is called I dislike using it and prefer to loop by hand]
Quilled Flower and Leaf
These ribbon rose is super easy to make and involves no sewing. I wanted a big flower so stuck the ribbon rose onto a base of scallop circles. The leaf is also a ribbon- foil creation. Here is the link to the simple ribbon rose and ribbon leaf tutorial
Ribbon Rose
Though I wanted to keep the focus on the ribbon rose , I couldnt resist drawing some golden glitter glue swirls at the borders to add to the festive mood of a celebration card.
Quilled Flowers and Ribbon Flower
The inside of the card is a Pedestal Pop up card with a Punch craft Lord Ganesha designed by my 5 year old daughter.
Pop up card Lord Ganesha
I bought the pear punch recently on impulse thinking I would use it make flower petals .Imagine my surprise when my daughter made this wonderful punch-craft depiction of Lord Ganesha using the pear punch and a scallop punch.
Pop up card Lord Ganesha
Our Punchcraft Ganesha is pretty straightforward to assemble but if anyone wants help I can post a step by step for our Punch Craft Ganesha.Added some quilled tear drop shapes, pearls and sequins at the border .

Pop up card Lord Ganesha
Sharing a tutorial on making a Pedestal Pop up card which is a simple and versatile pop up mechanism to pop up a special image.
Its easy to work freehand too but here is a template I made to guide you in case you want to make this type  of pop up quickly.The yellow star is the pedestal .
Pop up Card Template
The first rectangular strip will be the base of your pedestal. The blue and red shaded portions are your glue tabs.Your strip will have 3 mountain folds as shown

Pop up card Tutorial
While sticking a pop up strip first stick the tab going at your center fold, then fold your strip, apply glue to the other glue tab ,close your card and your pop up strip is ready.
Pop up card Tutorial
Stick your 2nd pop up strip as shown [ blue tab goes on to vertical surface and red tab to horizontal surface]
Pop up card Tutorial
Now your pedestal Pop up card mechanism is ready and you can stick your image.
Pop up card Tutorial
I went a step further and popped up our Punch craft Lord Ganesha again using a similar strip as the 2nd pop up strip.
Pop up card Lord Ganesha
So here is the side view showing the pop up card layers
Pop up card Tutorial
Here is the closeup of  a punch craft flower and metallic leaf
Punch Craft Flower
If you don't want to design tabs here is a Kirigami Pop up card template I designed for this Pop up card -Bold lines -cut,small dotted lines-valley fold,long dot line-mountain fold.
Pop up Card Template
We made this simple pop up card Lord Ganesha Card for my daughters teacher
Pop up card Pedestal Card
Its embellished by my daughter and she was so proud to take it to school!
Pop up card Pedestal Card
You can adapt the pop up cake card tutorial to make this card or use this Kirigami pop up card template I designed to make this simpler version of the Pop up Pedestal Card.
Pop up Card Template
Have fun-- I hope I am not overwhelming you with pop up cards--they are just so much fun to make and so only I am sharing some of the tips and tricks I learn while I make them. Do tell me how you like our cards.
Do pop up cards seem too difficult? Well here are links to nearly 30 Card Making Tutorials of different types
Related Posts Plugin for WordPress, Blogger...