Showing posts with label Princess Card. Show all posts

17.12.15

Warm Wishes Tag

Coffee Tag
             Hi friends I visited my friend Priya Sivaraj in Chennai recently and had an amazing time shopping from her craft shop. Shopping from a physical store can give you such a high and when the shop is owned by a knowledgeable crafty friend the experience is simply heavenly!!
          The Poppy Stamps tags die I used to make this tag is part of my huge crafty haul from Priya's shop and so is the gorgeous Kaisercraft Tea Cup stamp!
Stamped Cup
            I added chipboard snowflakes and glitter foam snowflakes to make my tag suitable for the season. I do not usually enjoy coloring but had so much fun coloring my tea cup and heat embossed leaves using the Akashiya Sai watercolor brush pen set Priya had gifted me!Supplies : Dies :  Memory Box Frostyville border  , Poppy Stamps Pinpoint Main Street Tags , Poppy Stamps Pine Boughs
Stamps : Leaves from Winnie and Walter In Bloom Elsa's Flora set, Tea cup from Kaisercraft Tea Party Clear Stamp set

Chipboard Ornament Tag

Chipboard Ornament Tag
            Hi friends, surprised to see so many tags from me...well only this year I discovered they are so fun and easy to make!! The star of this tag is chipboard! The lovely ornaments are chipboard embellishments I had picked up from a local supermarket quite some time back and hoarded for years! 
     
Chipboard and Glitter Foam
           I love using foam and hence love dies which can cut foam easily .The pine leaves were cut with my recently purchased Poppy Stamps pine bough die ! I used preglittered foam sheets to die cut my pines and deer....they are so neat to add the glitter element to a festive project as there is hardly any loose glitter!
Supplies : Dies : Poppy Stamps Pinpoint Main Street Tags, Poppy Stamps Pine Boughs , Memory box Leaping Deer
Linking to
  1. Ellen Hutson's 12 Tags of Christmas with a Feminine Twist 2015 Challenge - inspired by Sandy and Dawn's ornaments tags of  Day 12
  2. Chouxchoux Paper Art Challenge
  3. Crop Stop Challenge using products available at   the Crop Stop Store

Glitter Foam Poinsettia

Foam Poinsettia Tag
           Hi friends sharing a tag with a glitter foam poinsettia and a glittery ornament with "wish" die cut within it [ using a movers and shapers die] .My festive tag has an embossed snowflake design and a glittery snowflake border.The lacy Poppy Stamps die cut is for a feminine touch!
Glitter foam snowflake border
            Made the  poinsettia by hot gluing 5 leaf die cuts and adding a green glittery bead to the center. The hot green holly leaves are also glitter foam die cuts. There is also a little angel playing the flute but I couldn't capture him very clearly!
Foam Poinsettia
Supplies : Dies :  Memory Box Frostyville border  , PoppyStamps swirly curl border , Sizzix Movers & Shapers Wish , Sizzix BigZ Movers & Shapers Carved Ornaments , Provocraft Leaves
Embossing Folder : Sizzix Snowflakes
Edited : This creation was chosen as top 5 at the ABC Xtreme Challenge !

11.12.15

Dangling Hearts Tag

Dangling Hearts Tag
           Hi friends sharing a festive tag in traditional Christmas colors. I started with a white card stock and stencilled a beautiful Christmas tree using a 2 shades of Distress Inks  . Then went to work on it with different shades of pink - red Distress Inks and ended up with a bright vibrant red background !
Plastic Stencil
            I dont have any branded stencils so used a thin plastic stencil I had picked up from the market several years back.The stencil itself is not of very good quality and I doubt it will last long but it does have a beautiful design!
Stencil Art
             I ran the stencilled card through a Sizzix embossing folder and added a snowflake border and glittery foam trees .
Dangling Beads
          I am rather happy with the little heart- pearl danglers I added to the lower part of my tag!The red rose is a foam rose and the leaves are stamped and die cut using a favorite Heartfelt creations Botanical Wings stamp- die cut set.
Festive Beaded Tag
I hope you like my festive tag!

Supplies : Dies :  Memory Box Frostyville border  , Heartfelt creations Botanical Wings , Sizzix Card front Winter
Stamps : Heartfelt creations Botanical Wings 
Stencil : Unbranded Christmas tree stencil from Devi and Co Bangalore 

Stencilled Festive Tag

           
Stencil Art 
Hi friends I am really enjoying participating in Challenges these days as it helps me to venture into areas I am not familiar with and most importantly to use supplies that have been neglected!
            This simple festive tag features candles I made using a local unbranded stencil and sponging with Distress Inks  .The candle flame and the dripping wax were made glossy by using Glossy Accents
Embossed Card
          The lovely embossed background was made using a Sizzix embossing folder.I love how embossing can add so much interest to CAS projects.
Thank you so much for all the wonderful comments you have been leaving on my blogposts despite me posting everyday these days!
Supplies : Dies :  Elizabeth Craft Designs Best Wishes, Itsy Bitsy framelitEmbossing Folder : Sizzix
Misc Products: Glossy Accents
Stencil : Unbranded Festive Stencil from Devi and Co Bangalore
Christmas Stencil

Linking to  
  1. Chouxchoux Paper Art Challenge
  2. Little Claire's white mostly

23.11.15

Fairy Christmas Tag!

Fairy Christmas Tag
           Hi friends I am thoroughly enjoying making tags....it is so much fun to embellish a tiny piece of paper! I used a Christmas tree foam stamp to stamp a tree on a musical notes pattern paper and heat embossed using Ranger's Holographic embossing powder...this powder is just wow for festive projects...once embossed it literally shines in different colors depending on how the light is falling on it!
Heat Embossed Flowers
 Added my favorite stamped heat embossed parchment flowers and some silver Marianne leaves. Experimented for the first time using a snow marker and ooh it was fun to see the snow puff up!
Handmade Resin Fairy
     And that is my handmade resin fairy you see popping up every now and then in my projects! She is going to put the crystal ball [ a crystal bead I added to her hand!] atop the tree!
Beaded Border
        And yes I couldnt resist adding a sparkly snowflake border! Also proud of the beaded trim with the crystal beads behind them! It is crazily tough to get equal spacing with beads!!I fuzzy cut 2 butterflies from a DCWV pattern paper and layered them with foam dots to make a 3 D glittery butterfly.
Embossed Tag
I hope you liked my fairy/angel  tag!

Supplies : Dies : Memory Box Frostyville border  , Heartfelt creations  Sun kissed fleur, Marianne Fence, Marianne Designs Anja Leaf 3
Stamps : Itsy Bitsy Christmas tree foam stamp , Heartfelt creations  Sun kissed fleur rubber stamp,
Misc : Marvy Uchida Snow marker , Ranger Holographic Embossing powder
Linking to
  1. Linda 's 12 Tags Of Christmas challenge which is sponsored by her wonderful store, The Funkie Junkie Boutique - inspired by the beautiful tree and snow splatter on her tag of wk 6 [ link above]
  2. Happy Little Stamper Christmas Challenge 
  3. Craftindesertdivas Christmas
  4. Cropstop Challenge 
  5. Sweet Stamps Anything But a Card Dec 15

30.7.14

Pop Up card Disney Princesses

Pop Up cards 1
Pop Up Card- Princess
         Dear friends Thank you so much for the heartwarming comments on my Lever popup card tutorial . I am not a pinterest fanatic but I was thrilled that the tutorial pinned by Marmosa has gone viral on pinterest clocking 190 + repins in a short time!
Pop Up cards 4
Handmade Pop up card
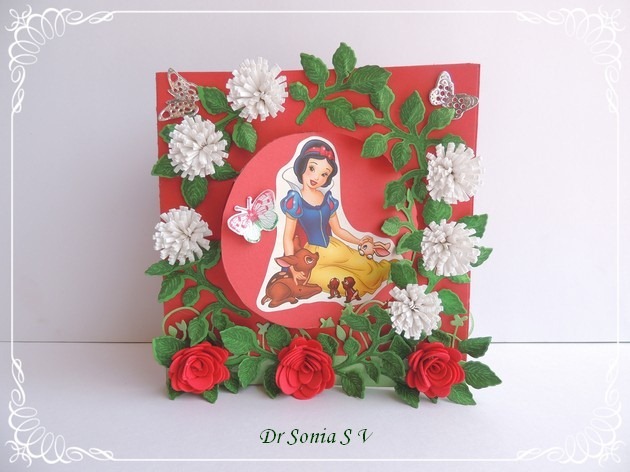
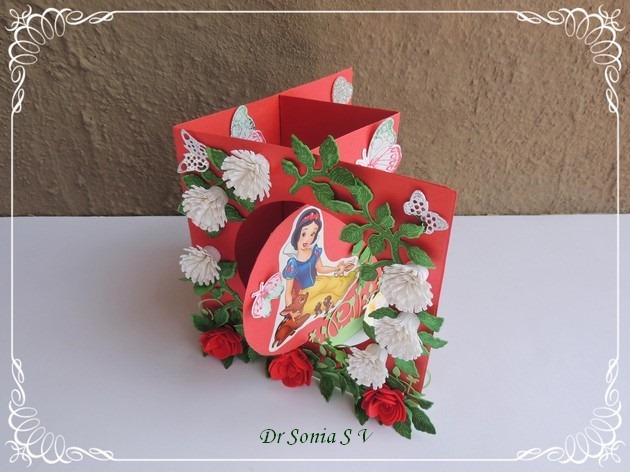
This is yet another handmade pop up card with the lever mechanism in a kiddy style featuring Snow white amidst lots of handmade flowers.The red roses are made from foam.
Pop Up cards 3
Pop up princess card
I kept the inside fairly simple this time as I wanted the card to close perfectly flat. My little girl has a lot of Disney Princess stickers and any card or project featuring a princess is a "wow" for her and this card will probably be given to one of her friends!

Pop Up card- clouds
I added a small pop up tab on the inside fold of the pop up card  to make my clouds pop out! The silver heart has been punched from glitter foam.

Pop Up cards 2
Pop up card
I hope you like little Snow white swinging around in this pop up card.

Supplies- Dies : Itsy Bitsy rolled daisy, Spellbinder Classic Leaf ,Memory Box fringe, Memory Box spring border, Memory Box cloud, Lifestyle crafts circle, Cheery Lynn  Butterfly, Sizzix butterfly,Wild rose studio floral frame die, Punches- Itsy Bitsy scallop heart foam Punch,Stamps- Sizzix butterfly, Heartfelt creations leaf.

5.10.11

Double Twisted Easel Card Instructions

Double Twisted Easel Card
I have seen so many easel cards on the net but have somehow never felt like making one.Recently my dear blogger friend Priya Sivaraj sent a gorgeous easel card to me and I was hooked! So here sharing my first easel card which is a double twisted easel card.
This is the closeup of the handmade paper roses[Link to Rose tutorial ] with some looped quilled white leaves.
Double Twisted Easel Card
Its a bit different from many of the easel cards on the net as I tweaked the dimensions so as to not waste card stock![I am quite the miser at times!!]
I make most of my cards using A 4 size card stock so sharing how I made this double twisted card with minimal wastage.
Fold your A4 into half.Mark the 1/2 way point at 10. 5 cm on the folded edge.Drop a vertical line 10.5 cm long from the central midpoint as shown and draw a horizontal line .
Double Twisted Easel Card Instructions
Cut through the lines you have drawn- don't bother about erasing the lines as these lines will be hidden.This will give you 2 squares each measuring 10. 5 cm . Score along the diagonals as shown
Double Twisted Easel Card Instructions
Mountain fold along the creases and you have your easel card base. Cut 10. 5 cm squares to mount on the lower triangles.
Double Twisted Easel Card Instructions
Make stoppers such as these rectangles raised on double sided foam or use flowers/ buttons etc to help your easel to stand.You can use the yellow card stock you had cut off for the stoppers thus using up those scraps too!
Double Twisted Easel Card
The position of your stoppers depends on at what angle you want your easels to stand.I positioned my stoppers symmetrically at an angle .
Double Twisted Easel Card
This is what the easel card looks folded down
Double Twisted Easel Card
Do tell me how you like my first easel card!
Here is a compilation of Card making tutorials

11.5.11

Recycling Pop Up card Tutorial

Have you ever  seen a beautiful image on a calendar,cereal packet ,magazine etc and loved it so much as to want to use it on a card?The easiest option is to cut out the image and use it on your card front. How about making a pop up card ?
How would you like to turn this calendar into a fairy tale Pop Up card?
Recycling Pop Up Card Making

Pop Up Cinderella Card
Planning your Pop Up Card
1.Cut out your images and decide how you would like to position them in your Pop up card.I have used a standard A4 sized card stock here for the base card which is folded in half and laid out as shown.
2.Once you decide on the positions, lay the pictures down flat. This step helps you to plan your Pop up card tabs and also helps ensure no picture projects out of the closed card.

Pop Up Card Making Tutorial
Fashioning and Planning the Tabs of your Pop up Card Images
The tabs need to be made from sturdy paper. I have recycled some medication pamphlets here to make the tabs.You need to make as many tabs as you have images.The center of the images will be glued on to your tabs so you can plan your layout accordingly.
3.Measure the distance from your image to the card center.
4.Fold it up at that point.This is how much your image will pop out from your card.
5.Make the next fold to give the tab a height less than the height of your image.Now you have the two important measurements to make your square or rectangle shaped tab. For the first image the tab was square with the side measuring as much as the distance from the center of the card.
Pop Up Card Making Tutorial
6. Measure the tab lengths for the other image.Here is the measurement of the image from the center of the card
7.Next side of the tab is less than the height of the image.
8.Next side which is parallel to the card base will be equal to measurement in photo 6.Final tab is a rectangular shaped tab with last side measuring the same as measurement in photo 7

Pop Up Card Making Tutorial
 9.Measure the image pop out distance from the image to card center for the last image to pop up.
10.Next height of tab as in earlier steps.This photo is not to confuse you but just shows an easy way to ensure equal measurements of two tab sides without using a scale![I am lazy to use a scale and go freehand most of the time].
Pop Up Card Making Tutorial
Making your Tab Support for your Pop Up card Images
Now is the easy part.Glue down your tabs!
11.Apply glue on the tab part which will go on the card base and stick it firmly in place
12.Fold your tab completely flat and apply glue on the tab surface which will stick on the other side of the card. Do not apply excess
13.Firmly close your card and hold to allow the glue to stick
14. Open and your tab is ready!

Pop Up Card Making Tutorial
15,16,17 Do the same to make the tabs for your other images
Pop Up Card Making Tutorial
Stick your images on the vertical tab surface and your Pop up Card is done!
Pop Up Card Fairy Tales

Pop Up Cinderella Card

Pop Up card Princess
Edited: This card came Tops 3 at Ambers Crafts

Related Posts Plugin for WordPress, Blogger...