 |
| Teachers Day Card |
Wondering why I am making Teachers day cards in July...? Well in India we celebrate Teachers day in September and my daughter has so many favorite teachers that I think I will need to make at least a dozen special Thank You style Teachers Day cards .
 |
| Teachers Day Card |
I had a ball using beads on this project and made a beaded butterfly [similar one here : Beaded Flowers tutorial]
Crafted a 3 D decoupaged fairy who swings, spins and literally soars into the sky in this kinetic card!
 |
| Kinetic card |
In this photo you can see how the butterfly charm dangles when the fairy spins up.My fairy has 6 layers popped up on foam and boy was she time consuming to make!!
 |
| Spinning Card |
Here is the aerial view of the spinning kinetic card
 |
| Spinning Card |
Since its a self standing spinning card I embellished the other side too.Added more 3 D decoupaged fairies,a glittery Thank U,silver peacock feather die cuts and lots of butterflies and punchcraft flowers on the other side of the Teachers Day Card
 |
| Teachers Day Card |
This design is one of my most popular card designs on this blog and here is the original spinning card. Some of my blog friends said they found my first spinning card tutorial a bit difficult so I thought I would tweak the tutorial a bit in this spinning card tutorial.
Materials Required
- Card stock - An A 4 for the base card and 2 roughly 4 x 5.5 inches pieces for the central spinner.Thick Card stock is preferred - The base card which forms your stand for the spinner needs to be particularly strong as it is a stand for your card and has to support the weight of your wooden stick and spinner card.The spinner card also should not be thin as otherwise it will be floppy and unsightly.
- Scissors
- Glue
- Double sided tape or glue dots - makes life easier while making the central spinner.
- Wooden skewer or anything else you can think of which can take the weight of the central spinning part of your spinner card
 |
| Spinning Card Tutorial |
I used Spellbinder Die cuts [measures 4 x 5.5 inches]as my central spinner.But you dont actually need any fancy tools to make a spinner card as shown in my first spinning card tutorial
I trimmed an A 4 card into 8 x 11 inches and folded it in half to make my base card.
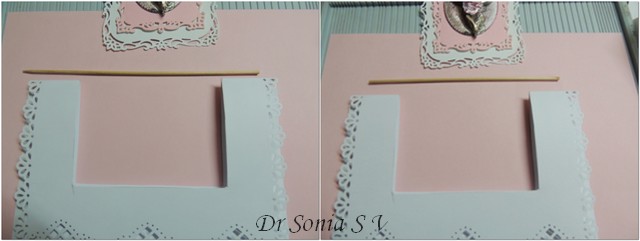
Positioned the lower half of the Central spinner in the middle of the folded edge and marked around it leaving enough gap [1/4 inch on sides and 1/2 inch below]all around .This central rectangle is 1 3/4 inches from each edge [as shown by the scoreboard markings].
Cut out this marked area [folded it measures 4.5 x 3.25 inches]from both halves of your folded base card
 |
| Spinning Card Tutorial |
Punch a border on your base card if you wish.Take a wooden skewer and trim off the excess so that it fits well within the width of your base card as shown in the picture above of the spinning card tutorial
 |
| Spinning Card Tutorial |
To Make the central spinner : Take 2 die cut/hand cut shapes [approx 4 x 5.5 inches]and center the skewer on one die cut as shown.Apply double sided sticky tape or glue dots above and below and stick on the other die cut/hand cut piece and you have made your spinner!
 |
| Spinning Card Tutorial |
Position your spinner inside your base card and see if it has space to swing freely [ you can do some trimming on the aperture made in your base card if your spinner is not spinning well]
 |
| Spinning Card Tutorial |
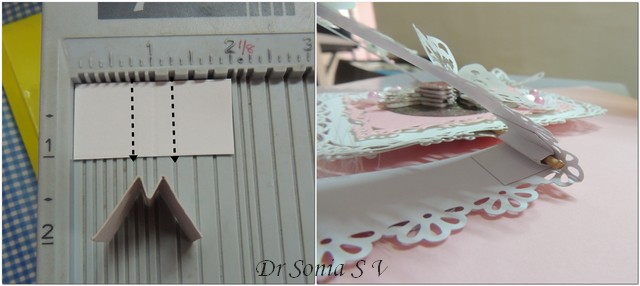
Make the supports for your spinning mechanism: from thick card stock cut out two 2 x 1 inch strips and score at 3/4 inch , 1 and 1 1/4 inch .Fold this into an M as shown above.The gutters of the M support the skewer on either side of the central spinner.Stick the long legs of the M inside the folded top edge of base card.I stuck the M legs of both strips [on either side of spinner aperture] on the inside of the back half of the base card first, then placed the skewer in the gutter and glued on the other leg to the inside of the front half of the base card.
 |
| Spinning Card Tutorial |
Your spinner card is actually done but it may have a tendency to fall especially if your spinner is heavy.
In that case make a stand for your spinner card like I did.Take 2 strips of card stock 2 x 6 inches and score at 1 3/4, 3 , and 4 1/4 inches.Punch borders if you wish and fold into an M as shown.Align it to line the lower corners of the front and back layers of your base card and you have made a sturdy stand for your spinning card
In that case make a stand for your spinner card like I did.Take 2 strips of card stock 2 x 6 inches and score at 1 3/4, 3 , and 4 1/4 inches.Punch borders if you wish and fold into an M as shown.Align it to line the lower corners of the front and back layers of your base card and you have made a sturdy stand for your spinning card
 |
| Spinning Card |
 |
| Teachers Day Card |
And here is the front view with a fairy child soaring up into the sky in this Teachers Day card!!!
 |
| Teachers Day Card |
Supplies : Fairies decoupage sheets ,Punches : Martha Stewart,Jef Butterfly,Jef flower and daisy,Dies : Spellbinders Rectangle,Spellbinders Peacock,Couture creation Oval, Cheery Lynn Butterflies
Edited :
This project was winner at Itsy Bitsy Sizzix tutorial challenge
This project was Top 3 at Whoopsy Daisy things with wings theme challenge
 |


Love your beautiful design cards... This is so pretty, love all the fancy punches you used on both of them...
ReplyDeleteThak you Shirl..yes I did have fun using the MS punches and was super thrilled as the card stock I used was very very thick and the MS punches punched them so easily!
DeleteSuch an innovative fold Doc!! Love the cute fairy card.
ReplyDeleteThank you Indira yes the fold is rather unique
Deletewow!! this is such a beauty Dr. Sonia :) No words to explain!!
ReplyDelete-Berina
Thank you so much Berina that is such a sweet thing to say
DeleteBeautiful...
ReplyDeleteOMG!! This is AMAZING Sonia. Thanks for the tutorial..Loz
ReplyDeleteThank you so much Loz for your support
DeleteOh my.This is super pretty.The tutorial is very descriptive and easy to understand.Total respect for creating it.It's so painful to keep taking pictures in between creating.so kudos to you.Love all the punching and the intricate details.The fairies,what are they?Stickers?
ReplyDeleteHa Ha Pallavi that is so true and the worst thing is I create most often at night and step by step photos are so difficult to take with poor lighting!!
DeletePallavi the fairies are made by 3 D decoupage technique. I got them as sheets from a store in Bangalore [have updated in post] and had to hand cut them and layer them with foam tape!!
DeleteThis is simply fabulous Sonia.........loved the tutorial, will definitely try it!!!
ReplyDeleteThank you Tanvi..please do try it..lots of fun too!
DeleteDropping by once again to thank you for joining us at Catchy Challenges. All the best!
DeleteBeautiful creation,thanks for the tutorial.
ReplyDeleteGr Elly
Thank you so much for dropping by Elly..your visits mean a lot to me.
DeleteOh its gorgeous and what a wonderful twist by adding a swinging element to it :) ..I love the way you have done the fairy in the front and back ..awesome use of your dies and punches !!
ReplyDeleteThank you Hussena..ha ha yes I did go to town with the punches and dies!!
DeleteWOW!! Fantastic Sonia,and so very beautiful.Fabulous tutorial...would love to see the card in real life..going to be one very lucky teacher.
ReplyDeleteluv CHRISSYxx
Oh yes Chrissy it loks gorgeous in real life..I had a tough time taking photos!
DeleteOMG so delicate fabulous tutorial and stunning card love it
ReplyDeleteHugs Kate xx
Thank you so much Kate..thrilled you like it
DeleteWOW!!! superb card Dr Sonia loved every single bit of the card 3d Decoupage fairy ,die cuts ,feathers and what not the little butterfly charm is so cute ..:) totally marvelous..your daughters teacher is the lucky one to have this wonderful piece...
ReplyDeleteThank you so much Radhika.Now I have to worry about making a dozen more "special" teachers day cards!!
DeleteAwesome awesome! Sonia. What an amazing work! Your daughter's Teacher must be very lucky! Thanks for the tutorial! The decoupaged fairy pictures are perfectly done. Love the colours too!
ReplyDeleteWOW! this is superrr amazing card.. the fold, the beads the butterflies, the decopage fair diecut everything is really gorgeous!Thankyou for playing along with us at BGC.
ReplyDeletelove,
Shafaq.
wow lovely card dear Sonia, you are just amazing at these! thanks for the tute..sorry for stopping by after a long time, just got busy, but i did miss you my friend :)
ReplyDeleteThank you so much for thinking of me Lavina. I always wait for your posts and visits
DeleteWow that's simply amazing ! Very very innovative fold Sonia ! Its just so lovely , and of course i love your tutorials they are just too good :)
ReplyDeleteThanks for sharing with us at BGC - Sky is the limit :) Adding a fairy is a nice twist :)
Hugs
Poo
Ahhhh!!! I can't find the words that will do this card justice!!! It is beyond stunning Sonia.. That fairy is gorgeous and I love how you made her pop , I could only imagine how long that took... I love all the intricate edges and detail to this card... beautiful my friend , just beautiful...hugs
ReplyDeleteWhat a fabulous transformation of a simple sketch into a wonderful interactive card ! You are really an inspiration to think differently..I loved the card and the punched borders make WOW ! Thanks a lot for the tutorial !
ReplyDeleteThank you Pooja.I usually dont use sketches but this time gave it a go!
DeleteIt looks like a little bit of heaven. The colors and the lacey edging makes it look like fantasy world. An absolutely gorgeous creation.
ReplyDeletehttp://ajourneyintoquilling.blogspot.com
CHris
Wow Sonia, You have really surpassed yourself on this card. It is truly beautiful. One teacher is going to be so lucky to receive this gift. Hugs Mrs A.
ReplyDeleteThis is just beyond gorgeous. Love every tiny detail. Fabulous style card.
ReplyDeleteNever seen this kind of card..you always surprise me with your new innovative ideas Dr...lovely card !!
ReplyDeletewow..such a beautiful n innovative card...loved d 3D effect...so well explained..thanks a lot for sharing.
ReplyDeleteGorgeous! I love the beautiful punched edges, embellishments and the spinning action of your card! My daughter is a teacher and would love this.
ReplyDeletePam
scrap-n-sewgranny.blogspot.com
You are so very clever and creative.
ReplyDeleteThank you for sharing.
Happy thoughts,
Petrina
You are so very clever and creative.
ReplyDeleteThank you for sharing.
wow thhis is amazing!!!! and it spins!! so many gorgeous things to look at on this card
ReplyDelete-Rachel w k
rwkrafts.com
A beautiful, romantic card and a great tuturial. Thank you! I certainly want to try and make this kind of card.
ReplyDeleteBest wishes,Wies
Really, really stunning! Your daughter's teachers will just be amazed! :^)
ReplyDeleteHugs, Penny
This is just so stunningly beautiful! Lucky teacher!
ReplyDeleteHugs,
Chriss
Oh my gosh, you are so amazing!! This is fabulous!! I've never seen a spinning card!! It is simply gorgeous!! You are so talented!! Love, love this!!
ReplyDeleteLisa
A Mermaid's Crafts
Hello Dr. Sonia! Nice to see you back. Hope you are doing good.. :)
ReplyDeleteThis spinning card is just amazing! Thanks you so much for sharing the tutorial. Looks veryyy easy! Would love to give it try! Thank you so much for joining us at Catchy Challenges. Good luck.. :)
Sonia
ReplyDeleteBreathtakingly beautiful. This is a gift not a card. :)
The recipient of this will treasure it for sure.
Thank you for the wonderful tutorial.
Myrna
Such an intricate detailed card Dr.Sonia. Love ur patience with the detailing..... Love those fairies n punches.
ReplyDeleteDr. Sonia ~ I cannot find enough adjectives to describe how beautiful your work is WOW..
ReplyDeleteBe blessed, Beckie
Just B Creative Crazy
Just Because Linky Party 8/1-/31!
Great sponsors and prizes!
That is gorgeous. Any teacher would be thrilled with that card. Great tutorial too
ReplyDeletethey are so pretty! what a great idea on the spinning center. thanks for the tutorial too.
ReplyDeleteWow....Loved it....Love the colors,fairy,punches...thanks for sharing...
ReplyDeleteGorgeous doctor.
ReplyDeleteWelcome back! Looks as if I am a bit late getting back here.
ReplyDeleteThere are going to be some very pleased teachers when they receive your cards. This spinning card is a beauty.
So glad to see you here Benzi..have missed you!
Deleteoh wow, gorgeous, love it, you really out did yourself on this one !!!!!
ReplyDeletePaula
Oh thank you Paula.I do tend to make better projects when I decide before hand who it is for!!
DeleteThis may be your best work yet! I really really love what you've made. And the colours are so soothing and pleasing! It's a super project! Thanks so much for playing along ItsyBitsy's Sizzix Tutorial Challenge. All the very best!
ReplyDeleteItsyBitsy - The Blog Place
Ha Ha you have put a big smile on my face!!
DeleteOh my word...I love these. I have a mirror that is shaped like this and it's spectacular. Only you would devise such a gorgeous card with the same concept in mind. The detail is as always exceptional and I'm overjoyed at seeing your creativity inspire so many people.
ReplyDeleteThank so much for your wonderful visit Sonia. :D
hugs to you,
Lisa x
Lisa thank you so much for dropping by. I have missed you!! And yes I do love to make crazy type of cards!!
DeleteThis world of card making is unique and your way of expressing it is very novel and innovative.I am sure all the teachers would be thrilled
ReplyDeleteanandhi
Oh! My Word what a stunning card.
ReplyDeleteA wonderful Tutorial that is so well presented.
Thank you for all the hard work you have put into this presentation.
I love everything about your beautiful card with all the delicate details.
Hugs
Patricia xxx
Thank you so much Patricia and yes this tutorial was one tough one as though simple it has so many technicalities!!
DeleteOh wow this is absolutely stunning. Words just can't describe how pretty this is. Thanks for the tutorial too. The last spinner card I made didn't hold up so well. This is a fab tutorial Thanks
ReplyDeleteLinda the trick is to use really thick card stock for the base and use the same thick card stock to make a stand. This spinner has a really heavy spinner what with the double decoupage having 7 layers on one side but it stand up very well. Do give it one more shot!!
DeleteThis is spectacular, Sonia!!
ReplyDeleteThank you so much Suman-ji!
Deletefantabulous and lovely card.very nice tutorial.love it .will try one.thanks for joining at catchy challenge.
ReplyDeleteThank you so much Megha..first time got to participate in Catchy Challenge!
DeleteI can only say: PERFECT!
ReplyDeleteOoh that is so sweet!
DeleteI get short of words to praise ur innovativeness..:),such a talented soul !
ReplyDeleteSpectacular work Sunehra ji...Thank you so much for sharing this awesome project at BGC.
hugs,
Bipasha
Ha Ha keep such ego boosting comments coming Bipasha....big hug to you!!
DeleteWow! Stunning cards! I love all the pretty details and dimension. Thanks so much for sharing your process! =)
ReplyDeleteGood to have you drop by Dana..off to explore your blog
DeleteSensational card! and a great idea! I used to try to do this :) hugs from Poland...
ReplyDeleteThank you Joolaa. Off to find your blog
DeleteBeautiful card :)
ReplyDeleteSo lovely! Great tutorial. Thank you for sharing with us.
ReplyDeleteThanks for sharing your gorgeous creation with us at The Paper Nest Dolls Die cuts Challenge!
Jasmina DT PND
Thank you Jasmina. Tried to find your blog but could not from your google profile
DeleteSuch a stunningly created card, Sonia. Your tutorial is wonderfully presented, as always! Your patience in doing these tutorials is such a virtue xx
ReplyDeleteThank you so much Sasha.I love my blog friends and readers so only share the tutorials!
Deleteit is such a gorgeous creation ! i just keep wondering how did u do one thing then i look at the other one again i wonder wow! how you could have done this technique .. in short this card is so detailed - breathtaking !!
ReplyDeleteCongratulations!! Dr Sonia winner for itsy bitsy tutorial challenge.. :)
ReplyDeleteFinally… I can come and visit you …your project of today is breathtaking, I specially like the innovation on this card,
ReplyDeleteThanks for sharing your wonderful tutorial, lots of hard work. just wonderful!
Keep in touch
Bibiana
Lovely card. There is always so much work behind every tutorial of yours. Thank you for the tutorial. Congrats on winning itsy bitsy challenge.
ReplyDeleteThank you so much Sharanya..yes tutorials are tough especially the photos!!
Deletewoooow so fantastic, wonderful details
ReplyDeletehugs pia
Thank you so much Pia..I so love your creations
DeleteWhat a stunning card Dr Sonia....love that heart border.
ReplyDeleteThank you Merry..I have a love hate relation with that punch!!
DeleteHi Sonia!
ReplyDeleteI somehow missed this post of yours. These days I keep missing everything! :( This is an awesome card! Whatever adjective I might use, it'll still not properly describe what I feel about this beauty! :) The whole thing is spectacular! It looked so complicated to me but the way you have explained everything is fab! Love this one to bits... Kudos to your patience, you always make perfect tutorials!
The dashboard does act crazy at times Sindhu and yes this is rather a fascinating type of card. Pictures dont actually do justice to it..it merits a video but you know how I hate videos!!
Deletefantastic card and awesome tutorial
ReplyDeleteplease join the the celebration at my blog
http://creativita-jovi.blogspot.in/2013/07/celebration-time-blog-candy.html
hugs
Jovita
Thank you so much Jovi. Yes I will drop in on your blog soon
DeleteWie immer, sind deine Kreationen , etwas Besonderes.
ReplyDeleteSo fein, zart und romantisch!!!
Liebe Gr üsse, Ulla
Oh my goodness, this is magnificent!
ReplyDeletereally gorgeous ,breath takingly beautiful..loved it
ReplyDeletegorgeous ,stunningly beautiful. Loved the tutorial as well.
ReplyDelete