Hi friends..have you ever bought something because you were attracted to the box or packaging! Hehe I have been guilty of that on more than one occasion! And following on that trail of thought...presenting to you a unique handmade Star shaped gift box perfect to hold chocolates and even jewellery!
Star Shaped Box
Making a shaped box is time consuming especially if it is a unique shape but it is so much easier if you have nesting dies to make your job quicker.I made this box using the new Crealies Crea Nest Lies XXL No 89 dies.
The lid is made using foam, card stock and pattern paper and the glass knob you see on the lid is actually a tiny glass mini vase!
Star Shaped Box
I made a simple star shaped card to go inside the box!
Hi friends it's been a long time since I posted any of my daughter's school projects .Of late most of the time they are made in such a hurry that I either forget to take pictures or they are made at night so I end up with grainy blurry pictures not worth sharing!
But this one was made completely by my kiddo with no help at all from me and I do have some decent pictures to share with all of you!
Neuron Model
Can you believe some of the popular posts on my blog include "How to make a Tooth Model" and "How to make a Respiratory System Model"!
So in case you landed on this page by googling " how to make a neuron model" let me run you through the creative process so that you can make a neuron of your own!!
Draw/Pint/Trace a Neuron
My daughter is 12 yrs and is quite good at drawing so she looked at the picture of the neuron in her Biology text book and drew a large neuron freehand. If you find free hand drawing challenging ...lightly trace or print the picture of a neuron
Neuron Model
Make it dimensional using lightweight media
To make a dimensional model on paper use thick paper as your base and avoid very heavy materials on top. If you have light weight clay such as Amos clay or Sakura clay you can make your structure using clay like in this Tooth Model we made long back.
For this model my daughter used different colors of hot glue! The cellbody and the dendrites were made using white hot glue. It is tricky to get the hot glue drawn into the thin dendrites so if you are not confident with hot glue do practise getting thin lines first and avoid hot glue altogether with young children!
The nucleus in the cell body was created by sticking on a red spiny pompom!
Neuron Model
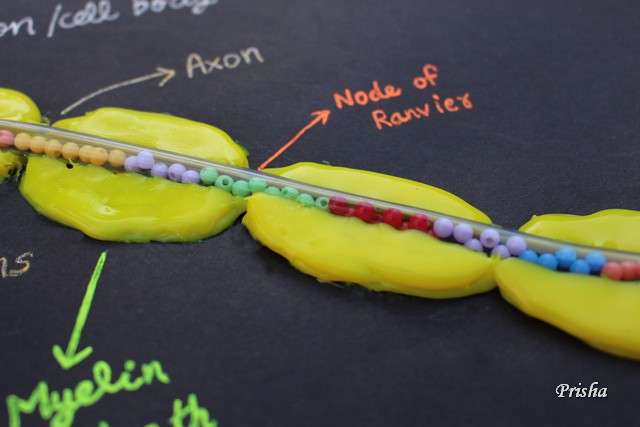
The central part of the axon[axoplasm] was made using a plastic tube filled with beads and sealed at both ends. A word of advice here...avoid seed beads as they are too tiny and don't move around well. The beads my daughter used here are inexpensive but medium weight beads which roll within the axoplasm and are wonderful to give the illusion of a nerve impulse travelling down the axon!
Neuron Model
The yellow myelin sheath of the axon was again created using hot glue. The end of the plastic tubing was split using scissors into multiple filaments to make the axon terminals and the synaptic bulbs was created using pink pom poms!
This project was a big hit in class and not only did kiddo score full marks but it was displayed on the board in her class [ which is a big deal according to her!]
Hi friends, sharing a special project- a mini album with its own box and a display stand made for Crealies using their new release of dies.I made it in a shabby chic style with flowers, lace and pearls galore
Cascading Mini Album with Stand
The album inside the box has some clever elements but is pretty simplistic in style as I wanted it to be functional but I really went to town making a beautiful box and display stand for it.
Cascading Mini Album with Stand
The display stand is pretty sturdy as it is made out of a double layer of chipboard. On the base I added a wooden fencing with grass and fluttering butterflies.
Cascading Mini Album with Display Stand
The 12 pointed star on the upper part of the stand is made with the new Crealies dies and I added lacy Crealies flowers behind for a shabby chic look.
Mini Album Stand
The stand has pink paper straws on the sides and I dangled tags with hearts and pearls on the straw on one side. It adds such a fun element to the project!
Mini Album with Stand
The display stand has a chipboard and foam base with large silver beads as feet to raise it above the ground!
Mini Album with Box and Stand
The Mini album box snugly fits inside the stand and I used the same pattern paper to create both so that they match perfectly!
Cascading Mini Album with Stand
Here is the box when you take it out of the display stand.
Mini Album with Box
Apart from the floral lace trim it is pretty simple. Dangling from one side of the lid is a silver bird cage .
Mini Album with Box
I added pearl and rhinestone butterflies and shimmering pink sequin butterflies. On one side is a large beautiful crystal heart dangling from the lacey fabric on the lid,
Mini Album with Box
And here is the back of the box....simple and beautiful with just the gorgeous floral design from the pretty paper!
Mini Album with Box
The box is has a flip top lid and is lined with pattern paper on the inside too.
Mini Album with Box
The box houses a 4 ¾ x 4 ¾ inch square mini album made with the new Crealies square dies.
Mini Album with Box
The mini album is rather special as it is a cascading album made up of 6 pockets each of which can house photo mats measuring 4¼ inches. The pockets of the mini are held together on an accordion which expands and cascades out ! The inspiration behind the cascading style is Amanda's album which she made using a kit.
Cascading Mini Album
Here is a quick video showing you how the mini album cascades out and how to make the cascading mechanism
The pockets and the photo mats were made using square Crealies dies.
Cascading Mini Album with Display Stand
I hope you liked the ideas !
Here are the products used:
Papers : K and Company Susan Winget Spring Blossom Teflon Bone Folders : from Brand Dress My Craft , Crafters Corner
Hi friends...hope you are having a fabulous day. Life has been hectic for me and I seem to be either running around frantically or just flopping down in bed! So crafting and blogging took a backseat.But it does feel good to be back to blog land to share a cute handmade gift idea : Mini Pop Up Flower Cards.
Pop Up Flower Card
These mini cards feature beautiful floral designs with lovely sentiments made using dies from Dress My Craft . These flower sentiment dies are so delicate and pretty and would look good on cards on your table, in scrapbooks and simply fabulous as bookmarks!
Pop Up Flower Card
To make these self standing Pop Up Cards you can die cut the flower sentiment dies in white card stock and color them using your favorite coloring media to enhance the detailing. I just used Distress Inks .
Pop Up Flower Card
The lovely papers you can see are from the Dress My Craft Magical Unicorns 6 x 6 paper pack. You just need a small 5 x 3 inch piece of pattern paper to make this Pop Up Card .
Pop Up Flower Card
The design I used from Magical Unicorns was so pretty I just used a few pearls to embellish the card!
Pop Up Flower Card
The flower die cuts have beautiful detailing on them but you can enhance the beauty with a sprinkling of Dress My Craft Sparkling dust to add a subtle shimmer to the flowers!
Pop Up Flower Card
These Pop Up Cards can be made with very little supplies.
Materials Used
Pop Up Flower Card Tutorial
Cardstock-3 x 10 inch
Pattern paper - Dress My Craft Magical Unicorns : Only a 5 x 3 inch strip is required: Cut this into two 1 x 3 inch strips and one3 x 3 inch square
Pop Up Flower Card Tutorial
Acetate Sheet- 2 x 6 inches- trim on the 2 inch side slightly
Adhesive- Red Tacky Tape and Liquid Adhesive like glossy accents to help stick the die cuts to the acetate without a creating a mess!!
Dies : Dress My Craft Flower Sentiment Dies
Scoring Board
Bone Folders- from Dress My Craft
Coloring Media: Distress Inks
Glitter : Sparkling Dust
I love how the sentiment acts as the stem of the pretty flower design!
These mini cards would look cool as party props on the table...what do you say!!!
Pop Up Flower Card
Video Tutorial
Here is a quick video Tutorial on the Dress My Craft channel to show you how to make these pretty and cute Pop Up Cards
Pop Up Flower Card
The "Love" Flower sentiment die is more intricately designed than the other two and is sooo beautiful !
Pop Up Flower Card
List of products used :
For International buyers- Dress My Craft