Hi friends...sharing a fun Birthday Shaker card featuring "candles". This is my DT project for the Cuttlebugmania Challenge where the theme is Candles/Light.
Candle Shaker Card
This card was easier than I thought and here is how you can make one too.
Die cut candles on cardstock and apply tacky tape on the backside and firmly stick a piece of acetate large enough to cover all the candles .
Easy Candle Shaker Card Tutorial
Stick double sided adhesive foam tape in such a way that you compartmentalise each candle .
Easy Candle Shaker Card Tutorial
Add your shaker elements....using different colors for each candle.
Easy Candle Shaker Card Tutorial
Cut a card piece to go over this and peel off the adhesive back and stick on the card piece and your Candle shaker is ready to add to a larger card base which you can further decorate!
Candle Shaker Card
The blooms are handmade foamiran flowers made with the Cheery Lynn sunflower die.
Dies :Flower : Cheery Lynn Sunflower ; Leaves : Heartfelt Creations Botanical Wings Die; Candles : Crealies Partz No 33 ;Crealies Duo Dies no. 41, Bows, Dovecraft Fairy , Spellbinders Sing It Loud 1,Tonic Studios Birthday Swirl,Crealies Set of 3 no. 41, Bows
Hi friends I love making handmade decorations and every Christmas I do try to make something handmade! Sometimes it is really elaborate and sometimes it is something very very simple.
So for my DT post for Maureen's Rudolph Days ChallengeI am sharing a quick and easy to make Christmas decoration - a Paper Starwhich is rather unique in that you can fold it and keep it away for easy storing.
Christmas Stars
These 3 dimensional stars were made with 6 squares of paper ,each measuring 12 cm[4 ¾ inches] and the complete star measures 6.5 inches.
I used the new Crealies Squash fold die[the same one I used to make the Apron Squash fold album] to quickly cut out the squares as they have the score lines in place but you can also hand-cut the squares
Christmas Stars
Since you will be able to see all the sides of these stars ,if you are using single sided pattern paper you can stamp the reverse of your squares before you assemble the squash folds into a star. You can alternately use double sided papers or make your own special Christmas stars using your favorite Christmas stamps!
Stamp the squares
You can use 5 squares to make a 5 pointed star or use 6 squares to make a more symmetrical 6 pointed star like I did.
You need not glue the last square but just hold it apposed to the first square using paper clips ! Here is the Tutorial
Dont forget to drop in at Maureen's Rudolph Days Challengewith a Christmas Project...the Challenge runs till Nov 30th and Maureen always has wonderful prizes for a random winner.
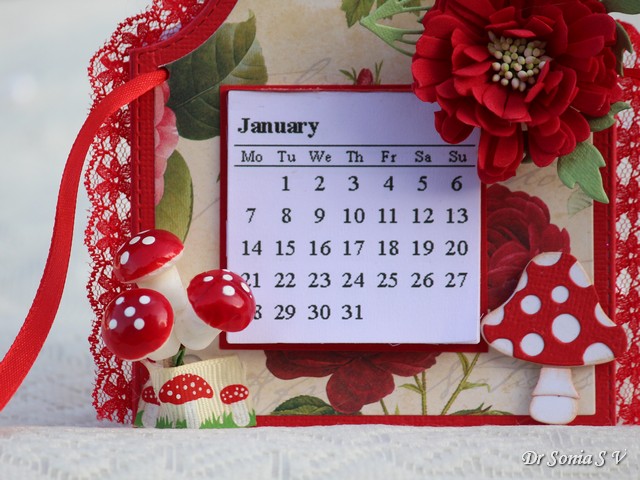
Hi friends I hope you like these Apron shaped Handmade Desk Calendars! I have always wanted to make DIY calendars but December is always a busy time and I have never ever got around to it. This time when I got the gorgeous cute Apron dies from Crealies in my DT kit, I knew they were perfect to make Desk Calendars .
DIY Desk Calendars
I made the calendars in cheerful colors and feminine with lace, ribbons and flowers as these are going to be Christmas gifts for my daughter's teachers.
DIY Desk Calendars
The cute mushroom was made with Crealies dies .
DIY Desk Calendars
Tutorial
These Apron shaped calendars have 2 sides and it will look nice if you decorate both the sides since they will sit on a desk/table and you will be able to see both sides.
You can use just 2 layers on each side but if you want to make them nice and sturdy to gift to special people or to sell here is how you can do it:
Handmade Calendar
Make the front layer with 4 apron shaped die cuts; from back to front: thick white cardstock,thick red foam [foam makes it thick and sturdy without making it heavy],red cardstock and pattern paper.
DIY Calendar Tutorial
Make the back layer using 3 layers: thick white cardstock, red cardstock
and pattern paper. The pattern paper side will face the outer side.
The lace was hot glued on and the ribbons threaded through holes made in the front half of the calendar.
DIY Calendar Tutorial
Join the top of the 2 aprons using a strip of card stock measuring 1 ½ x 1 ¾ inches and scored at 3/4 inch and 1/8th inch after that. This will give you unequal widths on either side of the scored part but it doesnt matter. The scored central part is so as to separate the top parts just a little bit
DIY Calendar Tutorial
To connect the lower halves of the 2 Aprons... a 3 x 3 ¾ inch cardstock piece is scored on the shorter side every 3/4 inches and folded into a "W"
DIY Calendar Tutorial
Apply adhesive on the outer 3/4ths and stick to the apron pieces on the lower parts. Optional : add an additional pattern paper on the inside of the calendar for a polished finish before you finish connecting the two halves.
I used a combination of tacky tape and liquid adhesive to stick the pieces.
DIY Calendar Tutorial
The W shaped connecting piece allows you to fold the calendar and also to open it out to stand nicely.It's a mechanism I adapted from commercial desk calendars!
DIY Desk Calendars
The calendar itself was printed on thin paper, cut into squares and stuck on the top part to make a tear away calendar.
Handmade Foamiran flower
The flowers you see are foamiran flowers made with Crealies dies using this Tutorial:
I hope you liked this gifting idea and that the Tutorial will be helpful to you.
DIY Handmade Calendars
They are perfectly sized to use as desktop calendars and do look cute!! I have to make 7 more of these as my daughter has 10 teachers!
Handmade Calendars
Here are the wonderful products I used from Crealies:
Hi friends...good to be back to the crafty world after a short break.
Sharing my DT project for Crealies made with the new CrealiesApron dies and Squash Fold dies.
I made an Apron shaped box and an Apron shaped mini album to go inside it!
Apron Shaped Box
Many of you will be familiar with a fun fold card the "squash fold". Crealies recently brought out a die set to make a squash fold and it was so fun to quickly put together a squash fold mini album inside the Apron!
Apron Shaped Mini Album
The mini was made using 3 squares cut with the Crealies Squash fold die.It is simple to make a squash fold by simply folding squares of paper but it is rather time consuming to decorate if you have to hand-cut . Using the Crealies dies...decorating was a breeze!
Apron Shaped Mini Album
You can use this as a regular card by adding sentiments and more decorations but I left 4 squares blank so that the recipient can add 4 little photos!
Apron Shaped Mini Album
Here is the Tutorial link to how you can put together a Squash fold Book/Album : Squash Book Tutorial