7.4.23

Rotating Triangular Box Tutorial

Hi friends sharing a special rotating box in the shape of a triangle. I once saw a rotating box in the shape of a cake some years back on Youtube and the idea stuck with me. I couldn't find the video again and so took the idea and worked out my own design.It was not easy and was a trial and error design but I am thrilled with how it turned out!
I made it to show off my Graphic 45 papers. I have used Graphic 45 Portrait of a Lady to make this project which is part of a series of projects I made for my craft room.

I love how Graphic 45 has apt sentiments which resonate so easily with most of us! I have kept decorations minimal on this box as it is going to be an everyday use item and anyway the pretty G45 papers don't require much embellishing!

Here is how the top of the box looks...with fussy cut flowers and a pearl adorned with a fussy cut rose.

The box has 3 sides and this is how it looks when opened.

There are 5 chipboard triangular supports and 4 swinging drawers made out of thick cardstock.

I hope you liked this unique box idea. 
Here is the link to the Rotating Box Tutorial 


6.3.23

Special Shadowbox

Shadowbox
Hi friends sharing a special project I made as a birthday present for my husband. He is a nature lover, an avid gardener and loves birds and butterflies . He also loves looking at houses and his catch phrase is "Enjoy". I tend to reach for Graphic 45 papers whenever I want to make something really special. So I made a special shadowbox using Graphic 45 papers and tried to incorporate all  my husband's favourite elements!
Shadowbox
I have used mainly the gorgeous Graphic 45 Artisan Style papers to make this project. 
The lovely light bulb is from Prima.
Made the peacock by layering 3 diecuts and adding pearls and glitter. Added flowers , leaves , fruits ad butterflies at different depths.

Shadowbox
A tiny bird nests on the rooftop hidden from direct view by the hanging flowers!

Shadowbox
Another little bird nests atop lovely flowers near the pillars of the house. Many of the  flowers in this shadowbox were made using the technique  of Sospeso Transparente .

Shadowbox
A pair of peacocks were  cut and layered atop the same peacock design to give a 3 D look.  I have used a lot of   flowers and butterflies fussy cut from snippets of paper and jazzed them up with glitter.

Shadowbox
Added tiny pearl  hearts on the feathers of the   peacocks.

Shadowbox
More butterflies, flowers and cute mushrooms on this corner! I used so many different dies to make the foliage as I wanted a medley of different leaves just like in nature!

Shadowbox
This picture shows the multiple layers of the shadowbox. I think from this view you can fathom the  many hours I spent making this project. It was indeed a labour of love!

Shadowbox
The shadowbox has a protective glass frame and I decoupaged it with matching paper from the same paper stack collection.

Shadowbox
Supplies used: Dies :  DMC Foliage and Leaves 9,Little Birdie Meadow Foliage,Little Birdie Fresh Foliage,Little Birdie Fern Forest,Little Birdie Fern Foliage
Papers : Graphic 45 Artisan Style, Graphic 45 Nature Sketchbook,Graphic 45 A Ladies Diary, Graphic 45 Baby to Bride for the sides of the  shadowbox

1.3.23

Mermaid Dresser

Mermaid Dresser
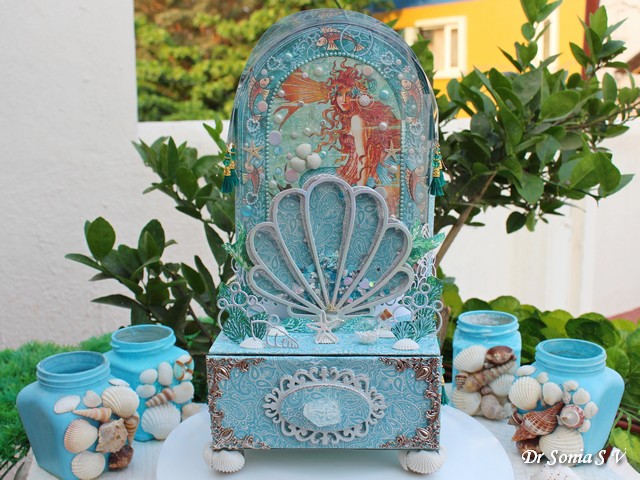
Hi friends sharing a magical mermaid dresser I made using chipboard and Graphic 45 Voyage Beneath the Sea papers. Sharing lots of pictures!
Mermaid Dresser
The dresser has a  crystal knob and silver metal corners .On opening you can see seaweed themed paper  .
Mermaid Dresser

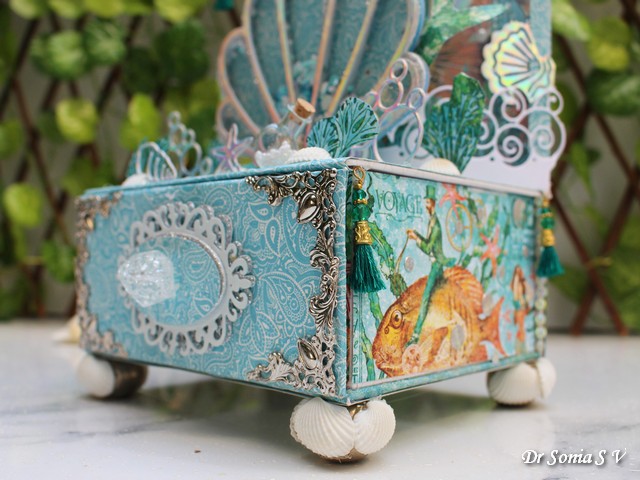
Added gorgeous  tassels all around. The feet of the dresser were made by covering large beads with shells.
Mermaid Dresser
Made the  large shell shaker in such a way that glitter and holographic paper layers are staggered .I couldn't capture the shimmer effect on camera!
Mermaid Dresser

And behind the shell is the beautiful mermaid protected in a shiny underwater sanctuary. To create the underwater look I created a dome using acetate and added an acetate hood atop it to completely seal it. I am super thrilled how it turned out as it was the  result of much experimentation!
Mermaid Dresser
Hung golden tassels from the  ends of the dome.
Mermaid Dresser

Here is the  side view showing more images from the gorgeous  G45 papers

Mermaid Dresser

Mermaid Dresser
All throughout  I added bubbles made of circles cut from holographic paper

Mermaid Dresser
The paper was so pretty I resisted going overboard with embellishments!

Mermaid Dresser
There is a beautiful mermaid at  the back also

Mermaid Dresser
With a lovely shell border made from holographic paper.

Mermaid Dresser

Mermaid Dresser

I also made matching jars for the dresser so that it is a set.

Shell Jars
This one has a deep blue star I made using resin and a mould

Shell Jars

Created them in a mixed media style with glitter and tiny pearls in the gaps
Shell Jars
I hope you liked my projects
Supplies used: Papers :Graphic 45 Voyage Beneath the Sea,Graphic 45 Come Away with Me
Dies :  Memory Box Splash Border,Little Birdie Victorian Rectangular Frame


28.2.23

Matching Pen-stand & Paper Decoration

Paper Decoration
Hi friends sharing 2 matching decorative project ideas which are perfect to showcase the favourite papers in your stash as well as use up paper scraps.
Pen-stand

I used my hoarded Graphic 45 papers to make this Origami Pen-stand and adorned it with butterflies,rhinestones and handmade foam roses.
I have a few favourite Craft Challenges that spur my creativity and my friend Brenda at All Sorts Challenge has chosen the theme "Matching Pairs" this week. I love making matching crafty projects so.....

With the paper scraps I had left I made a matching 3 D Paper Ball  decoration.

3 D Paper Ball
This is a perfect project to use up small paper scraps. I die cut 20 circles to make this paper ball. There are many tutorials on the net  on how to make this paper ball. I am just sharing some  additional tips that you may find useful.
3 D Paper Ball
Folding the circles into triangles is relatively easy  but sticking the circles is  rather fiddly and time consuming!
Use different sizes  binder clips to make your job quicker and easier while making 3 D paper-crafts !

3 D Paper Ball
The ball has a 5 circle top , a 5 circle base and a 10 circle waist! 

3 D Paper Ball
Tip : To get a fairly strong paper ball to which you can add a heavy dangler , add a strong thread/twine to the ball before gluing shut the parts as shown .
3 D Paper Ball
If your twine is thick like the one I used...stick it to the paper using a god adhesive like tacky glue or a quicker option like hot glue. Add a bead to the top and base to add interest as well as hide the teeny gap you may get.
Paper Ball
Add beads ,tiny flowers or butterflies like I did here to the  joints as how much ver care you take in gluing.....some joints tend to have gaps! And if are someone like me who gets bothered by such things...this is the perfect crafty solution to that!


3 D Paper Ball
A fun addition to this paper decoration is adding paper discs. Make the paper discs strong by adding foam supports to fit around the twine 
3 D Paper Ball
Once you glue the foam and twine add another paper circle atop the twine and foam . This way your paper disc is well supported and doesn't wrap yet remains lightweight.

Another scrap busting idea is to make paper beads .I made matching beads using a paper bead maker which is actually a toy I had got for my daughter years back but is  a cool crafty tool to use for your crafty projects.

Hehe ever since I became more disciplined and discerning at craft shopping I have been discovering new craft tools and supplies right at home!!!

3 D Paper Ball
I added butterflies I die cut from paper scraps to the paper beads and finished it off with tassels.
Paper Decoration

Here is how it looks.


Supplies used: Dies : Flower made with Little Birdie Florentia,Leaves -DMC Foliage and Leaves 9,Cheery Lynn  Rose Leaf Strip; Butterflies- Little Birdie Butterfly Medley ,Sizzix- Hero Arts Stamp- Die Set - 657776; Circles -Crea Nest Lies XXL No 84, Sizzix 3D Circle Ornament
Papers : Graphic 45 World's Fair
Linking to  
All Sorts Challenge-Matching Pairs
This Project was honoured at the  Butterfly Challenge . Thank you so much !

24.2.23

3 D Hot Air Balloon Shadow Box

Hot Air Balloon Shadow Box

Hi friends I am on a mission to use my craft supply stash , especially my hoarded papers .Sharing a shadowbox  made with my stash of Graphic 45 papers and featuring a 3 D Hot Air balloon 

3 D Hot Air Balloon
The  Hot Air Balloon was made using a Spellbinders die [also featured in this post : Travel Themed Card].Added flowers fussy cut from the papers over the balloon.

3 D Hot Air Balloon
Added clouds cut from glitter foam as a border around the balloon and also on the top of the shadowbox.Made the clouds appear at different depths by propping them on different length of rolled foam cylinders  .

3 D Hot Air Balloon
My favourite is the glass ball with crystal beads. Hung it from the foam cylinder support behind the cloud.

3 D Hot Air Balloon
Made the dreamy bench by staggering and layering silver and white bench die cuts and giving it a turquoise blue background .

3 D Hot Air Balloon
The bicycle  was made by layering 3 layers of glitter foam and cardstock so that it was thick enough to stand on it own.

3 D Hot Air Balloon
All the roses were handmade using dies and foam.

3 D Hot Air Balloon
I hope you liked this project.

Supplies used: Dies :  Flower- Little Birdie Florentia, Leaf - Cheery Lynn  Flourish 13, Magnolia DooHickeys Lovely Fence,Memory Box  Hanging Cloud Border, Bench-Marianne Designs LR0258,Cloud -Little Birdie - In the City,Spellbinders  Hot Air Balloon Contour Steel Rule Die. Oval-Crealies- Crea Nest Lies XXL No 51

Papers: Graphic 45 Baby to Bride

Linking to  Shopping Our Stash Letter B - Balloon,Bicycle, Bench. Not a single item is new in this project. Used hoarded papers and embellishments!

Outlawz Paper a la Mode

Not Cards : I love....diecutting,3D papercrafts and hot hair balloons

Related Posts Plugin for WordPress, Blogger...