Hi friends it's cold here in Bangalore and to bring in a little warmth, I made an altered box with warm golden hued flowers!
Hibiscus
The Hibiscus is a popular flower in India and though I am no stamping- inking expert I was happy I could get an ombre like gradation of colors on my gold embossed Hibiscus [ made using Ryn's gorgeous stamp] using several shades of Distress Inks .
I made the yellow- green background using Distress Inks and created the white dots using a white gel pen similar to my Happy Ombre Stars Card.
Thai Clay Flowers
I love making flowers from different media and the Plumeria flowers and buds you see on this box were made usingThai Clay [ also seen in this project : Thai Clay Plumeria Bonsai]
Altered Box
And if you are wondering what treasures my altered box holds.....hehe I am just using it to store some die cut flowers soon to be made into 3 dimensional blooms!
Thai Clay Flowers
The white cardstock on the background has a brick design embossing and I inked the edges in shades of green and brown .
Altered Box
The corners of the box have metallic filigree corners and one corner has a fluttering golden butterfly with a rhinestone chain and some magical golden balls and jewels!
Thai Clay Flowers
Thai clay is pure white and once I made my plumeria flowers, shaded the centers using a paintbrush and yellow oil paint .The stems of the flower buds were shaded green using finger tips dipped in green oil paint!
Thai Clay Flowers
I hope you liked my altered box with its summery blooms!
Edited :This project was lucky winner at Mrs A 's Butterfly Challenge theme Inking
Also I am so thrilled it was featured amongst the Top 3 at Stamping Sensations
Hi friends Thank you so much for the encouragement you showered on my CAS Ombre Stars Card. I loved the ombre style so got out my new "Hearts"Winnie and Walter stamps and tried to make another fun ombre card!
Heat Embossing
I used a Hero arts background stamp to make my background : involving heat embossing and sponging with Distress Inks ! The Thank you is a Marianne glitter foam die cut and I love how easily we can use foam to pop a sentiment from the background !
Pink Heart
The hearts are all heat embossed in "wow ultra shimmer" and sponged in different shades of pink.I popped them on adhesive foam tape before adding them to my ombre background !
Handmade Rose
It felt good making handmade roses and rose buds after ages. Here is the tutorial : Easy Rose tutorial . I love "leaves" and on this bloom too I added a variety of die cut leaves [ names of dies used listed at the end of the post]
I hope you liked this simple card!
Hi friends first of all Thank you so much for all the love showered on my Mixed Media Mini Book.....crafty friends are the best!! You girls have definitely boosted my morale to continue my experiments with mixed media!
Sharing yet another project which is out of my comfort zone....a CAS design ! I made this "Happy" Card for my Guest Designer Post for ICR CAS Challenge !
Ombre Creation
This is my first try at an ombre technique. I used different shades of blue ink on white cardstock and die cut the "happy" from it. This style of card seemed a perfect chance to showcase some of my new stamps from Winnie and Walter. I heat embossed 3 goldenstars and colored them in different shades of blue.
Ombre theme
Layered my golden stars on an ombre inked card panel . To make the ombre look more lively I added little dots using a white gel pen. Used a star embossed white card stock with a few star sequins [a gift from Winnie and Walter]to bring all the elements together.
I hope it has turned out okay. My in-house critique [ my 9 yr old crafty daughter] on seeing this card exclaimed " Who made this Amma?" [ amma is malayalam for mom ] and when I asked her how it was she just said "its not your style at all"! I guess that meant I better stick to layered flowery cards and projects in future !! Supplies : Dies : Winnie and Walter Happy Cutaway. Embossing Folder : Itsy Bitsy Stars. Stamps : Winnie and Walter True Star Sequins : A gift from Winnie and Walter Ink pads : Artistry Ink Pads Ocean Reef,Midnight blue; Distress Inks Tumbled Glass, Peacock Feathers
Handmade Mini Albums seem to be very popular nowadays but if you are like me and find the prospect of making and decorating numerous large album pages daunting, here is a super easy version: A mini book made from a single 12 x 12 paper!
Mixed Media Mini Book
This mini book has 16 pages you can write on or add photos to and 7 pocketsto hold tags. If you have a pretty pattern paper you want to showcase this is the perfect project! The gorgeous paper I have used is from Papericious.
Mixed Media Mini Book
This mini book is rather easy to make and involved just simple scoring, a few snips and accordion folding. Tutorial links
Pictorial version of the Mini Book Tutorial - Show how to create mini book pages and the cover and add a strong fabric spine Mixed Media Style Book Cover Tutorial -Shows tips on how to embellish in mixed media style
Here is the video tutorial
Mixed Media Mini Book
Now onto the front cover of my mini book...I tried on a few mixed media tricks and techniques...yes way out of my comfort zone!
Stencil and whipped Spackle
Before I could convince myself mixed media was not my thing and I better leave it to more talented "artists".....I used whipped spackle [ a product I am by now comfortable with] on a memory box stencil [ my first branded stencil!] and could create a lovely textured pattern!
Mixed Media Mini Book
The initial success gave me courage to add on a few more elements....tiny glitter balls, glass beads gel and some chunky glitter!
Texturing Media
My mini book cover measures just 3.5 x 3.5 inches and so experimenting with mixed media techniques to jazz it up did not feel too overwhelming!
Mixed Media Mini Book
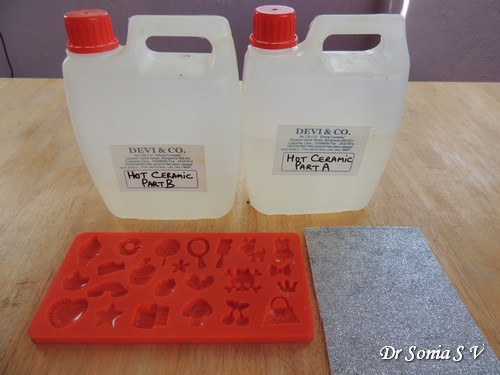
The crystal heart on the center of my mini book is a handmade resin embellishment I made using a Martha Stewart mold and resin components [ in the big white cans]
DIY Resin Embellishment Making
My resin "heart" was transparent and looked mottled on the textured background so I added a backing of silver paper to give it a subtle sparkle!
Mixed Media Mini Book
Apart from Distress inks I didn't use any paints or sprays but relied on the beauty of the pattern paper background to create different hues!
Mixed Media Mini Book
My daughter loves anything small and cute and has promptly claimed this mini book as hers! She says she is going to use it as a Birthday Book .
I was quite happy with it myself since it was a first of sorts but unsure if you all think it looks cool......What do you think my friends....?
Supplies : Dies : Poppy Stamps Pinpoint Main Street Tags
Hi friends, one of my crafty resolutions for the year is to make more home decor and functional crafts.Many of you who visit me will be knowing I am an ENT Surgeon.The photo below shows part of my "patient examination unit" at my clinic.
The Patient Examination Unit at my Clinic
Endoscopes form a very essential part of ENT examination these days and recently the thermocol box housing my endoscope camera head broke [ shown by the white arrow] and I decided to use my craft supplies to make a DIY box !
Foam Box
Endoscope cameras are very expensive and I needed to make a box which was both sturdy and soft! I lined an old mobile phone packaging with foam sheets both on the inside and the outside. For additional protection I added several pads of packaging sponge within the box.
Foam Box
I made a wedge on the front of the box for the camera wire to exit and this part was also lined with the foam sheet.
Foam Box
I kept the embellishments to a minimal with just a few heat embossed parchment flowers and die cut lace borders in silver cardstock.
Though from a crafty point of view it is such a simple box...I felt so gratified once it was completed!!What do you say my friends?
Supplies : Dies : Joy Crafts Lace, Heartfelt creations Sun kissed fleur, Marianne Designs Anja Leaf 3. Stamps : Heartfelt creations Sun kissed fleur Linking to
Peek- a-boo Designs : Colors chosen- blue, green , white .Stamps : Heartfelt creations Sun kissed fleur
Hi friends Thank you so much for the enthusiastic appreciation of my Step Card.Sharing a simple Pop Up Card I made for a nature lover friend of mine
Pop Up Card Embossed Butterlfy
The popup element in this card is a trellis with flowers growing on it and butterflies fluttering by!
Pop Up Card Butterfly
I didn't want to add lot of bulky leaves on the trellis so instead stamped my greenery on the background card .
Pop Up Card
The cute little orange flowers you see all over my papercrafted garden are rather easy to make using circle punches and here is the tutorial : Easy Circle Punch Flowers
Pop Up Card
And that is how the Pop Up Card looks from the side! Supplies : Dies :Marianne Designs Fence, Heartfelt creations Classic Leaf,
Wild Rose Studio Floral Frame , Cheery Lynn Butterfly,
Cheery Lynn Flourish Leaf strip ,
Sizzix- Hero Arts Stamp- Die Set Flowers and Butterflies
657773 , PoppyStamps Meso background
Stamps : Heartfelt creations Classic Leaf,Sizzix- Hero Arts Stamp- Die Set Flowers and Butterflies 657773
I love how our blogger friends can inspire us to challenge our creativity.My friend Alice known to many of you as Scrapamondo has recently been sharing lovely step Pop Up Cards...she made them using a die but since none of the sellers in India sell that particular die, I played around with some measurements and hand cut and folded away to create my version of a Fancy Fold Step Card.
Glitter Foam "Happy"
I used my new Marianne Lily and Forget me not flower dies as stencils to ink the die cuts to create the blue- white flowers. The Happy is a glitter foam die cut[ Winnie and Walter]
Step Pop Up Card
Blue- white and a dash of green look good together doesnt it!
Pop Up Card
The center panel has Tattered lace flowers with foam putty centers[foam putty was borrowed from my kiddo without letting her know!!]. The leaves you see on all my panels are stamped, die cut Heartfelt creations leaves.
Parchment Flowers
My last panel has parchment flowers heat embossed in white with tiny blue forget me not flower branches and a delicate yellow butterfly!
Fancy Fold Card
Here is how the card folds flat for mailing.
I hope you liked my new year card made with tons of new supplies I got during a recent shopping spree at my friend Priya's shop
I dont have a tutorial for my card as it was just an experiment which turned out right but the talented Selma has a useful template for the 5 step part.
Supplies :Dies : Winnie and Walter Happy Cutaway, Elizabeth Craft Designs Happy New Year,Spellbinders Donna's Alphas, Tattered Lace Lacy Rose, Memory Box Precious Hearts,Memory Box Pippi Butterfly,Memory Box Rounded Fence ,Heartfelt creations Sun kissed fleur ,Heartfelt creations Botanical Wings ,Marianne Designs Anja Leaf 3,Marianne Designs Anja Leaf 1,Marianne Craftables Tiny's forget me nots CR1307, Marianne Craftables Tiny's Lily CR1306, Stamps : Heartfelt creations Botanical Wings, Heartfelt creations Sun kissed fleur Papers : DCWV
Edited : This card was featured by Di at her Pixie's Playground...Thank you so much Di !
Hi friends, starting this year's projects with Nature's Craft celebrating new life!
Recently on a holiday in Goa I chanced upon a fallen branch of a coconut tree with half a dozen weaver bird nests attached to it.
Coconut Tree
Weaver Birds are nature's amazing architects and just look at their beautiful nests!The nests you see in the photograph below is actually hanging high up on the coconut tree.This particular coconut tree in our resort had at least 2 dozen weaver bird nests!
Weaver Bird Nest
The nests which had fallen to the ground along with the tree branch were fortunately empty and I like to think all the baby weavers are flying happily over the beautiful green fields in Goa!
Weaver Bird Nests
We couldn't spot a real weaver bird but most of them are yellow in color so I added a cutie yellow bird to the nest!
Altered Project
And some pomegranate!
Pomegranate Pollen
And a golden yellow butterfly amidst the flowers!
Golden Butterfly
A yummy gorgeous addition [ a treasure I got from the local market]
Yummy Pollen
How to make an easy Floral Branch
Floral Sprays
Since my nest was a natural one and I think taken a bit of wear and tear as it had been on the ground for some time it was rather friable.I didnt want to subject it to a lot of heat from the glue gun so to add flowers to the nest I made a floral spray.
Flowery Branch Tutorial
Sharing a simple tutorial on how I made it! Store bought flowers ,leaves and pollen with floral wire stems are the easiest materials to make a floral branch.
Easy Flowery Branch Tutorial
Take 2 flowers and keeping one slightly above the other simply twist their stems together.
Easy Flowery Branch Tutorial
While you twist you will have one stem longer than the other. Keep adding more flowers, leaves and pollen by twisting the stems.
Flowery Branch Tutorial
Its so easy to create a beautiful floral branch by just twisting on flowers and leaves!
Flowery Branch Tutorial
Just give yourself enough floral stem length when you add new flowers to the branch you have already created as that way you can twist and turn the flower or leaf to adjust its final position when you add your branch to your project!
Flowery Branch Tutorial
Once you have a desired floral branch ready you can go in and add more pollen/ leaves or flowers in gaps by simply twisting them in! You dont have to touch a glue gun at all!
Flowery Branch Tutorial
To add them to my nest I used bits of floral stem wire and wound it in and out of the nest gently and twisted it loosely to secure it! Since my floral branch goes around the nest's full length I secured it in several places.
Chipboard Hearts
I added 2 birds to my nest and 2 gorgeous chipboard scroll hearts!
Quilled Butterfly
So many flowers need a beautiful big butterfly...so here is my quilled butterfly fluttering by!
Altered Nest
I hope you liked my Altered Nature's craft , a gift from nature !