Showing posts with label Recycling Craft. Show all posts

19.2.23

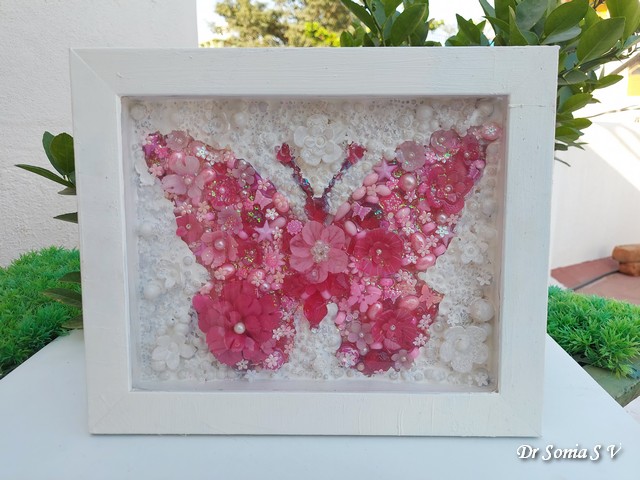
Mixed Media Butterfly


Resin Art
Hi friends if you have been crafting for a long time I guess you must have accumulated a lot of bits and bobs which you don't feel like binning but don't really like using either. Sharing an idea to use up those unwanted unused paraphernalia...a mixed media collage project!
Mixed Media
Altered an old brown plastic frame to make this project. Gave multiple coatings of gesso and white paint to myriad ghastly coloured beads and odd embellishments to make the white background .To make the butterfly  I  found I didn't have a lot of pretty pink  embellishments so had fun making new flowers using snippets of shrink plastic. 

Brought it all together with a sprinkling of pink flower sequins and a resin pour!

Hope you like this idea 

Linking to  

Pixie's Snippets Playground ---used all snippets literally to bring the whole project together

NBUS Challenge

All Sorts Challenge- Anything with option "wings"

Simon Says Monday Challenge- Frame it

Creations in Pink

Shopping Our Stash - B for Butterfly

Edited : Thrilled to be chosen as Top 5 at All Sorts Challenge- Anything with option "wings"


12.1.20

Unicorn Theme Party

Unicorn Theme Party
       Hi friends one of my crafty resolutions for 2020 is to get back to sharing crafts with my friends in blog-land and other social media. My daughter and I made so many things in 2019 but photographing and sharing the  projects online took a huge backseat. I had raised the bar on myself and felt either the  projects were too simple or the  photos were subpar or life simply got in the  way and I ended up sharing very few of my projects last year! Trying not to let self doubt and procrastination get in the  way this year!
Unicorns are so popular with both children and adults and we celebrated my daughter's 13th birthday with a super fun Unicorn theme party.
Unicorn Theme Party
My daughter's birthday falls on May 30th and she has summer vacations in April and May ...so every year we spend a good chunk of the  vacation planning her birthday.
We had the  party in our living room so we  put up the  main decorations in our living room.We had a pink and white balloon arch at the  doorway to our living room.
Unicorn Theme Party
We put up pink and white balloons and large flowers all over the  room but concentrated majority of the  unicorn decorations on this wall. You can see a huge handmade Unicorn banner,cute  clouds and rainbows ,a rainbow unicorn, floating hot air balloons and nearly a dozen decoupaged unicorns!

Unicorn Theme Party
The hot air balloons were die cut using the Spellbinders  Hot Air Balloon Contour Steel Rule Die and yes it did take hours to make the  balloons 3d! .My daughter helped to layer the  balloons atop Crealies  oval die cuts and we topped off the  hot air balloon danglers with die cut clouds [ made using Itsy Bitsy clouddie]
Unicorn Theme Party
The balloons dangle from blue satin ribbons and I added  clouds [ made using Memory Box dies]  on alternate ribbons.They looked fabulous swinging in the  wind!
Unicorn Theme Party
We put the  letters of  our "Happy Birthday Prisha" banner on Unicorn faces.The ears and face were made using Crealies  oval foam die cuts ...we could have added unicorn horns but my daughter wanted them to be plain horses!!The tiny floral stamps are also from Crealies  and the  flowers were also die cut with Crealies  dies.
Unicorn Theme Party
 My kiddo made the  Cloud hanging decoration freehand...aren't those cloud eyes simply adorable !!
Unicorn Theme Party- Rainbows and Clouds Decoration
The rainbows were pretty easy to make...we used  foam with rainbow colours and cut out big semicircular arches to make the  rainbows and added Memory Box die cut clouds on the  ends.
Unicorn Theme Party Cloud Pinata
 My little girl[ well officially a teenager but a little girl to me!!] made the  super cute cloud pinata all by herself...in fact she took hours to make it but it does look super adorable doesn't it!
Unicorn Theme Party 
She also drew and colored this gorgeous huge Unicorn..the  locks of hair are outlined with glitter glue and looks really special !
And here is the  birthday girl! The gorgeous hair bow is handmade...I made the  beautiful rose and foliage using foam !
Unicorn Theme Party
We had around 20 teenage girls for our party and planned some simple crafts for the  girls to make . We set up 4 big tables and here is how our table looked.
Unicorn Theme Party
And this is what the  girls made...Unicorn post it note holders. I cut up pieces of chipboard before hand so that the  base would be strong and pre-scored card stock stands for the  holder.Gave the  girls an assortment of pretty pattern papers to choose and lots of embellishments like rhinestones, pom poms , flowers, sequins and glitter to personalize their Post it note holders.
Unicorn Theme Party
The girls also played quite a few games but I didn't have to stress too much about the  games as my daughter herself organised all the  games !!
It was heartening to see the  girls enjoy themselves and after the  party so many of the  girls' mothers messaged me how much the  girls' enjoyed themselves!

I made quite a few Unicorn themed decoupaged decorations and since decoupage is such a time consuming craft ...I started making all the  decorations weeks before the  party!
Unicorn Theme Party
 Upcycled an old plate into a Unicorn!!
Unicorn Theme Party
And recycled a bottle into a Unicorn...this time with a frilly ruffled ribbon top and  pearls!!

Unicorn Theme Party
Made the  Unicorn themed boxes to hold our craft activity supplies by upcycling cardboard boxes
Unicorn Theme Party
And since every party needs tissue boxes...Unicorn tissue boxes!

Unicorn Theme Party
Made 3 Pen stands by recycling old Nutella jars into Unicorns!
Unicorn Theme Party
They are my personal favourite!
Unicorn Theme Party
I don't have a good photograph of our cake  but here is our 2 tier homemade Unicorn cake...It is a chocolate cake with butter icing done using Russian nozzles. My daughter made all the  cute  unicorns by hand sculpting fondant!
Unicorn Theme Party- Home made Cake
And though no unicorns in this one...I have to share it as it is always so popular at parties...a Jelly Flower cake...completely handmade with Jelly! [I am especially proud of  how it turned out as I managed to make it in between the  mad rush of getting the  house cleaned , putting up the  party decorations , baking and icing the cake and cooking for the  party!!]

Unicorn Theme Party- Jelly Cake
I hope you enjoyed reading about our party and hope some of these ideas may be useful !
Here are posts from our previous themed birthday parties:
A Frozen theme Party
Minion themed Party
Giant Paper Flowers Tutorial
Egyptian themed party - Scroll Invitations
Egyptian themed party - How to make a huge Mummy
Egyptian Themed Party- Framed Decorations Tutorial
Rapunzel Theme Party

12.10.17

Altered Pen-stand and Card Set

Altered Pen Stand
 Hi friends.....I somehow just love making pen stands! Not only are they  super useful but they offer an opportunity for recycling as well! This one too like the one in the previous Napkin Decoupage Tutorial post was made by recycling a metal tin.
I made a garden with cheerful handmade yellow chrysanthemums, sparkling magnolias  , hanging vines and a cute bunny.
Altered Pen Stand
The background is a bright cheerful yellow honeycomb pattern paper and to make it even more cheerful and happy I added cute fluffy dangling pompoms all around !
Altered Pen Stand
My garden has a gorgeous felt bicycle and a huge smiley felt flower both of which are gifts from my  blogger pal Priyanka Mathur
Altered Pen Stand
Sunny yellow is such a cheerful color isnt it and I hope my pen stand makes you smile!
I also made a matching card in bright yellow featuring a felt house and handmade magnolias.
Handmade Magnolias Card
I didn't have the same pattern paper I used to make the pen-stand but could recreate the honeycomb background pattern using ink pads and a honeycomb stencil .To my surprise and delight even the size of the honeycombs in the card and the pen stand turned out the same!
Stenciling
I find participating in Challenges fun as I get to venture out of my comfort zone and experiment! Tried the  smooshing technique by  spraying paints on my craft mat and smoooooshing the die-cut "cheers".
3 D Layering
I must admit I was not too happy with how it turned out ...a bit too artsy looking !! I  have tried to salvage it by layering it over 2 more "cheers" and making it  3 D. What do you say my friends.....?

Supplies used to make the  Pen Stand : Dies :  Magnolia DooHickeys Lovely Fence, Spellbinders Magnolia, Cheery Lynn Chrysanthemum Strip,Cheery Lynn  Rose Leaf Strip, Cheery Lynn Grass Border ,Poppystamps Weeping Willow Branches
Stamp and Die Sets : Heartfelt Creations Woodsy Critters - rabbit, Sizzix Framelits Die set 5 with Hero Arts Stamp Butterflies 3 No 657773

Supplies used to make the Card
Dies : Winnie and Walter  Essentials Audrey Cutaways ,Winnie and Walter Cheers Cutaway ,Spellbinders Magnolia,Spellbinders Delicate Doilies,Cheery Lynn  Rose Leaf Strip.

11.10.17

Napkin Decoupage Ideas and Tutorial

Napkin Decoupaged Projects
        Hi friends, I am sure many of you have seen gorgeous projects with textured decoupage...I especially love the projects where crafters decoupage on rope to give a ridged texture effect.
I usually don't have the patience for decoupage but I wanted to use this doggy themed tissue paper which I had picked up from the dollar store during my visit to the US last year and so came up with some fun easy ideas.
Napkin Decoupaged Box
This is a cardboard box recycled and given a second life  with the gorgeous puppies themed napkin.
Parchment Flowers
I love the delicate look of parchment/ vellum and so added quite a few parchment flowers made by heat embossing and die cutting the Heartfelt creations  Sun kissed fleur stamps - die set.
Napkin Decoupaged
The whole box was lined with corrugated white paper before decoupaging and that is the secret to the textured decoupaging!!He-he yes it's the lazy crafter 's route to decoupaging!!
Napkin Decoupage Tutorial 
My tissue papers which are from the dollar store were not the typical 3 ply[ has 3 layers] but 2 ply and so had only 2 layers.
Napkin Decoupage Tutorial 
Whenever you are decoupaging with napkins...remove all the layers except the top design layer...otherwise you can end up with a mess while decoupaging.
Napkin Decoupage Tutorial

My favorite decoupage glue is Mod Podge as I find it has the best consistency and is the easiest to use. You can use either a paint brush or a foam brush to apply the Modpodge...I hate the waste which the foam brush inevitably produces so almost always use a paint brush...just remember to wash your brush immediately after use [ or if you are lazy like me just dunk it into a jar of water till you can tear yourself away from the project you are working on!]

Napkin Decoupage Tutorial 
Now the trick to getting textured decoupage effect without going to a lot of trouble...apply modpodge on the corrugated base, lay your tissue paper on top and use a squeegee or something similar to gently glue your tissue paper into the ridges.

Napkin Decoupage Tutorial 
If you have an impatient nature/ rough hands...here is an easier way....lay a sheet of parchment paper on top of the napkin and ease it into the ridges of the corrugated paper!

Napkin Decoupage Tutorial 
I hope you can see the lovely ridges!

Napkin Decoupage Tutorial 
Patiently allow time to dry and finally apply 2 or more coats of mododge over the napkin again allowing enough time to dry. Varnishing is optional.

Decoupaged Box
My set has a pen-stand made by recycling this metal tin salvaged from the operation theater!
Napkin Decoupage Tutorial 

Tip: A white base is the best for napkin decoupaging as it brings out the design of the tissue paper best. You can use gesso if you plan to add more artistic flair or directly apply white acrylic paint/chalk paint.
Napkin Decoupage Tutorial 
I didnt add corrugated paper but simply brushed a coat of mod pode and stuck the napkin.
Altered Tin

Those puppies look adorable dont they?
Altered Bottle
I went all crazy with metallic pearl paints on this bottle and that is why the decoupaging looks a bit dark...in retrospect I think a white base would have been better.
Napkin Decoupage 
The bright parchment flowers with their huge button centers on the neck of the bottle are the cheerful elements!
Altered Bottle with Parchment Flowers
Lastly being first and foremost a card maker at heart...I just had to make a simple CAS card with the gorgeous tissue paper!
Napkin Decoupaged Card
This one was made by decoupaging the tissue paper on corrugated paper and then matting on card stock.
I hope you liked these easy  napkin decoupage projects.

Related Posts Plugin for WordPress, Blogger...