
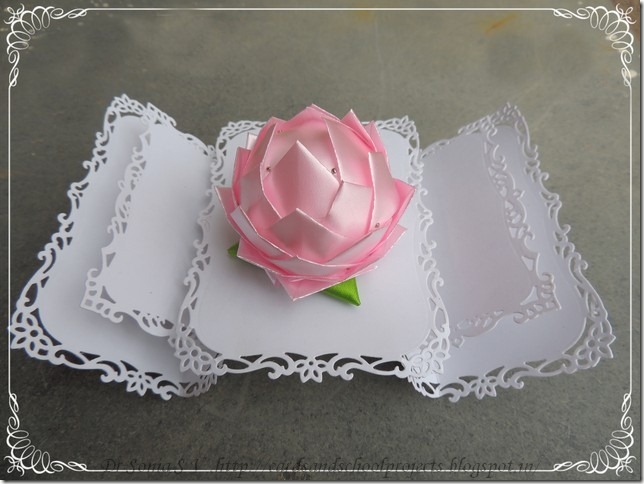
Thermocol craft lotus
For quite some time now I have been fascinated by thermocol /styrofoam ball ornaments .
You can dress up thermocol balls with ribbons,fabric scraps,pretty paper ,sequins or beads [lots of ideas!!]
I had a bit of a tough time following some of the pine cone tutorials on the net and finally decided to make my own version…it turned out looking like a lotus!!
Thermocol craft lotus
So sharing how we made our thermocol lotus ball!
Materials Required for the Thermocol Ball craft
 |
| Lotus flower tutorial |
- Thermocol balls – we used 2 inch sized ones. If you are not able to get a thermocol ball dont worry you can still make your lotus using a plastic ball but instead of pinning you will have to do a lot of gluing !
- Ribbon ,fabric or paper -I used 1 inch width pink ribbon.Use sizes and colors you want.
- Pins
- Scissors
From the pink ribbon Cut one square[ 1 x 1 inch] and many 1 x 2 inch rectangles [cut rectangles double the width of your ribbon/paper]
 |
| Lotus tutorial |
Fold the rectangles into triangles by folding up the lower corners to meet the upper edge.
 |
| Ribbon flowers |
My ribbon is kinda satiny and stiff like paper so I could fold and the creases remained
 |
| Ribbon flower tutorial |
If you are using fabric or normal ribbon you will have to hold the fold with your fingers
 |
| Ribbon flower tutorial |
When you have folded up the other corner you will get a nice triangle.Doesnt matter if you get imperfect overlapping edges!
 |
| Ribbon flower tutorial |
Pin the square onto the thermocol ball
 |
| Ribbon flower tutorial |
Take the triangle you had folded and Pin the lower 2 corners of the triangle on to the corners of the square as shown keeping the flaps hidden inside.
 |
| Ribbon crafts |
Keep pinning triangles to cover adjacent corners of the square keeping the lower edges of the triangles in a line on the thermocol ball
 |
| Thermocol Ball crafts |
You can even use one pin to hold 2 adjacent triangle corners as you get used to pinning on the thermocol ball!
 |
| Thermocol Ball crafts |
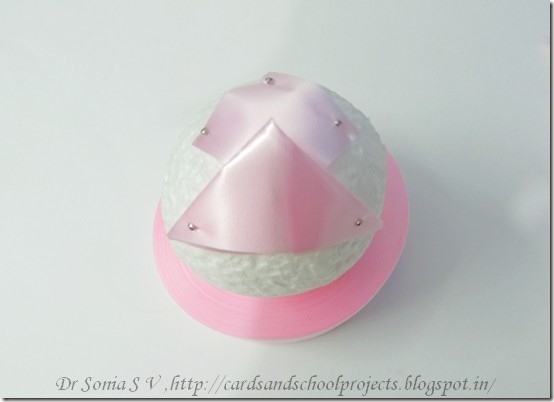
On completing a layer of triangles atop the square start pinning the next layer lower down .
 |
| Thermocol Ball crafts |
My next layer also had just 4 triangles. Here is the side view showing how the triangles are overlapped on the thermocol ball
 |
| Thermocol crafts |
Complete the thermocol ball lotus by pinning more triangles and finishing off with green ribbon leaves!
Do tell me how you like this thermocol - ribbon Lotus!!
I think it would look cool as a home decor and for religious souls I guess it would be lovely as a Pooja decoration for goddess Lakshmi!
Where to buy Thermocol Balls ?: Try your local fancy store.If you are in Bangalore its available cheaply in many sizes at a Packing Material Supply shop in Ebrahim street[ parallel to Commercial street].Also available at Itsy Bitsy. You can also check out my compilation of
Craft Supply Stores in India
Edited :this project got Honorable mention at
Crafter corner Festive theme


Its lovely lotus ! Wonderful decor idea...that too without any glue...Seems you are on roll thrid post in a row !!!!
ReplyDeleteYour Lotus is beautiful and so well crafted. Love the stand, too.
ReplyDeleteHow pretty~
ReplyDeleteAwesome lotus from ribbon, well done!!!
ReplyDeleteIt is amazing what you can do with a bit of ribbon and Styrofoam! Wonderful flower Dr. Sonia and beautiful card with those amazing die cuts. NancyD
ReplyDeletewow!!! very nice.. i think this when made with smaller ball and smaller ribbon would look like a pine cone :) very beautiful....
ReplyDelete-Berina
Moxie Craftie
Lotus is amazing..Loved it.. done pineapple using fish wire..
ReplyDeleteWow, wow, wow, Sonia, this is absolutely stunning!! The lotus flower looks amazing!! I love how you created it - thanks for the awesome tutorial!! Not only is the flower gorgeous, but the base is as well!! This is fabulous!! Have a great day :)
ReplyDeleteLisa
A Mermaid's Crafts
WOWW! How cool Sonia. I love this technique..Loz
ReplyDeleteThank you so much Loz I am sure you will make an amazing Xmas ornament with it
DeleteAnother fab tutorial. A perfect Lotus flower. Keep them coming! Hugs Mrs A.
ReplyDeleteThank you so much Mrs A. I am just getting around to post all the crafts done the past couple of weeks!!
DeleteThis is really lovely, Dr. Sonia.
ReplyDeleteThank you so much Teresa..I was lucky to get a satiny paper type ribbon which made the pinning super easy
Deletesuperb lotus tutorial and it is so pretty Sonia, thanks for sharing
ReplyDeleteThank you so much Shylaa ...I guess the pretty look is courtesy the gorgeous ribbon
DeleteVery pretty. I love your lotus flower the color is perfect and the base is just as pretty as the flower.
ReplyDeleteThank you so much for dropping by Diana
DeleteVery pretty. Thanks for showing how you made the flower. Thanks for stopping by my blog too.
ReplyDeleteThank you so much for visiting Terri
DeleteSuch a perfect lotus. Wen I saw it I was wondering how it cud be done. Thanks for de tut
ReplyDeleteThank you so much Sujana....that is why I always tree to share a step by step if I can!!
DeleteWonderful idea...n the lotus is looking fabulous..Thanks for sharing it Dr. Sonia.
ReplyDeleteThank you so much Shalu...it looks terrible as a pine cone but passes ok as a lotus!! Ha Ha
DeleteThis is lovely!! Adding this in my 'must try' list!! :)
ReplyDeleteOh good Ayushi...its a fab way to use up ribbon and scraps
DeleteWhat a beautiful lotus 3D flower Dr Sonia! You always seem to come up with such lovely ideas. I seem to have missed quite a bit of your posts. Especially love the poppy pop-up card tutorial and today's tutorial as well. You make it seem so easy :)
ReplyDeletewelcome back to blogland Hussena...missed your sweet comments and creations
DeleteThis is so beautiful! Thank you for the tutorial!
ReplyDeletePam
scrap-n-sewgranny.blogspot.com
Thank you so much Pam
DeleteThe lotus flower is beautiful..so easy to make..Gorgeous project Dr. Sonia!! thanks for the easy tutorial...
ReplyDeleteYes Jaya it was quick to make and even my kiddo chipped in
DeleteThanks for the tutorial Doctor. I am sure I am going to try this soon.
ReplyDeleteThank you so much Suganthi
DeleteWow!! beautiful lotus.. love the way you did Dr Sonia.. Thanks so much for sharing this wonderful tutorial..can't wait to make one for my room decor.. :) thanks for the lovely words on my pista shell necklace..
ReplyDeleteThank you so much Radhika....I thought about your pista shell necklace today too...hats off to your creativity!!
DeleteWOWZER, that flower is so STUNNING, that beautiful frame is all it needs, love the tutorial, I have a lot of those tiny balls so I will try to make one, thanks for your inspiration and you kind sharing, hope you have a wonderful week..
ReplyDeleteDianne you are so kind!!
DeleteThis is just beautiful! I have a daughter living in China- she may get one of these : ) Thanks for the visuals!!!
ReplyDeleteI guessed you had an Oriental connection from the many oriental themed cards you have shared!!
DeleteYour flower is beautiful and thanks for the detail tutorial. I'm going to try this.
ReplyDeleteHugs, Pat
Thank you so much Patricia...would love to see yours
Deletevery pretty and another great tutorial. Thanks for sharing
ReplyDeleteThank you so much Ann
DeleteHi Sonia, I always keep time to read your posts in detail! there is so much to learn from. I amaze to see your generosity to share the knowledge in detail. thanks for sharing this prettiest lotus making tutorial. Actually I bought these thermocol balls from Itsy Bitsy to make snowman, now I'll try lotus :) and thanks so much for your support and love for my blog, it means a lot :)
ReplyDeleteThank you so much Shilpa...you are too kind. And we made snowmen too...in this post :Thermocol Snowman
DeleteThe Lotus turned out gorgeous.I am amazed at your patience and grateful for all the tutorials that you do.I love the stand too.Thanks for playing along with us at Crafters corner challenge #14.Wish you all the best.
ReplyDeletegreat Dr Sonia, u can make anything look wonderful and beautiful. I love ur crafts.... super idea.
ReplyDeleteyou are magical dr Sonia.... :)
ReplyDeleteThank you so much Bhawana..ha ha I wish I had a magic wand to craft with!
DeleteGreat decoration! I tried once. I failed. Your instructions operate easily. I have to try again! Thank you for tutorial. Hugs from Croatia!
ReplyDeleteVery lovely,useful,brainy,wonderful tutorial!!thanks :-)
ReplyDeleteHa Ha I liked the "brainy" part!
DeleteAwesome doc .... Very useful tutorial
ReplyDeletehappyexperimenting.blogspot.com
Awesome doc... Very useful tutorial
ReplyDeletehappyexperimenting.blogspot.com
Thank you so much Hema good to have you drop in after long
Deletewow, this is so pretty,could never imagine coming up with something like this!
ReplyDeleteThank you so much Juhi
DeleteAwesome Lotus pictorial!
ReplyDeleteMajestic tute Sonia ji...such a perfect lotus with such minimal materials,well it is possible only by Dr Sonia :) amazing one !
ReplyDeleteThanks for playing with us @ BGC
Bipasha(DT)
Oh you are so sweet Bipasha!!
DeleteWow !!
ReplyDeleteWhat a fabulous creation!!
Thanks for playing in the challenge at Crafters Corner !
Hugs,
Riti (DT)
Thank you so much Riti
DeleteHave seen so many of ur work liked all of them all luck to u
ReplyDeleteThank you so much Sheeka
ReplyDeleteOi, upea työ :)
ReplyDeleteSonia ji ! I am now very eager to see your lotus pond!! this tutorial is so fabulous !
ReplyDeletethanks for playing with us at BGC#43
Hugs !