 |
| Pop up cake card |
A pop up cake is a versatile insert suitable for most cards be it birthdays, anniversaries, and any form of celebration.
 |
| Embossed Celebration Card |
The pros say you should keep the outside of a pop up card simple ! So only used a paper rose,some plastic butterflies and pearls on this lovely embossed white paper .Since my theme is celebration the embossing reflects party baubles and ribbons.
 |
| Heart Punch Handmade Flower |
I made the paper rose using my heart punch and here is the link to the
Heart punch Rose Tutorial.
Here is the closeup of the Pop up cake. Its simple to make and fun to embellish
 |
| Pop up cake card |
The Felt flower is handmade by using a circle of felt , cutting it in a spiral and rolling just like you make a spiral paper rose. Only difference from a paper spiral rose is its difficult to hold a felt rose using white glue so I used a glue gun.The shiny metallic green leaves were bought from a local fancy store.
 |
| Handmade Felt Flower |
This is one of the simplest Pop up Cake cards you can make.Why I like it so much and am sure you would too is that you don't have to use a scale to measure . You dont need a Craft knife and it can be made in a jiffy to beautify any card!
 |
| Pop up cake card |
Materials required to make a Simple Pop up cake card
- Card stock for base
- Card stock for Pop up card Insert:Here I have used half of an A 4 card- You can use thin paper too to make this pop up cake card. Don't use too thick paper as it wont fold well.
- Scissors
- White Glue
How to make a simple Pop up cake card
Its simple so dont get daunted by the number of photos-- I just posted lots of photos to illustrate each step
Fold your card piece into half
 |
| Pop up cake card Tutorial |
From the central fold line drop down 2 parallel lines around 2- 2.5cm long [make it as wide as you want].Join the 2 lines. Here you can see my latest toy-- its called a " Roll N Draw" I picked it up from a local stationary shop for 20 Rupees[ quite cheap!]Its a fantastic instrument -quite handy to draw parallel lines, circles,arcs,squares,measure angles!A useful tool for the paper engineer!
 |
| Pop up cake card Tutorial |
Dont worry about erasing any lines as you are working on the wrong side of your pop up cake card.Cut the parallel lines you drew.
 |
| Pop up cake card Tutorial |
Fold the step you have cut in the manner shown
 |
| Pop up cake card Tutorial |
Open the card and this is how it will look.
 |
| Pop up cake card Tutorial |
Now reverse your fold by pushing at the central fold from behind and you have the bottom layer of your pop up cake card.
 |
| Pop up cake card tutorial |
Close you card.Drop down 2 parallel lines like you did earlier only make them smaller say around 1.5 cm long. Since you are making a cake ,position the lines so as to make the 2nd cake layer at the center of the lower layer.
 |
| Pop up cake card Tutorial |
Cut only the top layer as shown.
 |
| Pop up cake card tutorial |
Fold and reverse your fold like you did earlier .
 |
| Pop up cake card Tutorial |
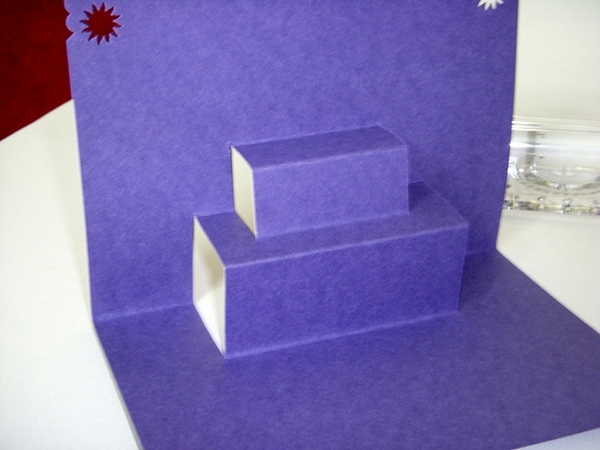
Now you have made the 2nd layer of your pop up cake card.Stop there or go ahead and add one more tier to your pop up cake!
 |
| Pop up cake card tutorial |
In the similar fashion you can make as many layers for your pop up cake as you want.Only take care to make the length of your drop lines smaller than the previous layer's.
 |
| Pop up cake card Tutorial |
This is one of the simplest pop up mechanisms and you can build all sorts of scenes on the steps.
 |
| Pop up cake card Tutorial |
Add candles, flowers, faux icing what not!
 |
| Pop up cake card |
One more tip I would like to share about making a pop up card is to take care while sticking your pop up to your base card.
Most pop ups look more effective stuck on a base card of contrasting color. Apply glue well to all the corners and edges and position the central crease flush on to the base card central crease.
 |
| Pop up cake card Tutorial |
Apply glue on one side at a time as shown.Dont use extra glue as glue seepage can spoil our pop up effect.Apply glue to the other side of the pop up mechanism and fold the base card over on to it.
The golden rules are to apply glue to all edges and corners, apply only a little glue ,test your pop up and then allow enough time for the glue to dry.
 |
| Pop up cake card |
Have fun making a simple pop up cake card. And do tell me how you like this celebration card.
From Itsy Bitsy : White Embossed Card, Flower Punch,Corner Punch, Alpha Beads to write " Celebrate", Plastic Butterfly embellishments


Wow, what wonderful projects. Thanks for the tutorial. Must try a pop up soon.
ReplyDeleteJudie
Thanks for the tutorial!
ReplyDeleteThis is Super AWESOME!!!Thanx for the tutorial.
ReplyDeleteVery versatile pop-up card. You are so right. This cake could be used for so many occasions. Thanks for the tutorial.
ReplyDeleteBeautiful! Love the pinks/purples and the pop-up cake. Beautiful roses! I enjoy seeing all your photos in the tutorial! Thanks for sharing!
ReplyDeleteGlenda
http://glendascards.blogspot.com/
Oh Sonia... How can you afford to make such b'ful creations! Hats off... Its such a lovely project.. full of fun and celebrations!
ReplyDeleteGorgeous card, love the embossed paper for the background,Love the rose, and the pop up cake is great, also love the lettered beads,adds nice touch to the card!!!
ReplyDeletePaula
Voww!! lovely card....lots of fun in making...
ReplyDeletethanks for sharing dear...
Vowwww!!! lovely card....soooo pretty.......
ReplyDeletefun in making...
thanks for the tutorial....
What a beautiful card. Your rose is awesome . Thanks for stopping by my blog
ReplyDeleteGorgeous! I love the beaded sentiment and the pretty felt flowers :)
ReplyDeleteSO very awesome! I think I am gonna try this soon :)
ReplyDeletelovely card and u really make it so easy to understand the method of making these gorgeous cards.hope to give it a try sometime.
ReplyDeleteWOW it looks so beautiful and rich. You are lucky that you are able to get the plastic butterflies and leaves. These sort are not available in Chennai . Thanks for the tutorial.
ReplyDeletecute idea! It looks easy enough to try... thanks for the great tutorial! I love your paper flowers too :)
ReplyDelete-rachel w k
rwkrafts.blogspot.com
Dear Nityakalyani-- you will surely get it in Chennai - just look hard enough-- I have a habit of dropping in to any fancy store I see and checking on their stash of stitching accessories from time to time--as you can see from the holes these are meant to go on a dress not on a card!!
ReplyDeleteWhat a great tutorial and card! Thank you for spending the time to do this! :)Amy
ReplyDeleteWow fabulous creation dear. Thanks for sharing.
ReplyDeleteLovely card...nice tutorial :-) good work Sonia.
ReplyDeleteThis card is sooo BEAUTIFUL!I just LOVE the pop-up cake.So SWEET!GREAT job with all the AWESOME details!!:)
ReplyDeleteAnother fabby tutorial Dr Sonia! I always learn something new when I visit you!
ReplyDeleteThis is so so awesome!! You're a doctor and engineer all rolled into one!! Super card and love the embossed white paper..looks beautiful against the pink rose!!
ReplyDeleteWOW!! beautiful card and i will have to give it a try:) thanks for the tutorial! Have a wonderful weekend!
ReplyDeleteHugs
Oh! What an awesome project Sonia! Thanks for sharing the tutorial! :)
ReplyDeletefabulous card and great tutorial. I love that heart punch flower
ReplyDeleteSonia this is so awesome. I love the colors and what a fun surprise when you open it :)
ReplyDeleteThat rose is fantastic. And so many embellies to admire... Awesome!
ReplyDeletexxx Monica
lovely card with beautiful flowers. tutorial is very clear to make it.
ReplyDeleteVery nice card.felt flowers look good...guess this time u have stitched them.Thanks for the tutorial...have to try now.
ReplyDeleteThis is such a fun card Sonia. The little celebrate beads are just darling. Your tutorial makes it so simple to put one of these together. Love the front of the card with the pretty rose and the rolled felt roses. Just beautiful.
ReplyDeleteBear Hugs,
Carol
Hi Sonia,
ReplyDeleteThanks for stopping by my space....
love your blog....so talented you are.....awesome crafts...and unique collection....
Happy to follow you....
http://anuzpaintingncrafts.blogspot.com/
http://anuzcakesnbakes.blogspot.com/
http://anuzhealthykitchen.blogspot.com/
Thanks for sharing this with us Dr..
ReplyDeleteVery informative, Dr. Sonia. Love your embossed baubles and the pretty handmade flower. Thanks!!
ReplyDeletewow you were totally right about it being simple! You are a good teacher doc! I love the colours and the little details. I can never get tired of saying this but you are BRILLIANT!
ReplyDeleteThank You dear friends for all the encouragement.. this is is what encourages me to put in that extra effort to write a tutorial.
ReplyDeletewhat a magnificent creation, I love it!
ReplyDeleteGreetings Baukje
A fun and beautiful card to make! Great tutorial!
ReplyDeleteLike the way you explained each step. Now to try to make one & let you know how goes it.
ReplyDeleteMelissa
"Sunshine HoneyBee"
http://CreatedbySunshineHoneyBee.blogspot.com
Forgot to mention that you should enter this into the Decorate to Celebrate challenge Wedding, Bridal Shower or Engagement.
ReplyDeleteMelissa
"Sunshine HoneyBee"
http://CreatedbySunshineHoneyBee.blogspot.com
Sonia, Your pop-up cards are always so fantastic!! Such detail you put into them!!! I love the paper flower you made. Just gorgeous!!!
ReplyDeleteabout your qn, I did go for 3 oil painting clases - "paint and take home". Rest of them I didn't learn it anywhere just do with my interest....:-)
ReplyDeletehi sonia very nice crad. like the embossed paper.
ReplyDeletegr8 tutorial.
Какой аппетитный тортик получился! Спасибо за урок!!!
ReplyDeleteAnother great card, at least there are no calories!!! Love the roses and the embossed paper.
ReplyDeleteWow, what a gorgeous project♥. Love the colour and the beautiful flowers♥. Great tutorial, thank you for sharing.
ReplyDeleteHugs Marita♫♫
oh wow such a wonderful card thank you so much for sharing.
ReplyDeleteI am your newest follower... Would love for you to come visit.
Celeste
www.touchedbyabutterfly.blogspot.com
This card is so amazing and gorgeous! You have THE BEST tutorials, Sonia! You explain everything so well and they are so easy to follow! Thank you for taking the time to put this together!! :)
ReplyDeleteLisa
http://indymermaid.blogspot.com
Thanks for the tutorial Sonia!!! loved the pop up card!!!gorgeous!
ReplyDeleteBeautiful card , clear and precise tutorial .you captured right details in your photos . Thank you for sharing on Make it Monday .
ReplyDeleteShirley-anne .
Hi DR. Sonia,
ReplyDeleteThis is beautiful. The flowers are also goregous. TFS.
Hugs,
Rez
Karezma Kreations
Wow !! ur pop up card are amazing!! Have to try a few of them...
ReplyDeleteNice tutorial! Made me feel nostalgic, recollected how my daughter and myself made our first pop-up card. Pop-up cards are lot of fun aren't they?
ReplyDeleteYour card is stunning as usual. thanks for sharing.
BEAUTIFUL CARD!.. love the embossed card front and the flowers too! :D
ReplyDeleteThanks for the fab tutorial! :D
Sonia, these are just beautiful, and what a wonderful idea! Thank you so much for sharing the tutorials!
ReplyDeleteAnother awesome card and tutorial. The flowers are so pretty too!
ReplyDeleteThank You dear friends for such encouraging comments
ReplyDeleteMagnificent! You have a great site!
ReplyDeleteThanks for stopping by my blog!
Wow, another beautiful pop-up Sonia, I spotted it at MIM , LOL, it looks even better being in my favourite colour, purple! Love the beads and the felt roses.
ReplyDeleteSandy
Oh stunning!! that pop up card is stunning.. totally loved the idea!!
ReplyDeleteThis is WONDERFUL and your tutorial makes it sound so simple! I'm really tempted to give it a go although "fancy folds" cards are usually beyond me. Thanks also for the very sweet comments you've left on my blog, and for sharing this with everyone at Make It Monday!
ReplyDeleteThis is so beautiful Sonia. Thanks for the tutorial.. Saw this on Make-it-Monday and popped over for a closer look..Love your blog..Loz
ReplyDeleteBeautiful pop up card...I forget to make them but they're so much fun and impressive. Thanks for reminding me with your lovely tutorial. TFS!
ReplyDeletebeautiful card , rose looks beautiful against purple.
ReplyDeleteLovely, and a very useful tutorial! Must bring a smile to anyone who receieves this card!
ReplyDeleteI liike your blog for the pictures, ideas, and the tutorials. Following you now.
And thanks for stopping by my blog :)
:-O... I missed commenting on this post.. How come?? anyways better late than ever.. the pop up queen is back with a bang.. Doc.. how many roles do you play... and how do you manage to play them so well.. Hats off to you.. super tutorial and Superb card... Ohh and I have a something for you on my blog... go check it out..!!
ReplyDeleteVery beautiful card! Love every element of it! The paper rose is my favourite, though :) You made a great tutorial, like always! You are amazing! Thanks for sharing your wonderful creations! And good luck at the challenges!
ReplyDeleteWhat a fabulous card! And totally vibrant!! LOVE IT!!
ReplyDeleteThanks very much for your wonderful tutorial. It's so straight-forward and easy to follow!
And the flower tutorials...wow!
I'm so glad that I popped over from MIM to come and have a look, there is so much still to see!
You rock, Dr Sonia!
love ths tutorial...very pretty too
ReplyDeleteWow this is amazing! Thanks for the tutorial and the sweet comment on my blog.
ReplyDeleteCame over from Make it Monday and I am so very glad I did. What an absolutely fabulous card. I am really going to have try and make a pop up card
ReplyDeletehttp://nanadonnascarddreams.blogspot.com/
Beautiful pop up card! Great details!
ReplyDeleteHoly Moly! Wow Wow Wow! I think I'm in love with this card! Very unique and beautiful! Just Wow! I'm so glad I found this on Make It Monday! Wow! Thanks for sharing!
ReplyDeleteKaren C
Lovely card and tutorial
ReplyDeleteHey Sonia! Thanks for linking this up to the Fabulous Felt challenge in the Moxie Fab World! I'm so glad you joined in on all the fun! :)
ReplyDeletejust to let you know.. that Sims is making a pop up card for her teacher today.. and we came here to see how it should be done!! :-) Thank you!!
ReplyDeleteA fabulous card with a great tutorial. Your flowers are exquisite, too =) Thanks for joining the Flower Power Challenge at the Sisterhood!
ReplyDeleteHi.
ReplyDeleteGreat tutorial! Thank you. I have to give this type of card a try some day.
Saw your card on the Make it Monday blog where I entered too!!
Hugs, Hilde
Thanks for the lovely tutorial. I have used it in y latest card. Please do come and see it. I shall be honoured :)
ReplyDeletehttp://pygmyarts.blogspot.in/2013/03/cake-pop-up-card.html
BIjal
Bikal loved your double pop up and thank you for being such a sweetheart and linking my tutorial
Deleteit's very easy
ReplyDeleteI can't figure out how to do the second layer of the cake but it looks like a really cool cake
ReplyDeleteThank you so much ...Pop up cards are tricky..try once more
DeleteI don't know how to do the second layer of the cake but it looks like a very good cake card :)
ReplyDeletegreat card!
ReplyDeleteGreat card
ReplyDeleteCouldn't make.. please upload a video tutorial instead.
ReplyDeletePop Up Cards are always tricky...sure I will try to make a video Tutorial
Delete