 |
| Bangle Butterflies Tutorial |
I have always liked to create things from whatever is lying around the house and now sharing a fun project to use up those old misshapen or outgrown bangles.Metal bangles are very popular here in India.
Of late we have accumulated quite a few " unusable " metal bangles at home as either they have been crushed out of shape [ little kids can easily crush these metal bangles out of shape by some enthusiastic games!] or they have become too small for my daughter [ how fast children grow!] Instead of throwing them away we made Bangle Butterflies out of them!
What you need to make Bangle Butterflies
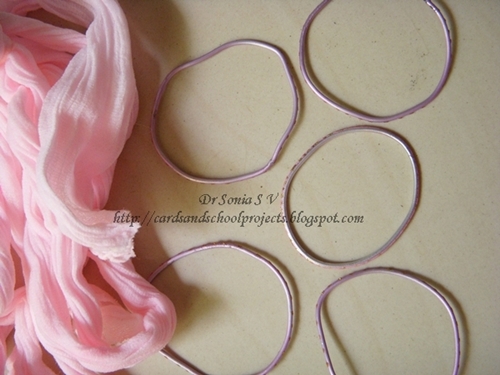
- Bangles: You need some old metal bangles- small "kid" ones are the easiest as then you don't have to struggle to get your stockings to cover them. If you don't have metallic bangles use the conventional florist wire which is traditionally used to make the stocking butterflies.
- Stockings- these are available as nylon stockings and very popular in flower making. I found 2 main types in the Indian market - the small cheaper variety [wont cover a bangle well] and the larger and longer variety [ slightly more expensive but good for this craft]
 |
| Stocking Butterflies Tutorial |
- Scissors
- The rest of the stuff depends on how you want to go about it ie To stick your parts you can use glue gun, white glue or florist wire or thread or twine
- Embellishments
How to make Bangle -Stocking Butterflies
You can make a butterfly using 3 bangles as shown
Shape your bangles into kidney shaped butterfly wings as shown.Make a central body by compressing your bangle. The central body of this butterfly happened by accident- it broke while I was shaping it so twisted it into a body with antennae!
 |
| Bangle Butterflies Tutorial |
I found I liked the 5 bangle butterfly better.Shape the bangles as shown. Shape the 2 front wings similarly by laying one on top of the other. Shape the back wings slightly differently.These metallic bangles are pretty easy to shape and mold as you like.
 |
| Bangle Butterflies Tutorial |
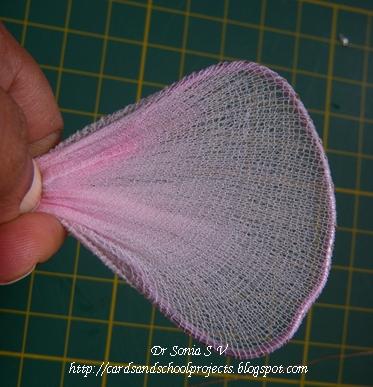
Wrap a bit of nylon stocking around your bangle butterfly wing.
 |
| Bangle Butterflies Tutorial |
Stretch and pull the nylon stocking towards the wing tip as shown
 |
| Bangle Butterflies Tutorial |
Tie the nylon stocking securely at the bangle butterfly wing tip.
 |
| Bangle Butterflies Tutorial |
Cut off the excess nylon stocking.
 |
| Bangle Butterflies Tutorial |
In the same way cover all your bangles with nylon stocking.
 |
| Bangle Butterflies Tutorial |
Shown below are the wings of the 3 bangle butterfly
 |
| Bangle Butterflies Tutorial |
Assemble your Stocking butterfly- You can do this using a glue gun , nylon thread, etc.
 |
| Bangle Butterflies Tutorial |
When I first made this Bangle butterfly I didn't have a glue gun so tried various methods to assemble the butterfly. Sticking everything together with white glue works but you need a lot of patience!Using a Glue gun is the easiest option but if you don't have a glue gun you can use a florist wire or strong nylon thread to tie the wings to the body of your butterfly.
 |
| Bangle Butterflies Tutorial |
So if you dont have a glue gun you can use a wire or thread ": Thread it through the 2 wings of opposite sides
 |
| Bangle Butterflies Tutorial |
Tie the wire or thread to the back side of your butterfly's body as shown. Again if you are using a glue gun- super easy to attach the wings to the body of the Butterfly.
 |
| Bangle Butterflies Tutorial |
Embellish your butterfly with gems, beads, felt
 |
| Bangle Butterflies Tutorial |
Or add a it of swirly glitter glue as shown below
 |
| Bangle Butterflies Tutorial |
Use your butterfly as a flower pot accessory like we did here .
 |
| Stocking Butterflies Tutorial |
Other ideas to use your bangle butterflies: make a wind chime, use it to decorate a photo frame, use it as a fridge magnet, make a magic wand out it!Little girls will love magic wands made out of butterflies and they make great party favors.
 |
| Bangle Butterflies Tutorial |
Well I hope you enjoyed this bit of recycling . Do leave me your comments
Edited: Yippeee! This Recycled project won at the
Craft room Challenge[Home Decor Project]!
If you are on Pinterest you can "Pin" this tutorial by clicking this button :
Pin It


Great tutorial! I've always wanted to try this.
ReplyDeleteVery pretty recycled bangles great idea to use them to add colour around the home like this. Thank you for sharing with us at Craft-Room Challenge, good luck XOXO Zoe
ReplyDeletewow..lovely idea...tutorial is great..will definetly try it..thnks for sharing the tutorial
ReplyDeleteQuite lovely, thanks for tutorial, have to give this a try. TFS.
ReplyDeleteJudie
Thank You dear friends for appreciating my Bangle butterfly
ReplyDeleteAwesome Tutorial Sonia you're always so detailed I love it! You make it so easy for people like me to try these projects, and Congratulations on all your projects that have been showcased you Deserve it for such GREAt Work!!
ReplyDeleteDIVAOF5.BLOGSPOT.COM
Lovely butterfly♥. Thanks for sharing.
ReplyDeleteHugs Marita
Cool buterfly great job!
ReplyDeletebyebye,Lean
Great idea for recycling bangles1
ReplyDeleteWOW, lovely butterfly, great tutorial!
ReplyDeleteI love it!
ReplyDeleteThanks for sharing the tutorial!
What a great idea, and they look fabulous! Thanks for sharing your great tutorial too! Good luck, and thanks for joining us at the Craft-Room Challenge. Maria x
ReplyDeleteAs always, a great effective tutorial! Little girls here would love wearing them in their hair. I will have to remember this after we have the next grandchild, who of course will be a girl!
ReplyDeleteWow! This is awesome upcycling Sonia! Love how you worked a misshapen bangle into these fluttering beauties! Fabulous work! :)
ReplyDeleteVery pretty butterflies! They would make great embellishments! I love the idea and thanks for the great tutorial! :)Amy
ReplyDeleteSonia, You just amaze me everytime I visit your blog!!
ReplyDeleteThe things you think of using that most people would throw away. These butterflies are awesome!!
What a creative mind!!!
these are too good! thanks for teaching!
ReplyDeleteLike the bangle butterfly creation. I like Butterflies. Now I have to find some bangles or use florist wire which I have. I have plastic ones that were my daughter's but they are not pliable/cannot be shaped without breaking.
ReplyDeleteMelissa
"Sunshine HoneyBee"
http://CreatedbySunshineHoneyBee.blogspot.com
Wow, this is very pretty. Thanks for stopping by my blog. Your cards are all very beautiful.
ReplyDeleteSonia you always do such fab job on your tutorials!! Always detailed but easy to follow :) The butterflies are a wonderful recycle project and beautiful also! Thanks for sharing/
ReplyDeleteCool! I love it! I do make nylon stocking flowers, but never a butterfly so far, so i guess today is the day! Thanks for the inspiration!
ReplyDeletecreative idea. thanks for the tutorial
ReplyDeleteawesome!!!! never even thought of it!! and thanks of sharing those ideas of using the butterflies!! so patiently , you have taken so many photos!!My Patience never goes along with my photography!!kudos!
ReplyDeleteSonia - so nice of you to share the tutorial. All the best for participating in the contests. btw what type of gauge do you use while attatching the wings. Have a great day
ReplyDeletevery beautiful and creative!
ReplyDeletelove this butterfly, thanks for the idea .and congrats on being the blog hop winner at make it monday, this seems to be ur lucky month:)
ReplyDeleteРазкошна пеперуда!Поздравления!
ReplyDeleteThese are great! Thanks for the tutorial!
ReplyDeleteYou've taken recycling to a new level...simply gorgeous!! Thanks for the wonderful tutorial!!
ReplyDeleteI love the butterflies you made..... the are really pretty :)
ReplyDeleteFabbie idea!.. Love the reuse! :D
ReplyDeleteFabulous !! Thnx fr d tutorial. :)
ReplyDeletewow too good i need both ...they looks super cute..
ReplyDeleteThis is fabulous! Lovely lovely use of those bangles :)
ReplyDeleteTo do that you must have a lot of free time and patience! I could never do it! Congrats! It is beautiful!
ReplyDeleteThank You dear friends for the awesome encouragement
ReplyDeleteNityakalyani- Any gauge wire should work to help attach the wings- I used a thin wire .
Great idea for recycling bangles!
ReplyDeleteYou always surprise me with your beautiful creations!
ReplyDeleteGreetings Baukje
Wow!! big thanks for the tutorial..and thanks for the comment u left on my card...yup i did look for other challenges where that card can fit...but didnt find any.
ReplyDeleteWow, so many gorgeous projects, loved having a browse through your blog.So creative. The Flutterby is so pretty. Carolxx
ReplyDeleteOn my! Doc this is such a cute idea. I have tried these with the regular craft wire. Made stocking flowers too. But using bangles is a brilliant idea :)
ReplyDeleteAwesome, simply awesome, thanks for sharing. I tried my hand at making these butterflies and I failed miserably but you seem to have sailed through. Love the pink butterfly the most. And out of a bangle - HOW CLEVER!
ReplyDeletexxx Monica
Thank You dear friends for the warm and encouraging words.
ReplyDeleteGreat work,thanks for sharing!!!!!!!
ReplyDeleteFabulous butterflies and a great idea. Thank you for joining us at Craft-Room Challenge.
ReplyDeletexxx Hazel.
This is superb my dear :)
ReplyDeletethanks for the detailed how-To ;)
Have fun!!!!!
Doc... This is absolutely super.. Absolutely love the pink butterflies.. Thanks for the tutorial and thanks for playing again with craftyJc again...
ReplyDeleteHugs,
Khush
Wow Wow Wow...u simply rock !!
ReplyDeletereally beautiful, and you explained the steps very well, thanks for sharing!!!
ReplyDeletePaula
So adorable!! I love how you come up with new things every time!
ReplyDeleteYou are so creative! I just love your work!
ReplyDeletehugs
Deanne
http://deannescreativejuice.blogspot.com/
it turned out so lovely, what pretty colors too! I don't think I have ever seen a prettier stocking :)
ReplyDeleteoh these are so pretty Sonia .. whata fabulous idea.. and make your flower pots come alive
ReplyDeleteLisa
ps .. Congrats on winning the candy on my blog for MIM.. please email me at lisa.coe@btinternet.com
with your address so i can post it out to you
Lisa xx
Simply gorgeous! Totally loved this tutorial.. I'm following you now.. and am looking forward to seeing lots of inspiration here.. :-)
ReplyDeleteWhat a lovely idea - cute little butterflies! Thanks so much for joining our Craft room challenge...Esther xx
ReplyDeleteSonya this is so clever and these butterflies are real pretty love the orange one :-) thanks for joining us at Craft room challenge- debix
ReplyDeleteThis was a great idea and a great tutorial. I am definitely going to try this. Thank you for sharing! They are beautiful!
ReplyDeleteDorcas
Oh my gosh, Sonia, this is so creative and beautiful! I love, love the butterflies! You have the best tutorials...they are so easy to follow! What an amazing, gorgeous project :)
ReplyDeleteLisa
indymermaid.blogspot.com
those are so pretty. I love them. I also love the idea of using things that you already have laying around the house.
ReplyDeleteFabulous idea and how wonderful that you did a tutorial also. Thanks for joining us at Craft-Room Challenge. Kim xx
ReplyDeleteSonia, I am always so impressed by your creativity, I love this butterfly:):)
ReplyDeleteHow beautiful, and what a wonderful tutorial, such clear step by step instructions. I always like making something pretty out of nothing. Thanks for joining us at Craft-Room Challenge and good luck. Julia xx
ReplyDeleteSonia - your creativity is outta the world. What a fabulous piece of art that is!!
ReplyDeleteThis will make a lovely hair accessory for little girls too!!
You are oh so wonderfully creative and soo generous with ur time by sharing all these lovely tutorials.
Thanks for playing along at CraftyJC Challenge
How very pretty Dr Sonia! I love the little details!
ReplyDeleteRe: your win on Make It Monday, have you sent your address to Lisa J so we can get your prize off to you? If not, send it to my email address on the post..
http://ppp-makeitmonday.blogspot.com/2011/09/make-it-monday-54-new-linky-party-and.html
and we'll get it off to you asap!
Mary J x
Me again! Don't worry, Lisa has told me you've emailed her already!
ReplyDeletettfn!
its amazing....
ReplyDeleteWOW.. Thats really a great post.. This is a very interesting way to make the butterflies...
Scavenger Hunt Ideas
ths s beautiful sonia...love the pretty pink color on that
ReplyDeletethis is such a wonderful tutorial, sonia! your creativity is so awesome! love your sweet bflies and they can be attached to so many things! thanks for playing along:)
ReplyDeleteBEAUTIFUL job with your butterfly!You are so creative!I just LOVE your ideas and work!:)
ReplyDeleteSonia, this is so beautiful. I love coming over here to see what you have created.
ReplyDeleteDIANA L.
http://dianamlarson.blogspot.com
Very clever and so very pretty! Thank you for sharing this!
ReplyDeleteLovely butterfly.. :)
ReplyDeleteVowwww!!!!thanq for ur grt tutorial.....
ReplyDeletebutterfly looks sooo beautiful....
Oh my goodness. I have never seen anything like this and I am in complete awe! These are wonderful little flutterbies. :D
ReplyDeleteThank you so much for sharing this wonderful tutorial.
I guess I won't be going out to a dinner anytime soon...all my stockings will be torn for crafts! LOL
Lisa xx
Super clear and easy tutorial. you are full of such lovely ideas. Must try this one out too.
ReplyDeleteHugs Mrs A.
Those butterflies are wonderful! It is so much fun to use things in new ways. Thanks.
ReplyDeleteStop by my blog when you get a chance, Sonia...I have an award for you (which coincidentally coincides with this gorgeous project)! :)
ReplyDeleteLisa
http://indymermaid.blogspot.com
hi, i really liked ur the butterfly craft...and thanks a lot for a very simple n understandable tutorial...stop by my blog sometimes..
ReplyDeleteBeautiful butterflies, i'm a fan of this friends, lol!... I know a lot of time ago a technique to do flowers with nylon (panty hose that the ladies used) so I see this I remember.. looking like the same. I never see butterflies with nylon only flowers... You did amazing projects. Good Luck!
ReplyDelete-Sony
Beautiful butterflies. I love how you gave life to misshaped bangles :).
ReplyDeleteI have some of these butterflies that I purchased, but now (thanks to you) I can make more myself. Thank you so much for your detailed tutorials. They make everything look so easy. Your butterflies are gorgeous!
ReplyDeleteKelly
http://kellyscraftylife.blogspot.com
Thank You so much for the encouragement dear friends
ReplyDeleteThat really looks pretty in the potted plant/ They look like fun to make too!
ReplyDeleteSonia, its a wonderful butterfly you have created using old bangle & stocking material. the tutorial is very good. a small suggestion, if you add the antennae it will make it even more beautiful and lively :-) best wishes.
ReplyDeleteSuch beautiful butterflies. I love them and may even have some of those bangles lying around. Wonderful tutorial. Thanks for sharing.
ReplyDeleteHugs
Brenda
I would be honored if you came to see my blog here
How cool is this? I love the finished project- and I think you should write a book! I always find a treat here when I stop by!!!
ReplyDeleteLooks dainty n nice, all set to sit on a lil girl's headband or frock :)
ReplyDeleteThis was a great "how-to". I just spent a good bundle on something like this and thanks to you, I no longer have to! Thanks!
ReplyDeleteWonderful Dr. Sonia. Really loved it. Now, i'll be using my metal bangles lying unused for years because of my too sensitive skin.......
ReplyDeleteBeautiful butterlies and a super tutorial...thanks, Dr. Sonia!
ReplyDeleteLove that butterfly, fantastic job Sonia!
ReplyDeleteu r the best dr sonia.....amazingggg job!!!!
ReplyDeleteu r such a amazing craftier..very innovative..thanks for grt tutorial
ReplyDeletewow... I saw this at a shop and I have always wanted to do this..!!! But I could not make out how to attach the wings to the body... !! Thanks for sharing ... ;-)
ReplyDeleteWow Sonia! your website is extraordinary - wonderful! this is a project I am going to try soon - your tutorial is wonderful - so clear, thank you for sharing this... off to read more now :)
ReplyDeleteWow great idea Dr. You have done a good job . And your tutorial with many pictures is superb... Thanks for your frequent visiting.
ReplyDeleteits so beautiful... thanks for sharing..
ReplyDeletelove u....
oh god sonia i just throw a bunch of my old bangles ...i feel so bad :-(.... but thanx for sharing
ReplyDeleteWOW I always wanted to know how to do these butterflys, THANK YOU for the FAB tutorial, I shall make some for my daughters room as it's under decoration and I did buy some shop ones but do need more and bigger ones
ReplyDeletehugs
Ildiko
Lovely Soniaji!!!Thanks for dropping by my blog!!
ReplyDeleteI love these butterflies! In the school where I used to work here in India, we also were making stockings flowers for parents, red ones ))) Thanks for reminding about this craft, I am going to buy the supplies now!
ReplyDeleteReally wonderful...loved it!
ReplyDeleteThis is brilliant!!! I had been wondering about these butterflies!!! i love the tutorial!! TFS!
ReplyDeleteHi sonia,
ReplyDeleteYou are just great. I saw butterfly made out of bangles.its so beautiful. You are just a innovator. I threw away few bangles last month. If i would have seen your site earlier i could have used it. But no worry i would definitly make one . Very brilliant. I just keep on checking your site and i love them, its ocean and is filled with so many ideas.
wow ! what a great work u have don superb!
ReplyDeleteNice and very easy tutorial. .thank u mam..I hv tried this and the outcome is vry pretty ...its lovely :)♡
ReplyDelete