Showing posts with label Pom Pom crafts. Show all posts

11.2.19

How to make a Neuron Model

Neuron Model
Hi friends it's been a long time since I posted any  of my daughter's school projects .Of late most of the time they are made in such a  hurry that I either forget to take pictures or they are made at night so I end up with grainy blurry pictures not worth sharing!
But this one was made completely by my kiddo with no help at all from me and I do have some decent pictures to share with all of you!
Neuron Model
Can you believe some  of the  popular posts on my blog include  "How to make a Tooth Model" and "How to make a Respiratory System Model"!
So in case  you landed on this page by googling " how to make a neuron model" let me run you through the creative process so that you can make a neuron of your own!!

Draw/Pint/Trace a Neuron
My daughter is 12 yrs and is quite good at drawing so she looked at the picture of the neuron in her Biology text book and drew a large neuron freehand. If you find free hand drawing challenging ...lightly trace or print the picture of a neuron
Neuron Model
Make it dimensional using lightweight media
To make a dimensional model on paper use thick paper as your base and avoid very heavy materials on top. If you have light weight clay such as Amos clay or Sakura clay you can make your structure using clay like in this Tooth Model we made long back.
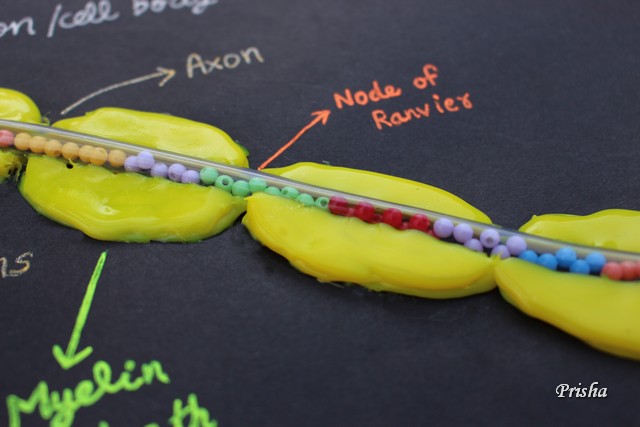
For this model my daughter used different colors of hot glue! The cellbody and the dendrites were made using white hot glue. It is tricky to get the hot glue drawn into the thin dendrites so if you are not confident with hot glue do practise getting thin lines first and avoid hot glue altogether with young children!
The nucleus in the cell body was created by sticking on a red spiny pompom!
Neuron Model
The central part of the axon[axoplasm] was made using a plastic tube filled with beads and sealed at both ends. A word of advice here...avoid seed beads as they are too tiny and don't move around well. The beads my daughter used here are inexpensive but medium weight beads which roll within the axoplasm and are wonderful to give the illusion of a nerve impulse travelling down the axon!
Neuron Model
The yellow myelin sheath of the axon was again created using hot glue. The end of the  plastic tubing was split using scissors into multiple filaments to make the axon terminals and the synaptic bulbs was created using pink pom poms!
This project was a big hit in class and not only did kiddo score full marks but it was displayed on the board in her class [ which is a big deal according to her!]

8.8.17

Asteroids and Meteoroids School Project

Asteroids and Meteoroids School Project
       Hi friends life is slowly settling down for me and since I have been missing my blogger friends I thought I will restart blogging but not with my creation but my daughter's!
This is a school project my 11yr old made for her Geography school project on Asteroids and Meteoroids.
Asteroids and Meteoroids School Project
       We really put a lot of  paper-crafting supplies to good use to make this 3 D chart. The letters were cut from glitter foam using Spellbinders dies and  spray paints and  glitter glue came in quite handy to create the planets and other celestial bodies!
Asteroids and Meteoroids School Project
 The base of the 3 D chart is a sheet of thermocol  painted in  a splotchy manner with black spray paint and glittered up with patchily with sparkling silver glitter glue!
Asteroids and Meteoroids School Project
 The "Asteroid belt" between Jupiter and Mars has modified "pompoms" made sparkly with generous helpings of silver glitter glue!
Asteroids and Meteoroids School Project
 Jupiter is my favorite...love how the splattering of paint and the glitter glue gives it a misty,shimmering look! And in the photo below you can see the closeup details of the Asteroid belt!
Asteroids and Meteoroids School Project
 My daughter was so proud of her model and I think for a long long time she will remember about this little topic in geography !
Asteroids and Meteoroids School Project
I will be visiting you all soon! I sure did miss my blogger pals!

9.6.16

Pom Pom Bunny Card

Bunny Card
           Hi friends my daughter celebrated her 10th birthday in May and since I had house-guests I was awfully busy and managed to make just a simple card adding a single cute element which I knew she would love-- the pom pom bunnies!
Bunny Card
      This card was actually made for my mom to gift to my kiddo.
Since I didnt have a lot of time to work on it kept it as a simple garden scene with a sparkling cloud  ,a floral pattern paper background and a lovely gate!
Bunny Card
The pink heart is a sparkling rhinestone I had been hoarding for quite some time and my daughter loves bling!
Bunny Card
The bunnies' garden has a hanging vine with tiny flower sequins and some teeny weeny pink ribbon roses.
Bunny Card
    Not the best of my creations and I feel quite guilty for not having made a more elaborate card though the bunnies frolicking on the grass did make my daughter squeal in delight!
Supplies : Dies :  Poppy Stamps Weeping Willow Branches, Spellbinders Guilded Gate,Memory Box Marshmallow Clouds,Cheery Lynn Grass Border
Pom Pom Bunny- Itsy Bitsy
Pattern Paper - Papericous
Ribbon Roses and Flower Sequins- Local Fancy Stores Sahakara Nagar
Linking to  
  1. Poppy Stamps Challenge - used top row flower , ribbon and sparkle
  2. Simon Says Monday
  3. Word art wednesday

22.5.15

Plastic Cup Craft - Puppy Power !

Plastic Cup Puppy
          Yes you guessed right...this "Puppy" with long floppy years was made by my daughter .I think the inspiration is our Cocker Spaniel Goldy who has been her companion since she was a year old!
A girl's best friend!
    It is so heartwarming to see crafting being encouraged by big brands these days.Yesterday I took my daughter to a shopping mall and she had an Ice Snow Gola [ basically an Ice Lolly] in a cup.They encouraged children to recycle their plastic cups into craft creations and upload a picture to the Snow Gola FB page!
Recycling Crafts
         My daughter enthusiastically designed and made this Puppy with felt ears [which she  cut herself] and a pom pom nose! Her puppy"Goldy" looks so happy, dont you agree!
Edited : This post was featured in the Top 15 Art and Craft posts 

25.3.14

Handmade Flower Bouquet Tutorial

Handmade Flowers 1
Handmade Flower Bouquet
My mother loves flowers and I made this bouquet of handmade flowers for her 67th birthday which we celebrated just a few days back.Red is her favourite colour and I used 2 shades of red punch-craft paper to make this handmade floral bouquet.
Handmade Flowers 2
Porcelain Heart
The flower vase is a crystal glass filled with pearly white marbles and dressed up with a garland of pearls.The porcelain-like heart on the tag is handmade [Here is the tutorial: Embellishment tutorial ].

Handmade flower bouquet tutorial

Handmade Flowers 3
Paper flower tutorial 

Materials Required to make the Paper Flowers

Paper – Chart paper or thin punch-craft paper is easiest to shape and layer to make the paper daisy flower in this tutorial .If you use cardstock you will have to spend more energy embossing the petals!
Paper Flowers- Die cut, punch or hand cut paper flowers . I used the Sizzix Bigz Tim Holtz Tattered flowers die and die cut 4 flowers at a time from thin punch-craft paper. I find this a big advantage while using BigZ dies compared to thin dies.Use 3 - 6 cut flowers to make a single paper flower.
Embossing tools – Use any rounded end  object you have – eg rounded end of a pen , clay modelling tool, parchment craft embossing tool, rounded end of a quilling tool or a proper punchcraft embossing tool.
Embossing Pad or Mouse pad –to shape the petals.
Flower Center Suggestions- Pearls, Glitter, Seed Beads,Quilled fringed flower,crepe paper ball or even a  pompom like I have used in this paper flower
Adhesive- White PVA glue [Fevicol MR is my favourite] to stick the flowers and a glue gun to stick the pompom.

Paper Flower tutorial

Handmade Flowers 4
Paper flower tutorial
Place the flower on the mouse pad/ embossing pad and run the embossing tool from the tip of the flower petal to the base of the petal.If you emboss your petal from the outside to the inside it tends to curl the maximum!Different diameters of embossing tools will give a slightly different look to your embossed paper flower so do experiment to get the look you love the most!
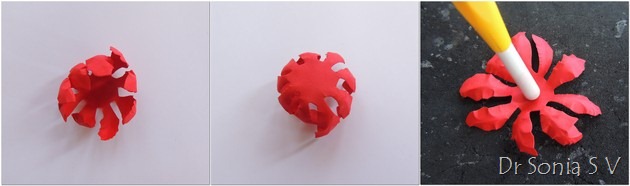
Handmade Flowers 5
Paper flower tutorial
Invert this cup type flower on the embossing pad and now emboss the center of the flower alone with a circular movement of your embossing tool to get a good cup shaped center.
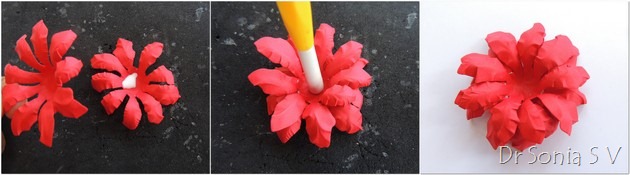
Handmade Flowers 6
Paper flower tutorial
Apply glue only to the center of the flower and stick at least 3 flowers in a staggering manner. Some of the handmade flowers in my bouquet have up to 6 layers of paper flowers
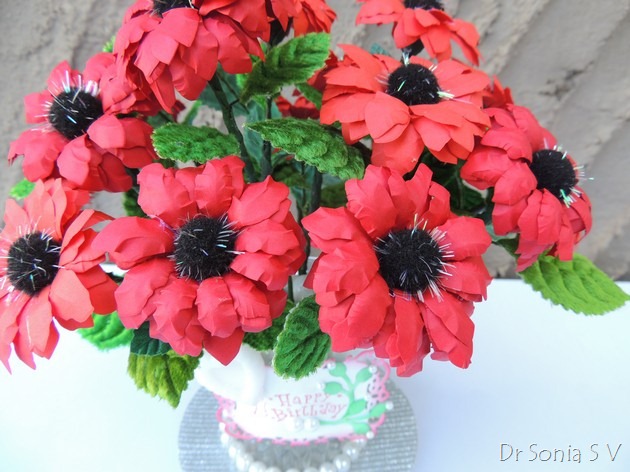
Handmade Flowers 8
Handmade Paper Flowers
I experimented using different objects for the flower centers and found I loved the unique look of the sparkly black pompoms! If you have enough patience you can use regular white glue to stick the pompoms otherwise use the glue gun!!

How to make a handmade flowers bouquet

The paper flowers shown above were so easy to make that in no time I had a whole bunch to assemble into a handmade floral bouquet.To make the flower bouquet you can use
Flower tutorial  1
Handmade flower tutorial 
  1. Stems – options are
    • Metal wires- thicker gauge is preferred so that they can take the weight of your flowers.
    • Wooden skewers like I used in the thermocol rose tutorial .
    • Readymade stem with branches like in the foam rose tutorial .
  2. Floral tape 
  3. Flower calyx
    • If your handmade flower has a flat base like my daisy here you need to make a calyx so that your flower sits prettily on your floral stem.I used 5 mm quilling strips and a slotted quilling tool to make the conical calyx for my paper daisy.
    • If your handmade flower has a pointed base like in my handmade  foam roses  you can insert the stem into the flower base and wrap a cut flower or star shape around it as a calyx.
  4. Leaves – make your own wired leaves like in this Cala lily tutorial  or use ready-made paper or fabric leaves. I have used veined velvet leaves here.

How to make the Flower Calyx

Since many of my blog readers are not into quilling explaining the steps to make a quilled flower calyx.
Flower tutorial  2
Flower Calyx tutorial 
You can use 3 mm , 5mm or even 1cm width paper strips to make your flower calyx. I used a paper strip nearly 17 inches long [formed by gluing 2 quilling strips end to end].
Insert the end of the paper into a slotted quilling tool.[If you dont have one you can simply try rolling the paper strip around the wooden or metal wire you are going to use as your floral stem].Roll the quilling tool and use your fingers to help form the paper coil.
Flower tutorial  3
Flower tutorial 
Apply glue on the end of the paper strip,stick and complete your paper disc.
Flower tutorial  4
Handmade Flower tutorial 
Use a rounded object [I used the other end of my quilling tool] to shape your quilled paper disc into a bell shaped calyx.Just press in your rounded object into the paper disc in a circular movement going inwards from the periphery and you will form a cup shaped paper shape. This is a bit tricky if you are not used to it as you may get tents,volcanoes and mini monster shapes instead of bells and cups!It doesnt really have to be perfect!
Flower tutorial  5
Handmade flower tutorial 
Once you have a fairly decent conical shape insert your metal or wooden skewer into it as shown and push the paper cone right to the tip of your metal/wooden stick.Apply PVA glue or hot glue into the cup and stick your paper flower on it.Apply a bit of glue on your floral tape [always better unless your floral tape is nice and sticky] and wrap around your quilled paper calyx and down the wood/metal stem of your paper flower.
You can keep adding the wired leaves as you wrap the floral tape or add them later.
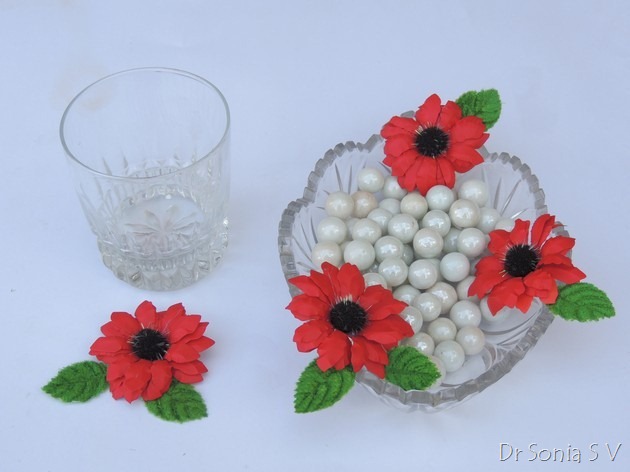
Handmade Flowers 7
Handmade Flower Bouquet
I didnt have the right flower vase for my handmade paper floral bouquet so made one using a crystal glass [whose siblings had all broken!!] and pearly white marbles.
Handmade Flowers 10
Handmade Flower Bouquet
The sparkling pompoms,the shiny marbles ,the white pearls and the porcelain heart makes my flower bouquet shimmer in the light.
I hope you like this simple handmade flower tutorial .Do tell me how you like it.
Here is the link to more Handmade flower tutorials
Related Posts Plugin for WordPress, Blogger...