Showing posts with label Shaped Boxes. Show all posts

7.4.23

Rotating Triangular Box Tutorial

Hi friends sharing a special rotating box in the shape of a triangle. I once saw a rotating box in the shape of a cake some years back on Youtube and the idea stuck with me. I couldn't find the video again and so took the idea and worked out my own design.It was not easy and was a trial and error design but I am thrilled with how it turned out!
I made it to show off my Graphic 45 papers. I have used Graphic 45 Portrait of a Lady to make this project which is part of a series of projects I made for my craft room.

I love how Graphic 45 has apt sentiments which resonate so easily with most of us! I have kept decorations minimal on this box as it is going to be an everyday use item and anyway the pretty G45 papers don't require much embellishing!

Here is how the top of the box looks...with fussy cut flowers and a pearl adorned with a fussy cut rose.

The box has 3 sides and this is how it looks when opened.

There are 5 chipboard triangular supports and 4 swinging drawers made out of thick cardstock.

I hope you liked this unique box idea. 
Here is the link to the Rotating Box Tutorial 


14.2.23

House Shaped Box


House Shaped Box

Hi friends do you sometimes look back on an old project and felt it was downright boring! Well I decided to revamp this somewhat plain paper holder I made  more than 3 yrs back!

House Shaped Box

I love adding handmade flowers to my projects and find making flowers from shrink plastic absolutely fantastic! 
Shrink Plastic
There is something magical about cutting a sheet of plain plastic , heating it , oohing and aahing over how it shrinks & shaping it into a beautiful flower!

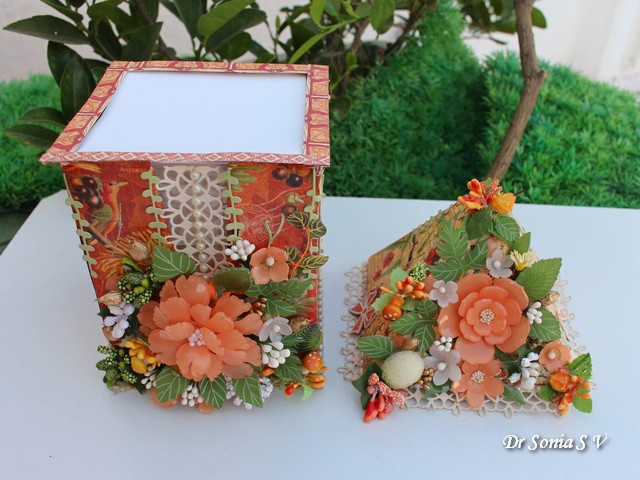
House Shaped Box
Here is how the box looks with the roof removed!

House Shaped Box
And hehe though this is a utility item, I admit I don't really use the papers from this holder...this paper holder just sits on my table for me to look at and smile!!

Supplies used: Dies :  Flower and Leaf dies from Dress My Craft, Lace ,Leaf- Crealies. Papers : Graphic 45 Time to Flourish

2.2.20

Slider Box Tutorial


Hi friends I love interactive mechanism and in this post I am sharing an Interactive box....a sliding box along with a matching Pop Up Card and a Post it note holder all made with nesting dies from Crealies  

I used fairy themed papers and add matching handmade foam flowers on the  front of the  box

I used one of my favourite Crealies  dies to make the   simple flowers from foamiran


The lid of the  box is special....it has a slider opening and on pulling up the  slider you can see an image inside!


I kept the  inside fairly simple as I plan to use it as a gift box...you can add cute scenic elements inside if you want to use it as a shadow box.


Tutorial 
Here is a generalized Tutorial to make the  slider mechanism . I am not giving any exact measurements as you can adapt the  techniques to any die in your stash
The sliding mechanism is in the  lid of the  box and is a modified slider card.
Materials
  • Nesting Dies. In this post I have used Crealies  dies : Crea Nest Lies XXL No 96 Ticket.
  • Card stock : thick good quality to make the  base so that you have a sturdy slider
  • Pattern Paper
  • Good adhesive
Make a box of dimensions such that  is smaller than the  largest nesting die you are going to use.
Leave a 1/2 inch flap extra at the  top of the  box on all sides [ see the  picture lower down the post to understand what I mean]

Tape 2 nesting dies together to get a wide frame- my new glass mat was really helpful in getting the  centering right!

Die cut 2 frames from card stock and one frame from pattern paper

I also die cut the  larger of the  die from cardstock and pattern paper to form a an optional base for the  box[ see picture lower down]

Make a slider piece so that its  dimensions are slightly larger than the  inner aperture of the  frame
To allow the  slider to move in and out of the  lid you need to create a pocket in the  lid for it using double sided foam tape or cardstock like I did here. The advantage of using cardstock is that is looks more polished and there is no danger of it becoming unstuck over time which is a risk with foam tape!

The card pieces are as long as the sides of the  box. 
The lower one measures 1 and 1/8 inches and is scored 1/2 inch from either side of its width leaving a 1/8 inch in the  middle as shown above
The side pieces measure 2 inches and are scored at 1/2 inch from either end of the  width and then 1/8 inch from this 1/2 inch score line


 The side pieces are stuck in such a way that the  1/2 inch sides are on the  frame and placed such that the  slider piece can move freely.

The lower one is stuck in such a way that the half inch part is on the  base and the  rest is free as shown below

This is how it will look with the  slider  in situ


Once you are happy with the  sliding ...you can add the top frame lid consisting of pattern paper frame stuck to the  cardstock frame.


Apply glue and stick


This is how you slider lid will look


Apply glue to the  box which you had made with an extra half inch free flap on the  top on all sides as shown


 Stick the box under your slider lid and press firmly


Optionally add another base layer to the  box and decorate as you please

I made a matching card for the  box by layering die cuts.


On the  inside I tried a new type of Pop Up Card design and it turned out super cool!I used the  nesting diecuts to create pop up layers one in front of the  other.


The "live laugh love life" is from a new Crealies  stamp set and is perfect for small cards and tags.

Here is the  side view showing the layered pop up mechanism

 Here is the  backside of the  box and card which is simple to give enough space to write a personal message.

To complete the  gift set, I made a matching shaker  Post- it note holder too.

I love how versatile nesting dies are and I hope you liked these ideas on how to use them in different ways
Linking to  Simon Says Stamp Wednesday Challenge - Anything goes

18.10.19

House Shaped Paper Holder

House Shaped Paper Holder
Hi friends sharing a simple but functional project I made for my  table....a notepaper holder in a house shaped box. I made with new dies from Crealies .
House Shaped Paper Holder
I love Graphic 45 papers and I have realised that instead of hoarding them in a cupboard I can use them to make functional projects for my home...that way I get to enjoy their beauty all year long!
The leafy vine is one of my favorite designs from Crealies  ...though it is so delicate ..it is a breeze to cut .
House Shaped Paper Holder

The lace design is from Crealies  too and it so so delicate but yet easy to cut...that is what I especially like about Crealies  dies...they cut so easily !

The roof detaches to reveal the  note papers stored within.
I hope you like this idea.
You can get Crealies  dies from : Crealies  

15.2.19

Star Shaped Box and Card

Star Shaped Box 
          Hi friends..have you ever bought something  because you were attracted to the box or packaging! Hehe I have been guilty of that on more than one occasion! And following on that trail of thought...presenting to you a unique handmade Star shaped gift box perfect to hold chocolates and even jewellery!

Star Shaped Box 
Making a shaped box is time consuming especially if it is a unique shape but it is so much easier if you have nesting dies to make your job quicker.I made this box using the new Crealies Crea Nest Lies XXL No 89 dies.  
The lid is made using foam, card stock and pattern paper and the glass knob you see on the lid is actually a tiny glass mini vase!

Star Shaped Box 
I made a simple star shaped card to go inside the box!
I hope you like this idea!
Papers : DCWV Ciao Bella Stack
Dies : Crealies  
Crealies  Dies:


25.1.19

Photo Holder with Easy Handmade Flowers

Mixed Media Photo Holder
Hi friends have you ever started a project intending to make one thing and ended up making something entirely different!! When I started this project I intended to just make a simple card to showcase the new Crealies Square dies .
Crealies  Squares
Crealies  dies are designed so cleverly that even if you mix and match different sets they coordinate perfectly. Here I used 2 Crealies  die sets to create numerous layers and frames .
Mixed Media Box Base

I got so carried away while I added the original "card" to the front of a box made using this Tutorial : DIY Recipe/Photo Holder Tutorial 
Mixed Media Box
The box is raised above the ground using cute metal feet.
Mixed Media Box
The sides are accordion folds dressed up with the octagonal lace design from Crealies and I added lots of beautiful lace and fabric trims to give this memory box a shabby chic and feminine feel!
Mixed Media Box

In the first photo you can see a roof on the holder and it is detachable roof . I wanted a delicate look so I  made it out of acetate and lacey die-cuts made with the Crealies   Decorette XL No. 02  which is also used on the sides  of the photo holder
Mixed Media Box
 The "memories" you see is a Crealies Text die cut and it is placed on the Crealies scroll banner die and encrusted with flower pearls .
Pearl encrusted Scroll 
In the lower corner I added a square frame with pearls ,  pearly hearts, a brass key and a clock which are perfect for the concept of the  "memory box photo holder "!

Mixed Media Box
And how can I have a post without sharing a few tips.So here is a mini Tutorial of sorts explaining how you can make a 3 dimensional lily.

Easy Flower Tutorial 

I used the Crealies   Uno no.51   and  Set of 3 no.51 flower dies.
You can try with any other flower  die cut or punched flower shape too.
Feel free to adapt this idea to whatever supplies you have!
You need only 6 petals so cut away the rest .
Dont discard the petals you cut always as you can use it to make flower buds. 
Ink the center of the flower as shown and tie a bunch of stamen for the center. 
Paper Flower Tutorial
Place the flower with the inked surface away from you on a perforating pad/soft mouse pad and run a metal tool/pen over the petals from outside to inside. 
Paper Flower Tutorial
This will curl the petals as shown
Paper Flower Tutorial
Now turn the piece over as shown below
Paper Flower Tutorial
Apply glue to the lower center and one petal and glue the stamen bunch inside and forming a 5 petal flower as you glue one petal over the other.
Paper Flower Tutorial
I arranged the flowers in such a way that they are seen rising from a flower vase. I made the cute flower vase at home using a chocolate mould and resin! The design on the vase was made using  the Crealies  Decorette XL No. 02 die.
Handmade Resin Flower vase
It was so fun using not only the new Crealies  Squares dies but a whole bunch of exclusive Crealies  dies to make this special project and I hope you liked this idea.
Mixed Media Box
Here are the list of products:
Crealies Dies/Stansen :
Crea Nest Lies XXL no.8
Crea Nest Lies XXL no.85


Related Posts Plugin for WordPress, Blogger...