Showing posts with label Product Review. Show all posts

11.9.18

Triple Craft Punch Review and Project Ideas

Triple Craft Punch Projects

           Hi friends, when I first started crafting I fell in love with Craft Punches and so  I was especially  thrilled when Shalini  launched Craft Punches under her brand Dress My Craft 
In this post I will demo the Dress My Craft Triple Punches and show you how versatile they are with a couple of projects.
Special Features of the Triple Punches 
  • Size : They are pretty large and sturdy Punches and can punch  paper widths of upto 2.5 inches .No limit to the length of paper you can punch!
  • Mechanism :All 3 Triple Punches act by the  "Lever mechanism" which is personally my most favorite punch mechanism as not only is it easier to punch paper using lever punches but it also gives cleaner cuts
  • Can hold in hand and punch! Because of the levering mechanism you can hold the punch and punch with your hand instead of having to always set it on a surface to punch.This is an advantage when you want to use the negatives of the punch-outs as shown in my video.
  • Layering Punches- The base of the 3 punches have markings of 1.5, 2 and 2.5 inches on wedges to fit papers of these 3 widths-  this makes layering of your punched out tags and banners super easy. 
  • Wedged Paper feeder-The wedges on the paper feeder base are an especially useful feature as if you cut your paper to size and feed it into a wedge say 1.5 or 2 or 2.5 inches...you can easily align the edges of your paper so that you dont get a wonky or crooked tag/banner.

  • Another advantage of the  wedges is it allows you to easily align paper widths such as 1 ¾  or 2 ¼  to make layering quicker and easier.
  • Nonskid Base : The base has built in nonskid discs which is especially handy when you are working with big punches such as these.
Craft Punch Base
  • Heavy duty Punch : The punches can easily punch papers of 300g and it even smoothly punched ivory sheets!
  • Punches thin paper too- now you may be wondering why am I listing this as an advantage of these Dress My Craft punches...well surprisingly some heavy duty punches  give jagged edges with thin paper as they are meant to be used with card-stock! 
  • Cut pieces are useful too! I  am sure there are many of you who like  to waste as little paper as is practically possible when you craft. I love it when I can creatively use the negatives and little bits which are left  with the main punched design . When you scroll down you'll see how easy it is to create chevrons and beautiful patterns with the negative bits of the triple punch designs!
Ok now let me show you some project ideas to show the versatility of the Triple punch designs

Sharing some quick and easy to make Handmade Gift Ideas
  1. Layered Bookmarks
  2. Mini Album/Box Closure Mechanism
  3. Business/ID Card Holder Box
  4. Accordion Box
  5. Organiser/Gift Basket
Bookmarks
When I got the triple punches a few days back I was frantically making notepad holders as Teacher's Day gifts and these layering punches were quite  handy to quickly make some gorgeous matching bookmarks for my daughter's teachers. 


I used the Rounded Tag Punch to create the layered bookmarks. It is very easy to create layers quickly using the wedges and markings.
Notepad Holder and Bookmark
Crafty Tip
If you are using the increments of 0.5 inches width strips....increase your paper strips by 1/4th inch only to get the perfect margin.I played around with the measurements of the strips to get borders of different widths.
Craft Punch Bookmarks

One big time saver with this tag punch is the hole which also punches perfectly with the rounded top shape. You just have to add an eyelet and a thread to finish the  bookmarks!
Love how the punches work beautifully with different papers.
 
 Box / Mini Album Closure

The shape of the Rounded Tag is just perfect to make a stylish closure mechanism!


I created a acetate window box from this project : Foamiran Flowers Hanging Decoration and made a secure closure using the Rounded Tag punch.

 You just have to add an eyelet and thread a ribbon/twine to create the closure.

ID Card/Business Card Holder


These cute Mini Flip top boxes are designed to hold ID/Business Cards. They are made from  10 ¼  x 4 inch pieces of card-stock using the rounded tag punch.

Accordion Boxes

  This box looks similar to the boxes shown above but is much easier to make and is quite roomier too.

 It is an accordion box which is ½  inch thick and measures 3 ¾ x 2 ½ inches  .You can make it in different lengths to hold tags, I love you notes, small photographs etc.

I designed them to hold Membership cards/ID cards/Visiting Cards.


Because of the magnetic closure it is not advisable to use it with Credit Cards.


 The base is made from a single strip of cardtock measuring 2 ½  x 10 ¼  inches

 And the accordions on the sides help it to expand. And they also help partition the inside of the holder to keep the cards separately for easy access.

Chevron Pattern
Here are the backsides of the boxes showing how you can use the negatives of the punch-outs to create chevron patterns. They would look beautiful in cards too.

Here is a short  video Tutorial to make the ID card holders


 Organizer Baskets/ Gift Basket

Because the Tag Punch can punch through really thick paper...it is fabulous to make Mini Organisers or Gift baskets. These cute Organisers  have wooden dowel sticks threaded through eyelets in the tags and you can carry them around by holding the rods.


 You can make them as long as you want. These are 4 inches long and 2 inches wide and are perfect to hold tiny bottles of nail polish [above]  or crafting supplies such as Alcohol Inks [below]!

I hope you liked the project ideas and before I bid adieu don't forget to check out this post on the  Use and Care of your CraftPunches 

Supplies from Crafters Corner
Papers : Dress My Craft Floral Symphony, Dress My Craft Hydrangea Lawns, Dress My Craft Pastel Pink Textured Cardstock, K and Company Tim Coffey Cottage Garden Specialty Paper, Acetate

30.1.17

Buying the Best Paper Cutter !

         Hi friends, I am often asked for guidance on what products and tools to buy and I also love to keenly follow papercrafting tool discussions on social media and forums.
One discussion which keeps cropping up time and again is which is the best paper cutter to buy!
Way back in 2012 I shared a post on Paper Cutting Tools and though a lot of what I wrote then is still valid , 5 yrs down the lane I think it's time to revive the discussion on paper cutters.

Should you really buy a Paper cutter ?
The answer is a big YES!!!
Regardless of whether you are a card maker, scrapbooker , hobby crafter , professional crafter or just a homemaker...you should definitely get a paper-cutter!!
We all love using scissors but using a scissors to cut  perfectly straight lines does take a bit of effort and time doesn't it!!
Having a decent cutter  makes cutting paper not only super easy but quick , accurate, enjoyable and efficient!!

Which is the best paper cutter ?

Most of us like to research well before buying a new tool or product but  there are  such a huge variety of paper cutters out there  that it can get pretty confusing.

And the "Best Paper Cutter" for you will actually depend on your needs, personal preferences and budget!

That said, paper cutters range from exorbitantly expensive industrial standard ones which can cut a massive 400 papers in one go to cheap plastic ones which you are better off not buying !

One of the most popular and hot selling cutters in the paper crafting industry as of the time of writing this post is the Tonic 12 x 12 inch Guillotine Maxi Cutter
but since I want you to make your own decision not only now but also in the future when newer and newer cutters come into the market, I am discussing the important factors you should consider before buying the perfect cutter for you!!

This post is based on
  • my personal experience 
  • discussion with fellow crafters 
  • reading tons of reviews
  • watching dozens of videos on the different brands of cutters 
  • and taking special note of the problems crafters had due to a certain type  or feature of a cutter
so that I can bring to you a useful and completely unbiased  post.

Here are the factors you should consider to decide which paper cutter to buy.
1. Size of the Paper Cutter
  • Unless you are really really sure of it I would advise you to get a 12 x 12 inch paper cutter.
    Tonic Guillotine 12 x 12 inch
This is the most useful size for us papercrafters as a lot of our pretty pattern paper comes in that size and most project measurements and tutorials work around that size range!
  • Smaller cutters
The first cutter I got  [an impulse buy from my local market!]had a base platform which was only 5.5 inches wide.
Metal Cutter
Not only was this cutter a complete misfit for me for lots of reasons,  the size  per se put severe
restrictions on my crafting requirements as I needed larger sizes of paper to make fancy fold cards, boxes and pretty much most projects!
But I have seen many many crafters especially cardmakers perfectly happy with a small cutter . So it all depends on your needs.
Advantages of a small cutter :  cheaper, more compact and portable 
Maybe a small sized cutter will be a good option as a 2nd cutter
  • Cutter larger than 12 inches
If you have the space and need for a larger size by all means get one.Believe me you will love it!
From my small 5 inch cutter I jumped to purchase a huge 21 x 16 inch Deli guillotine .
21 x 16 inch Cutter
The huge size of this cutter helped me tremendously in cutting and recycling large cardboard boxes, cutting  chart paper for school projects and in cutting large ivory sheets which I use in card making and most 3 D projects.
Because I have this huge cutter I can buy larger sheets of paper/cardstock [which are always more economical ] and  easily cut them down to whatever size I wanted ! But yes it takes up a lot of space and you need to have a dedicated place to keep it.


2.Does the cutter have an extendable arm or does it fold away for storage

Sometimes the cutter may be able to cut papers 12 inches or more  but only by using an extendable arm . And some manufacturers  incorporate a fold in the middle of a 12 x 12 inch cutter so that it can fold away for storage or portability.
eg : Procision Rotary Trimmer folds in half .Tonic V blade trimmer and Fiskars Sure Cut Deluxe have extendable arms.


For many crafters these features may be a bonus feature as they like the compactness and portability features it gives the cutter.

But the problem with these type of features is  that either the measurements are missing in the junction of the extendable arm/ fold area or it is difficult to get accurate measurements in these areas. 
This is a crucial point  you should consider since the fold / extendable arm junction often falls around the 6 inch mark and that mark is so important to most cardmakers and album makers.
So the consensus is that if you need a 12 x 12 inch cutter go for a cutter which has a solid 12 x 12 base without folds or extendable arms.


3. Cutter Mechanism
For crafting purposes there are 2 main popular types of cutters depending on how the cutting blade works
  • Cutters which have sliding blades - Rotary or V blade style
  • Guillotine cutters which have long blades on levers which you bring down on your paper to get a nice cut guillotine fashion!
Cutters with Sliding blades
eg Tonic V blade trimmer , Fiskars Surecut trimmer

First of all I 'll list the pros which make these trimmers popular in crafting circles
  1. Most of these trimmers are lightweight and portable
  2. Fancy cutting blades may be available to give fancy edges to your paper
  3. Scoring blade option may be available depending on the brand
  4. It is possible to cut a slit in the middle of your paper and to even cut out a window on your paper
  5. Generally cheaper compared to the branded guillotine cutters
  6. Precise placement of the cutting line possible and many have markings  on the right side of the cutting blade as well as on the casing of the blade through which the blade slides.
Cons 
  • most brands unless specifically mentioned as self sharpening will need to have the blades replaced- this can be rather tiresome as not only do you have to find a local source for the blades but take into consideration the cost of all those blades you will be needing!
  • frayed edges are common and slight fraying can occur even with a fresh blade
  • cutting capacity of the blades in most of the brands are inferior to a guillotine cutter
  • cutting specialty paper such as handmade paper trickier and more likely to give frayed edges or even refuse to cut at all!
  • most trimmers can cut only a single sheet of paper at a time
  • most rotary trimmers  within a decent price will not cut cardboard /chipboard 
Guillotine Cutters
Nearly all the guillotine cutters I researched had fantastic reviews about their cutting ability. 

Pros
  • Nice sharp clean cuts
  • Easy to cut 
  • Cutting is quicker than with a sliding type trimmer
  • Blades are sharper compared to that of a sliding trimmer and can cut better and a  wider range of materials
  • Most are self sharpening and need no blade replacing 
  • Can cut multiple papers  depending on brand
Cons
  • you cannot cut a slit in the middle of your paper
  • guillotines don't come with scoring or fancy blade options
  • you have to exercise due care when working it !
When buying a guillotine pay attention to product descriptions and reviews about these features in particular:
  • Blade's  resting position
Guillotine cutters have their blades on the long handle and on the base and after cutting it is always desirable to have a cutter which can stay in the closed position without having to fiddle with difficult to manoeuvre locking mechanisms.
A locking mechanism which is too hard to lock and unlock makes it a pain so do read specific reviews about the locking mechanism if that is important to you.

As of the date of writing this post I have read a lot of negative reviews about the locking mechanism of the Martha Stewart guillotine cutter with crafters complaining how difficult it was to use.

The locking mechanism of my large 21 x 16 inch Deli malfunctioned and the cutter stays in the open position with blades exposed ! And yes it is a rather undesirable and admittedly dangerous situation !!!
Deli cutter
The Tonic 12 x 12 maxi cutter on the other hand has a perfect lever mechanism...there is no lock to fiddle with and the blades stay closed easily.

Tonic Guillotine
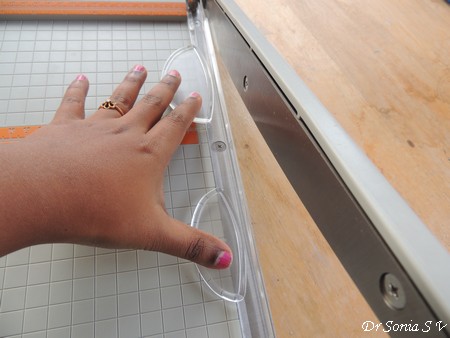
  • Safety finger guard- can be either a transparent plastic or  rubber piece which not only holds the paper in place but also prevents you from chopping off your fingers!
Do read the reviews of the finger guard/paper holder as in some cutters  the space under the safety guard was too narrow and crafters found it difficult to insert paper under it easily.
My 16x 21 inch Deli cutter has a safety guard attached to the cutting lever and it swings  up each time the the cutting arm lifted and it is a bit of an irritation! [see picture above] 
Also some guillotines do not have a safety finger guard ! My 10 inch Deli does not have a safety guard and yes I agree it is unsafe and accidents can happen but the advantage is that you can better see exactly where  you are cutting!!  

4.Measurements 
  • Check if the cutter has  measurements in  inches and /centimeters
Even if all your life you have been  used to working with centimeters the majority of craft tutorials are in inches and you really need a cutter which can measure inches 
  • Check the smallest measurement possible
If you make albums or boxes or other 3 d projects it will be very very helpful to you to have a cutter which can measure fractions such as 1/8th of an inch and even 1/16th of an inch such the Tonic Guillotine shown below
Tonic Guillotine
One of the main disadvantages of my Deli cutter [pictured below] was that I had to eyeball measurements smaller than 1/4th of an inch and the grid line on the base was in centimeters which was quite useless to me as I usually worked in inches.
Deli Guillotine
  • Position of the measuring lines
Most cutters will have measurements on the top edge but it is a big big bonus if you have a cutter that has measurements in other places such as midway and also at its lower edge and the vertical border
To get an idea about the position of the measurements, increments and the ease of reading the measurements - look at videos and zoomed pictures as these features are often not mentioned in the product description

5.Grids on the body - this is one feature which is super useful. Not only does it help you to see your paper is nicely lined up but it also helps you to quickly know the measurements. Here again it's helpful to have grids in fractions of inches rather than centimeters.
1/2 inch grid lines on Tonic Guillotine 12 x 12


6.Material the cutter base is made of
Metal Cutters  are heavy and bulky and many top class brands such as Dahle have cutters made of metal  and they cut soooo beautifully !
But do beware of certain metallic local cutters .My first cutter from a local brand [picture above] was metallic and though its blades are still sharp, it creaks like crazy while cutting and the cutting action also is not at all smooth. Plus it has too many faults which I wont bore you with!! 
Plastic Cutters : Here again stay away from really cheap plastic cutters...not only will they break easily but they will wobble like crazy when you cut!
Wooden Cutters: Both my Deli cutters are made of wood and I love the nice sturdy feel of these cutters! Yes having a wooden base will make your cutter heavy and it will all come down to personal preference!

7. Additional perks which may appeal to you 
Newer features are always being added as the paper crafting industry evolves and tries to woo us with newer, tempting add ons.
But beware some features may look good in writing but may not be practically all that cool!
eg a Scorer with trimmer may sound awesome but just go through some of the you tube demos and the reviews and  you will reach the conclusion that you may be better off buying a dedicated paper cutter and a dedicated scoreboard separately!!

8. Online reviews- be sure to specifically google for the negative/problem reviews! And try to watch videos to see the cutter in action before you take the plunge to buy it. If possible do talk to crafty friends, ask questions online and finally weigh the pros and cons and judge the value for money before you buy.

Now coming to one of the best cutters in the  papercrafting industry


Review of the Tonic Guillotine 12 x 12 inch maxi cutter
First of all the best thing about this cutter is its size...its base can hold and cut papers 12. 5 inches in size . And this 12.5 inch rather than a simple 12 inch is especially advantageous as many of our pattern papers have an extra 0.5 inch plain bit which we  need to discard!

It has a  body  made of good quality plastic which helps to keep it fairly lightweight despite its size .
The cutting blades  are self sharpening as there are twin blades present on the base as well as on the guillotine lever and each time you bring down the lever the blades slide against each other and not only cut the paper and but also self sharpens!
Can easily cut tiny slivers of paper with precisions up to 1/16inch widths!
Crafters who enjoy quilling and quillography can easily cut customized paper-strips using thick paper!
Measurements in inches and centimetres
Measurements are etched so they will not wear off with time.
Measurements at top of guillotine
Markings every 1/16th inches is especially advantageous as you don’t have to eyeball it - especially important for album , box making etc
Markings present at 3 places on the base: at the very top, in the middle and in the lower part
Marking at middle and lower part have an uncluttered look making them easier to read for people who prefer that
Middle Marking
Base has grids etched on it every ½ inches and you can actually even score on these if you want to.
Marked grid lines make it easy to vertically align your paper and also to make quick measurements
No extendable arm or folding line to hinder measuring in any area!! 
Transparent plastic finger guard is present near the cutting edge .This helps you to hold your paper near the blade safely.
Tonic Guillotine
This safety guard is  made perfectly....it is secured to the base and does not lift up when you lift the guillotine blade. 
In one of my cutter models the safety guard lifted up and it is a bit of an irritation! Also the safety guard has enough room under it to easily slip in your papers, foam, etc
Tonic Guillotine
You can even consider the safety finger guard to function as a smudge guard as it helps you to hold the paper in place without directly touching its surface!

There is a magnetic well in the top to hold your pins and paperclips! A nice additional feature indeed!!
Magnetic Holder
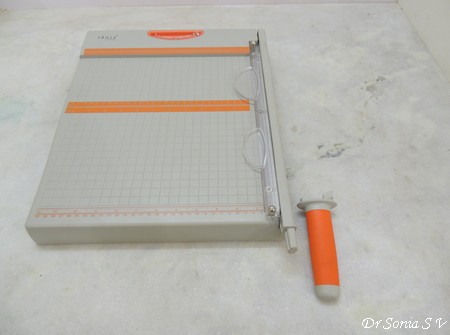
The kushgrip handle is detachable  and it can be stored in a slot under the  cutter. This makes the cutter more compact for storage or if you want to travel with it.
Detachable Handle


Here is a picture of my working space to give you an idea about the size of the  Tonic Guillotine 
Tonic Guillotine Cutter and Big Shot
Cons
 The only cons I could find were
  • A vertical measurement line would be a nice additional feature to measure the vertical dimensions of the paper without having to turn it.
  • The orange measurement markings on the top were somewhat difficult for me to read without my spectacles...but then my eyesight is not what it used to be...cant blame the cutter for that!!

Tips on Using a Guillotine Paper Cutter
  1. Always work on a stable surface - don't use your cutter on your bed or on a wobbly table - not only is it risky but you will not be able to get the required force!
  2. You will get the best cutting results if you use the guillotine cutter whilst standing as then you will use the guillotine levers in the best possible way!
  3. Abut your paper against the top edge to easily get perfect straight cuts 
  4. Always always press down firmly on the paper using the finger guards- this not only prevents your paper from moving while you are cutting it also helps give nice clean cuts
  5. Bring down the cutting lever of the guillotine in a nice fast sweep. Especially when cutting "difficult" paper such as handmade paper
Cutting Capacity
The tonic guillotine cuts a wide range of materials. I tried it with thin paper, holographic paper, thick card stock, foam, fabric paper, cardboard, and even plastic and all cut beautifully !
Here is the video demonstration of the Tonic Guillotine in action showing the range of materials it can cut and special demonstration of the dos and don'ts of using a guillotine!


I hope you liked this rather exhaustive writeup. Do share tips of your own and views!

Where to buy Paper Cutters
Here is the link to the complete range of Paper cutters at Crafters Corner 
Link to the tonic guillotine at Crafters Corner Tonic 12 x 12 Maxi Guillotine

18.10.16

Kraft Tex Mini Book and Luggage Tags Tutorial

Mini Book
         Being able to work with super tempting new products of my choice is one of the biggest perks of being DT for India's premier shop for imported Craft supplies....Shalini Mittal's Crafters Corner....Shalini always brings innovative and amazing products from all corners of the world to India! And C & T Publishing's Kraft tex is one product which has been selling out so fast that in fact I had to hold on for this post to go live as it had already sold out from Crafters Corner several times!!
        In this post I will share what is so special about Kraft tex and project ideas.

What is Kraft tex?

Kraft tex is a super special paper which looks and feels like leather, can be die-cut and stamped on like paper and yet is supple and strong like fabric and the ultimate is it can even be washed and ironed!!

Why is Kraft tex so special?

What is so special about Kraft tex and why it is so popular with paper crafters is that it has all the properties of paper which we paper crafters love [can be die cut, stamped, embossed etc] but yet is strong and durable and can take wear and tear. So it is highly popular  in making albums, books, bags, wallets and any project which needs to withstand wear and tear! 
Kraft tex 

Kraft tex
Kraft tex is sold in huge rolls of 18 x 54 inches and comes in many colors , the most popular being natural and black. I have used natural Kraft tex in my projects as I love the leather look of this shade of Kraft tex. The rolls are huge and value for money as you can create so many projects from a single roll.
Kraft tex Bag Instructions
When you buy a roll of Kraft tex you even get a free Tutorial with detailed pattern to make a handbag using Kraft tex. Kraft tex is so popular that there are even books of sewing projects using Kraft tex !!

How to Use Kraft tex ?

Kraft tex feels like a thick leather paper. You can cut it with normal scissors and even die cut it with thinlit /wafer thin dies.

Though it already has a lovely leather look and feel, if you want to make it look more like fabric/ leather ...here is how to do it :-
  • Cut out the required amount, crinkle it, soak or even boil it in hot water and either smoothen it with your hands or iron it and use.
  • Another way to get a crinkled leather look is to wash it in the washing machine and after drying ,iron it using your iron.
Because of the fibre content in Kraft tex it will not tear even on machine washing...isn't that cool!!!
Cutting ,Scoring and Embossing Kraft tex
Because of its unique properties you can score  Kraft tex using a bone folder and hence it can be used to easily make the spine of your mini albums.You can also run it through an embossing folder to get a lovely embossed texture
Embossing Kraft tex
I scored and embossed a piece of Kraft tex to form a sturdy cover for my mini book.Left the spine area unembossed as the spine would look better un textured.
A tip to follow when using Kraft tex in album making is to use a strong wet glue like Aleene's tacky glue rather than red tacky tape as it gives a stronger adhesion.
Kraft tex Mini Book Cover
Here is the inside of my mini book/album with pockets and tags.This book was made with a single sheet of 12 x 12 inch pattern paper and has 8 pages with pockets to hold 8 tags. I used 4 x 3 inch piece chipboard on the front and back and wrapped the whole thing in Kraft tex for extra strength.
Mini Book
Added a golden chain with cute metal charms on the spine of my book .
Mini Book
Created the  main focal element on the cover by twisting rose buds around a resin heart and adding leaves galore [Cheery Lynn  leaves and Heartfelt creations leaves] plus lovely crystal fillers.
Mini Book
All the metal charms and embellishments got a nice rubbing with Inka Gold. Do scroll down the post for links to all the products I have used to make this mini book.
Mini Book
I thought I would use this handy little mini book to hold the numerous lists I keep making.I am a lists sort of person and love to jot down to do lists , shopping lists, goals etc etc!
Mini Book
I first  made this Christmas One Sheet Mini Book following Kerri's Tutorial .I am sharing my version in this Video Tutorial  .These are so easy to make and will make great gifts
Making Monogrammed Luggage Tags with Kraft tex  

My second project using Kraft tex are these easy to make strong and cute Luggage Tags.
DIY Luggage tags
To make these easy DIY Luggage tags, I die cut Kraft tex using Xcut Luggage Tag dies though you can use any nesting die you have or hand cut your tag shapes.
Xcut Tag die
How easy is it to die cut Kraft tex?
It is super easy...and see how clean even the tiny circular apertures on the side have die cut...!
DIY Luggage Tag
Gluing Kraft tex
Kraft tex Luggage Tag
          Though Kraft tex has many properties of cloth it is not difficult to glue . I used Aleene's Fast Grab tacky glue not only to glue paper and ribbon to Kraft tex but also one layer for kraft tex to the other. Love this glue which Shalini sent me in my DT pack.It is sticky but not irritatingly sticky if it gets on your fingers, dries fast and is very very strong.
Luggage Tags
Stamping, Inking and Heat Embossing Kraft tex
DIY Luggage tags
      I wanted to see how well Kraft tex took inks and so stamped on it with a variety of ink-pads including Memento and Archival ink using alpha stamps .Also experimented using Embossing Powders and loved how sturdy the material was in taking the blast from the heat gun.
Alpha Stamps
In the tag below , the central part is normal white card stock I inked with Tea dye and Walnut stain Distress Inks  to match the color of natural Kraft tex . The shiny butterfly was made using glass cabochons, mariposa paper and a super useful Ultimate Back support which can convert anything into a hanging charm! Here is the  Glass cabochon Tutorial.
DIY Luggage tags
       All the cute metal charms I have used in my Kraft tex projects were part of my Crafters Corner DT package and my all time favourite is the gorgeous golden flower girl!!
       The monogram in this tag has gold embossing, outlining with a Sharpie and a die cut felt P.
DIY Luggage tags
I hope you liked my mini book Tutorial and  Kraft tex projects...do tell me.
More Resources
Supplies : All from Crafters Corner
Stamps : Heartfelt creations Open Leaf stamp ,Alpha Cirque Stamps 
Dies : Cheery Lynn Butterfly, Heartfelt creations Classic Leaf Die , Xcut Luggage Tag Die

Related Posts Plugin for WordPress, Blogger...