Showing posts with label Birthday Party Crafts. Show all posts

25.11.18

Christmas Stars Tutorial

Paper Stars
Hi friends I love making handmade decorations and every Christmas I do try to make something handmade! Sometimes it is really elaborate and sometimes it is something very very simple.
So for my DT post for Maureen's Rudolph Days Challenge  am sharing a quick and easy to make Christmas decoration - a Paper Star which is rather unique in that you can fold it and keep it away for easy storing.
Christmas Stars

These  3 dimensional stars  were made with 6 squares of paper ,each measuring 12 cm[4 ¾ inches] and the complete star measures 6.5 inches.

I used  the new Crealies Squash fold die[the same one I used to make the Apron Squash fold albumto quickly cut out the squares as they have the score lines in place but you can also hand-cut the squares
Christmas Stars
Since you will be able to see all the sides of these stars ,if you are using single sided pattern paper you can stamp the reverse of your squares before you assemble the squash folds into a star.
You can alternately use double sided papers or make your own special Christmas stars using your favorite Christmas stamps!
Stamp the squares
You can use 5 squares to make a 5 pointed star or use 6 squares to make a more symmetrical 6 pointed star like I did.
You need not glue the last square but just hold it apposed to the first square using paper clips !
Here is the Tutorial 


Dont forget to drop in at Maureen's Rudolph Days Challenge with a Christmas Project...the Challenge runs till Nov 30th and Maureen always has wonderful prizes for a random winner.

Supplies : Dies :  Crealies Dies:Cardzz No 13  ;Crealies Stamps:Mounted Rubber Stampzz No 11,Bits and Pieces No 135

27.7.15

Folded Star Tutorial

Folded Star Decoration 
         Hi friends sharing a super simple yet glamorous paper decoration tutorial .Had made these folded paper stars as part of my daughter's Frozen theme birthday party decorations [ you can read about it by clicking the link]
DIY Frozen party Decorations
We had a blue- white color theme and so made white stars with blue  foam star tips and  snowflake centers
Folded Star Decoration
Since I used white ivory card stock to make the body of the paper stars added a bit of glamour using glitter foam snowflakes and stars
Paper Star Decoration
Paper Star tutorial 
I made these Paper stars initially by following a tutorial by Alix but though it is a super simple project I did run into a few hiccups hence sharing a detailed tutorial with tips.

Materials Required

  • Thick Card Stock- For Indian readers I recommend Ivory Card stock available in Stationary shops otherwise you can use the  thickest card stock you get. Good quality double sided pattern paper would look especially cool.Avoid thin paper as it will make your stars floppy!
  • Adhesive : Double sided Tacky tape [Read more here: 12 Tacky Tape projects]makes your job quicker otherwise use regular white glue [ Fevicol MR]
  • Stapler- drastically cuts down your time!
  • Paper Cutter- If you have a guillotine cutter [read more here : Paper Cutting Tools] making a large number of paper stars is quick and easy!
Folded Star Tutorial 
Cut card stock into 10 x 1 inch , 8 x 1 inch and 6 x 1 inch strips.

Folded Star Tutorial 
 Fold all the paper strips in half
Folded Star Tutorial 
 Line up the ends of the paper strips- it is important to line them up perfectly to get a perfect star at the end!
Folded Star Tutorial 
 Glue or staple the ends together
Folded Star Tutorial 
 Staple the other end of the folded strips
Folded Star Tutorial 
You have made one unit of your folded star. You need to make 7 or more such units. I found that stars made of 7 or 8 units looks the best.
Folded Star Tutorial 
So to make one folded star you need to cut 7  each of 10, 8 and 6 inch wide strips and staple them together.
Folded Star Tutorial 
Once you have made 7 folded units, apply double sided  tape or white glue to the outer side of the unit and stick to another unit as shown
Folded Star Tutorial 
If you are using white glue give enough time for the glue to dry. I found tacky tape the easiest and fastest adhesive option in this step. You can also use a stapler but it can be tricky to staple through several layers of thick card stock!
Folded Star Tutorial 
Keep on sticking more folded units
Folded Star Tutorial 
If you wish to add a ribbon you can add it to the adhesive strip before sticking together your 1st and 7th folded unit!
Folded Star Tutorial 
And here is how the folded star looks --super easy to make but a word of warning its not for little hands as my daughter [ she is 9 yrs] declared it was tricky to align the paper strips properly!
Folded Star Tutorial 
Since these stars are dimensional I added punched out glitter foam stars and die cut snowflakes to both sides of the folded star.
Folded Star Decoration
The blue one you see below was made from thinner chart paper and did not turn out as sturdy or as beautiful as the others when hung!
Folded Star Decoration
I hope this easy star tutorial will come in handy for making easy party decorations or Christmas decorations.
Folded Star Decoration
Edited : This tutorial was featured at Totally Tutorials

22.6.15

DIY 3 Tier Stand Tutorial

DIY Cupcake Stand
   Hi friends sharing a 3 tier cupcake stand I made for my daughter's Frozen themed Party [you can read about some of our other Frozen theme party decor here : DIY Frozen BirthdayParty]. 
         Store bought stands are very expensive and I dare say not so pretty or personalized! You can make these stands in 2,3 or more tiers to display not only cupcakes but all kinds of party food or even to beautifully display your handmade crafts for your next craft exhibition or to simply sit prettily in your room to display little knick-knacks! 
DIY 3 tier Stand
          To make your tiered stand you need to cut out squares or circles from thick cardboard [or thin plywood if you have access to it].I recycled the packaging from a fan to make my tiered stand. Squares are easier to cut out but if you want to cut out circles you can use circular plates or trays to trace around and cut.[ My circles are 12 inch, 8.5 inch and 6.5 inch in diameter]
 Cupcake Stand Tutorial 
Apply normal white glue or preferably a  decoupage glue such as mod-podge [ you can read about Modpodge here : Mod Podge Tips and Secrets] on the non-glossy surface of your cardboard / wooden shapes and stick pretty paper.
If you use a foam brush you can quickly and easily apply a uniform thin coating of glue [which is essential to prevent wrinkling and wrapping up of your lining paper].
Cupcake Stand Tutorial 
For pillars of your stand you can recycle tins / card board tubes  or even plastic containers like I did here.
Cupcake Stand Tutorial 
           Tins cans are quite sturdy as pillars but I couldnt find one which fitted the height requirement I wanted for my base [yes we creative souls are sometimes finicky to the centimeter!] so I stacked several plastic containers to get the height I wanted and still keep the base sturdy!
Cupcake Stand Tutorial 
Wrapped and hot glued silver glitter foam around the stacked containers and the yellow rectangle you see on top is double sided foam tape I added to help level the top and easily stick it to my cardboard piece.
Cupcake Stand Tutorial 
You can wrap your tin /cardboard pillars with  pattern paper or foam like I did here.The easiest adhesive for this is the red tacky tape[ Read more about Red tacky Tape here: 12 Uses of Tacky Tape]
Cupcake Stand Tutorial 
Not only do I love the look of glitter foam , the reason I used foam in this project was that if you hot glue foam you will get a very strong adhesion!
Cupcake Stand Tutorial 
Here is how my 3 tier stand looks un-embellished.
Cupcake Stand Tutorial 
Covered the raw edges with a Joy Crafts die cuts and added lots of silver Cheery Lynn  die cut butterflies interspersed with tiny blue plastic butterflies.
DIY Cupcake Stand
I used blue ruffled ribbon on the pillar base[ also serves to hide glue blobs!] and also  added tiny pollen bunches on the pillars to deck them up a bit!
DIY Cupcake Stand
Since this particular stand was for our Frozen theme party I added a glittery snowflake on top.
DIY Cupcake Stand
The snowflake was attached to a wooden skewer attached to the top tier of the stand using air dry clay.
DIY Cupcake Stand
I used Spellbinders and Sizzix dies to cut out my snowflake from glitter foam [what I like about foam in such 3 D projects is that it is light weight yet dimensional and easy to adhere with hot glue !]
DIY Cupcake Stand
Here is the aerial view of the easy to make 3 tier stand. I hope you enjoyed this tutorial
Supplies : Dies : Sizzix  Winter, Spellbinders Snowflake, Joy Crafts lace border, Cheery Lynn  butterfly
Edited : This tutorial was featured at Totally Tutorials!

8.6.15

A DIY Frozen Themed Birthday Party !

       
 Frozen Themed Birthday Party
           Dear Friends , the 2nd half of May each year is super busy for me as my daughter celebrates her birthday on May 30th. In India we have a lot of religious festivals with elaborate rituals and customs but in our home we give  a miss to most of these festivals and give the maximum importance to celebrating our little girl's [ no more little!] birthday!
DIY Frozen Themed Birthday
             In January, I had shared some Foam baskets I had made in advance for her Birthday and many of you had commented I was so smart to plan so much in advance! Well May arrives and I am not feeling very smart as the little princess claims she wants a " Frozen" theme party . In usual "stressed out" - "no time for it" - Mom mode I panicked but thinking back it was one of the most enjoyable themes to DIY for a birthday party!
         The net abounds in Frozen theme party ideas and the best thing was the color scheme of blue and white and lots of snowflakes. My daughter is currently in love with the color blue [ she did go through and orange phase some years back!] and who doesn't love snowflakes!!
          Sharing lots of pics and tips so that any mom/ grandma/ dad/ aunt out there with a birthday girl who demands a Frozen party can take courage...we did it and so can you!
1. Invitation Cards
The first thing we made were the Invitation cards.
Frozen Invitation Cards
They were super simple this year compared to our  Scroll Shaped Card for our Egyptian Party last year]
Frozen Invitation Cards
           We started with white card stock, embossed it using a Sizzix folder , stamped snowflakes[ Itsy Bitsy foam stamp] , randomly sponged on blue ink and topped it off with punched glitter foam stars ! I  am especially proud of them as they were designed and made by the birthday girl herself!
Tip : Keeping things random as in the random stamping and sponging made these cards super quick & easy  to make .A bit of glitter  [ like in our glitter foam star] always adds a bit of  glamour!
2. Easy Snowflakes
Paper Snowflakes

          We used this tutorial of  
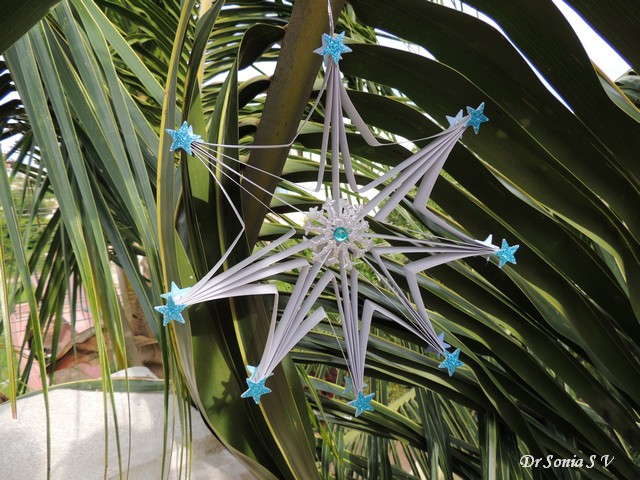
Paper snowflakes/ stars I made long back when my daughter was younger. This time I am proud to say the birthday girl could make a snowflake completely on her own! We used regular thin chart paper to make huge snowflakes  and hung them all over the house!
Paper Snowflakes
Tip : this is one decoration you can afford to make some  errors..you dont have to cut perfect straight lines or even cut lines at equal distances..your final snowflakes will still turn out cool! If  you dont obsess about perfection these are quicker to make!
Frozen theme Party Props : Castle and Snowflake Tree
Frozen Party Decor

3.Frozen theme Castle
I really wanted to make a huge 3 D cardboard castle but time was a big crunch so I had cook up a way to give my little girl her theme castle...!
Frozen theme Castle
           We altered the pink and purple toy castle you can see as a prop in our Tangled theme birthday party . The toy had faded over the years so we actually gave it a face lift ! I spray painted it white first and handed it over to my daughter to paint blue wherever she wanted!
Frozen theme Castle
Tip : When in a time crunch use props you may already be having in your home!

4.Icicle - Snowflake Tree
Snowflake Tree
           Okay this one just happened! I had all these spoons [ from my daughter's Pediasure days!] dumped on my table as I was sorting through spoons for the party .Distractedly  stacked them while I was thinking of the party menu and lo I had created an Icicle tree!
Spoon Craft
Well a sorry looking icicle tree [yeah I invented that word!] till you dress it up with glittery snowflakes [ made using a sizzix die and glitter foam]
Glitter Foam Snowflakes
Tip : You can make decorations by recycling the craziest of things!
5. Happy Birthday Accordion

Accordion Happy Birthday Banner
I am still obsessed with Karen Burniston' s Pop Up Accordion die  [earlier projects here : Pop Up Dangler Card, Pop Up Accordion Card] and used to it make a glittery Happy Birthday in a Pop Up - Accordion style

Accordion Happy Birthday Banner
            All the silver and blue glittery elements were die cut from glitter foam . Added a layered snowflake in the centre of the accordion for the Frozen theme!
Tip : If you dont have time to make a big Birthday Banner , a simple Accordion style [even without the pop up element] Happy Birthday is an easy yet glamorous looking birthday decoration to make!
6.Frozen themed Birthday Card
Pop Up Birthday Card
Now this was a super simple highly un-embellished card but you know what...the birthday girl loved it!!
Pop Up Birthday Card
           And no I didnt even print out the images of the characters from the movie [ Murphy's Law of Printing: Home Printer wont work when its  really needed to work]! Like most crafters I hoard a lot of stuff and the images were cut out from the packaging of the Frozen character toys I got my daughter!
Pop Up Birthday Card 

The delicate "Happy Birthday" and cute snowflake were die -cut from glitter foam [Yeah you know I love glitter foam!]
7.Blue Balloons !!!
Frozen Decor
            As I already told you one of the easiest things about the Frozen theme was the color scheme. It was so easy to give an instant Frozen theme look by simply decorating with lots of blue and white balloons!
Time Saver Tip : Using double sided foam tape to stick balloons to wooden/metal/plastic surfaces is much quicker than tying strings on them and hanging them! But do avoid foam tape on your walls as  it can peel off your wall paint when removing!
8. Olaf the Snowman 
Olaf the snowman 
         If you have seen the movie  I bet one of your favorite characters is Olaf the snowman! Many of you know my daughter loves to draw and paint .Well she drew and painted 2 huge Olafs and we propped them on card board supports to complete our Frozen theme Decor!
The Birthday Girl
I hope you enjoyed  our Frozen theme Birthday Party decorations. We made lots more Frozen themed crafts and I will share them in subsequent posts!
Supplies :  Stamps: Itsy Bitsy Snowflake Foam stamp,
Paper : Blue stars and rosettes made with Chart Paper,Olaf and cards made with Ivory Card Stock,
Punches : Martha Stewart Deep Daisy fan from Crafers Corner [ on the rosettes],  Star Foam  Punch
Dies : Sizzix Winter Die from Crafters Corner, Elizabeth Craft Designs Karen Burniston Oval Accordion Pop Up die, Elizabeth Craft Designs Happy Birthday, Spellbinders Snowflake Die, Spellbinders Donna’s Alphas , Sizzix You are Invited Embossing folder 
Related Posts Plugin for WordPress, Blogger...