Showing posts with label Foam craft. Show all posts

17.1.20

DIY Stationery Set


Hi crafters...sharing a cute and functional project I made using Crealies  dies: a DIY personalized Stationery Set.
My daughter and I often go to craft stores together and craft shopping  is one way we really bond! When she saw this pattern paper with cute succulents at our local craft store ,she begged me to buy it.I was skeptical at first as I really couldn't think of  how I would use cacti in my creations!!!
She wanted me to make something with it for her...and I made a stationery set.
The set has a Post it note-holder, a Mini bag, an eraser, Jumbo paper clips and a Matching pen.

The post it note holder is in the  shape of a school bag. I love how Annelies [ the  owner of Crealies  ] designs her dies with gorgeous useful add-ons like the  tiny pockets you can see in the  front and the  strap and buckle! The buckle slides so smoothly over the  strap!


I made a layered flower  using Crealies dies and can you see the  dangling "P"...it is my daughter's Monogram and I made it using Crealies  Alfies dies , foam and pattern paper.

The school bag is held closed with magnets and opens to reveal a 3 x 3 inch post it note....I love how the  Crealies  Cardzz dies are so perfect to make large utility projects.

There is space to add a small pen or pencil inside if you wish.


On the  other side I added a flap[ under which you can hide something secret!!]  and personalized it with my daughter's name. I also diecut several tiny numbers and added it to the  base to match with the  theme!


This is a tiny school bag and  turned out soo cute!


This was made with the  Crealies  Xtra set and it too has tiny dies to add the  cute pockets with the  buttons and a separate strap and buckle die too.


I constructed this using several layers of foam and card stock so it is sturdy yet light weight. It too has a magnetic closure ,


The mini school bag can hold a big eraser which is again monogrammed "P" using the  Crealies  Alfies. Love the size of these alphabet dies as they are tall but thin and perfect to fit in tiny spaces.


This is the  back side of the  bag


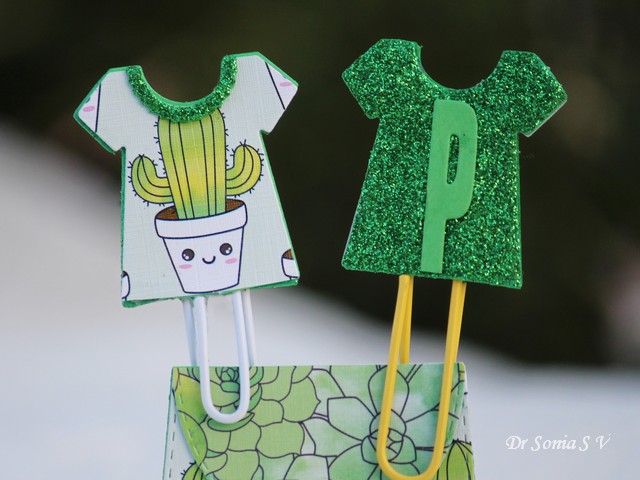
I used Crealies Uno Camera and Onesie dies to create these cute paper clips. 


These are very sturdy as I added foam and cardstock beneath the  pattern paper and the  paper clip is hot glued between layers of foam so that it doesn't come out easily. 
I personalised the  back side with "P".

The little camera turned out sooo cute!I have shared a similar Camera clip in this post too: Interactive Camera 


And lastly here is a matching pen  which was super easy to make by wrapping and sticking the  pattern paper around a pen.


I used glitter foam around the  pen cap and fuzzy cut an image from the  paper and added it to the  pen cap

Added the  alphabet " P" onto the  foam pen cap to complete the  set!


I hope you liked these ideas...my daughter loves this set . It was easy to make  and will make a lovely handmade gift set !

Crealies Dies/Stansen :


12.1.20

Unicorn Theme Party

Unicorn Theme Party
       Hi friends one of my crafty resolutions for 2020 is to get back to sharing crafts with my friends in blog-land and other social media. My daughter and I made so many things in 2019 but photographing and sharing the  projects online took a huge backseat. I had raised the bar on myself and felt either the  projects were too simple or the  photos were subpar or life simply got in the  way and I ended up sharing very few of my projects last year! Trying not to let self doubt and procrastination get in the  way this year!
Unicorns are so popular with both children and adults and we celebrated my daughter's 13th birthday with a super fun Unicorn theme party.
Unicorn Theme Party
My daughter's birthday falls on May 30th and she has summer vacations in April and May ...so every year we spend a good chunk of the  vacation planning her birthday.
We had the  party in our living room so we  put up the  main decorations in our living room.We had a pink and white balloon arch at the  doorway to our living room.
Unicorn Theme Party
We put up pink and white balloons and large flowers all over the  room but concentrated majority of the  unicorn decorations on this wall. You can see a huge handmade Unicorn banner,cute  clouds and rainbows ,a rainbow unicorn, floating hot air balloons and nearly a dozen decoupaged unicorns!

Unicorn Theme Party
The hot air balloons were die cut using the Spellbinders  Hot Air Balloon Contour Steel Rule Die and yes it did take hours to make the  balloons 3d! .My daughter helped to layer the  balloons atop Crealies  oval die cuts and we topped off the  hot air balloon danglers with die cut clouds [ made using Itsy Bitsy clouddie]
Unicorn Theme Party
The balloons dangle from blue satin ribbons and I added  clouds [ made using Memory Box dies]  on alternate ribbons.They looked fabulous swinging in the  wind!
Unicorn Theme Party
We put the  letters of  our "Happy Birthday Prisha" banner on Unicorn faces.The ears and face were made using Crealies  oval foam die cuts ...we could have added unicorn horns but my daughter wanted them to be plain horses!!The tiny floral stamps are also from Crealies  and the  flowers were also die cut with Crealies  dies.
Unicorn Theme Party
 My kiddo made the  Cloud hanging decoration freehand...aren't those cloud eyes simply adorable !!
Unicorn Theme Party- Rainbows and Clouds Decoration
The rainbows were pretty easy to make...we used  foam with rainbow colours and cut out big semicircular arches to make the  rainbows and added Memory Box die cut clouds on the  ends.
Unicorn Theme Party Cloud Pinata
 My little girl[ well officially a teenager but a little girl to me!!] made the  super cute cloud pinata all by herself...in fact she took hours to make it but it does look super adorable doesn't it!
Unicorn Theme Party 
She also drew and colored this gorgeous huge Unicorn..the  locks of hair are outlined with glitter glue and looks really special !
And here is the  birthday girl! The gorgeous hair bow is handmade...I made the  beautiful rose and foliage using foam !
Unicorn Theme Party
We had around 20 teenage girls for our party and planned some simple crafts for the  girls to make . We set up 4 big tables and here is how our table looked.
Unicorn Theme Party
And this is what the  girls made...Unicorn post it note holders. I cut up pieces of chipboard before hand so that the  base would be strong and pre-scored card stock stands for the  holder.Gave the  girls an assortment of pretty pattern papers to choose and lots of embellishments like rhinestones, pom poms , flowers, sequins and glitter to personalize their Post it note holders.
Unicorn Theme Party
The girls also played quite a few games but I didn't have to stress too much about the  games as my daughter herself organised all the  games !!
It was heartening to see the  girls enjoy themselves and after the  party so many of the  girls' mothers messaged me how much the  girls' enjoyed themselves!

I made quite a few Unicorn themed decoupaged decorations and since decoupage is such a time consuming craft ...I started making all the  decorations weeks before the  party!
Unicorn Theme Party
 Upcycled an old plate into a Unicorn!!
Unicorn Theme Party
And recycled a bottle into a Unicorn...this time with a frilly ruffled ribbon top and  pearls!!

Unicorn Theme Party
Made the  Unicorn themed boxes to hold our craft activity supplies by upcycling cardboard boxes
Unicorn Theme Party
And since every party needs tissue boxes...Unicorn tissue boxes!

Unicorn Theme Party
Made 3 Pen stands by recycling old Nutella jars into Unicorns!
Unicorn Theme Party
They are my personal favourite!
Unicorn Theme Party
I don't have a good photograph of our cake  but here is our 2 tier homemade Unicorn cake...It is a chocolate cake with butter icing done using Russian nozzles. My daughter made all the  cute  unicorns by hand sculpting fondant!
Unicorn Theme Party- Home made Cake
And though no unicorns in this one...I have to share it as it is always so popular at parties...a Jelly Flower cake...completely handmade with Jelly! [I am especially proud of  how it turned out as I managed to make it in between the  mad rush of getting the  house cleaned , putting up the  party decorations , baking and icing the cake and cooking for the  party!!]

Unicorn Theme Party- Jelly Cake
I hope you enjoyed reading about our party and hope some of these ideas may be useful !
Here are posts from our previous themed birthday parties:
A Frozen theme Party
Minion themed Party
Giant Paper Flowers Tutorial
Egyptian themed party - Scroll Invitations
Egyptian themed party - How to make a huge Mummy
Egyptian Themed Party- Framed Decorations Tutorial
Rapunzel Theme Party

22.12.18

Foamiran Roses and Leaves Tutorial

Foamiran Roses and Leaves
Hi friends...I love making flowers and  had a gala time experimenting with the new Dress My Craft Rose Die # 2. There are a total of 14 dies in this set and it is perfect to make roses ranging in size from tiny rose buds to really huge blooms!
Let me jump right into the Tutorial
Foamiran Roses and Leaves Tutorial 
You can use just 2 sizes of petals to make large  foamiran roses. Die cut 5 sheets of foamiran at a time using the petal dies.This not only saves time but helps to thin the foamiran even further!
Foamiran Rose Tutorial 
Die cut at least 2+3+5 [these are the petals in each layer from inside to out] =10 small petals and 5+7 [outer 2 layers of petals]= 12 larger petals. Always cut a few extra petals as foamiran is very thin and it is inevitable to tear a few petals as you work especially if you are impatient like me!
Foamiran Rose Tutorial 
Use a coloring media of your choice to shade petals if you wish. For these roses I lightly shaded the upper part of the petals with Mungyo Artists Soft Oil Pastels. I shaded the small petals slightly darker.
Tip:  Shading the central petals darker helps to give more depth to your flower.
Foamiran Rose Tutorial 
Shape the petals into a cup shape using your fingers or a ball tool. If you want to save time you can heat your petals by touching the petals to an iron and your petals will quickly curl into a cup shape  but this does tend to make your petals thicker !
Tip: Using your fingers is faster but make sure you don't have nails on your fingers as otherwise you will get nail marks on your petals!
Foamiran Rose Tutorial 
Take a forceps and grasp the upper edge of your petal as shown.

Foamiran Rose Tutorial 
Twist the forceps to the back  as shown.

Foamiran Rose Tutorial 
Heat this edge on the iron box for a few seconds

Foamiran Rose Tutorial 
Remove and curl it into place using your fingers again.This is how the back of your petal will look now.

Foamiran Rose Tutorial 
Do the same for the other side of your petal.

Foamiran Rose Tutorial 
Sometimes as your heat the petal the cupping may smoothen out...then use your ball tool/finger again to cup the central part again.

Foamiran Rose Tutorial 
Don't be frustrated if you tear a few petals in this shaping step !! Shape all your petals in this way. You will need around 10 small and 12 large petals to make your rose.
Foamiran Rose Tutorial 
The easiest way to make a rose is by starting with the bud. You can use  a crunched up cotton ball, aluminium foil , clay or even a paper ball  as your center. 
I used the pointed Styrofoam buds from Dress My Craft for my rose center...love that these come in many sizes,have a wire stem to hold and the shape is just perfect!
Foamiran Rose Tutorial 
Glue 2 petals overlapping each other around the central Styrofoam bud. 
Tip: the quickest glue for foamiran is hot glue but be very sparing in the amount of glue you use and only apply at the lower part of the petal...that way you wont see unsightly white blobs of glue when you make your flower!

Foamiran Rose Tutorial 
For the 2nd layer use 2 to 3 petals. The easiest for beginners is to use 2 petals in the 2nd layer as trying to get in 3 petals is a tight fit ...so don't be frustrated if your rose center doesn't look as cool as you wanted it to!

Foamiran Rose Tutorial 
Add 4 to 5 layers in the 3rd layer. Working in 5 petals in easier 
Tip: Once you have made one or 2 flowers you will quickly understand the right amount of overlap to get that perfect petal arrangement!
Foamiran Rose Tutorial 
Add the  outer 2 layers in the same way...overlapping the petals as you glue.
Foamiran Roses and Leaves
If you are making a bouquet or a home decor item the under-surface of the flower will be visible...add a calyx using the calyx die in the set.
Foamiran Rose Tutorial 
 Scrunch up the die cut calyx to make it look more natural. Turn your rose over and apply a blob of glue on the center . Add your calyx, curling it to overlap and cover the center and stem of your rose.
Foamiran Rose Tutorial 
How to make Foamiran Leaves

Foamiran Leaf Tutorial 
Once again die cut 5 sheets at a time  ...this helps to make the leaves thinner.

Foamiran Leaf Tutorial 
You can draw,use mould or even stamp to add veins to the leaves but here is a super easy way to add lovely veins.
Place the leaves on a perforating pad [ used in parchment craft and flower making] or a thick mouse pad and run the pointed tip of the Dress My Craft golf tool on the leaves to make your veins.
Foamiran Leaf Tutorial 
It is so quick to make your leaves using this method!
Tip: Hold your tool in a slanted fashion rather than vertically up...this way you will not tear through the delicate foamiran.
Foamiran Leaf Tutorial 
If you are making a bouquet you need to add leaf stalks...sharing a quick tip to make your job easy and fast: Insert floral wires an inch or so into the glue bottle, twirl and remove it.
Tip : Use a quick drying tacky glue for fast and mess free results. I used Aleene's tacky glue here.

Foamiran Leaf Tutorial 
Stick the wire on the under-surface of your leaf[ the surface with the less prominent vein markings]

Foamiran Leaf Tutorial 
It is faster and more fun if you batch process a bunch of leaves in one go!
Foamiran Leaf Tutorial 
Leave undisturbed to dry . Be patient!!

Foamiran Leaf Tutorial 
And voila...your beautiful leaves are ready to go on your floral arrangement!!
Foamiran Roses and Leaves
I hope you liked this project and found the tips and techniques useful.
I apologise I could not make a video ... I am much better at writing than speaking and I really wanted to share all the steps and tips in a post so that it will be easier for you to reference back to it at leisure!!
Here are the supplies used.
Everything is from Crafters Corner
Supplies : Foamiran SheetsDress My Craft dies  : Rose die #2 , Styrofoam Buds, Mungyo Artists Soft Oil PastelsFloral Tape, Golf ToolsBall ToolsFlower making wireAleene's tacky glue
Related Posts Plugin for WordPress, Blogger...