|
| Pop up cake card |
A pop up cake is a versatile insert suitable for most cards be it birthdays, anniversaries, and any form of celebration.
 |
| Embossed Celebration Card |
The pros say you should keep the outside of a pop up card simple ! So only used a paper rose,some plastic butterflies and pearls on this lovely embossed white paper .Since my theme is celebration the embossing reflects party baubles and ribbons.
 |
| Heart Punch Handmade Flower |
I made the paper rose using my heart punch and here is the link to the
Heart punch Rose Tutorial.
Here is the closeup of the Pop up cake. Its simple to make and fun to embellish
 |
| Pop up cake card |
The Felt flower is handmade by using a circle of felt , cutting it in a spiral and rolling just like you make a spiral paper rose. Only difference from a paper spiral rose is its difficult to hold a felt rose using white glue so I used a glue gun.The shiny metallic green leaves were bought from a local fancy store.
 |
| Handmade Felt Flower |
This is one of the simplest Pop up Cake cards you can make.Why I like it so much and am sure you would too is that you don't have to use a scale to measure . You dont need a Craft knife and it can be made in a jiffy to beautify any card!
 |
| Pop up cake card |
Materials required to make a Simple Pop up cake card
- Card stock for base
- Card stock for Pop up card Insert:Here I have used half of an A 4 card- You can use thin paper too to make this pop up cake card. Don't use too thick paper as it wont fold well.
- Scissors
- White Glue
How to make a simple Pop up cake card
Its simple so dont get daunted by the number of photos-- I just posted lots of photos to illustrate each step
Fold your card piece into half
 |
| Pop up cake card Tutorial |
From the central fold line drop down 2 parallel lines around 2- 2.5cm long [make it as wide as you want].Join the 2 lines. Here you can see my latest toy-- its called a " Roll N Draw" I picked it up from a local stationary shop for 20 Rupees[ quite cheap!]Its a fantastic instrument -quite handy to draw parallel lines, circles,arcs,squares,measure angles!A useful tool for the paper engineer!
 |
| Pop up cake card Tutorial |
Dont worry about erasing any lines as you are working on the wrong side of your pop up cake card.Cut the parallel lines you drew.
 |
| Pop up cake card Tutorial |
Fold the step you have cut in the manner shown
 |
| Pop up cake card Tutorial |
Open the card and this is how it will look.
 |
| Pop up cake card Tutorial |
Now reverse your fold by pushing at the central fold from behind and you have the bottom layer of your pop up cake card.
 |
| Pop up cake card tutorial |
Close you card.Drop down 2 parallel lines like you did earlier only make them smaller say around 1.5 cm long. Since you are making a cake ,position the lines so as to make the 2nd cake layer at the center of the lower layer.
 |
| Pop up cake card Tutorial |
Cut only the top layer as shown.
 |
| Pop up cake card tutorial |
Fold and reverse your fold like you did earlier .
 |
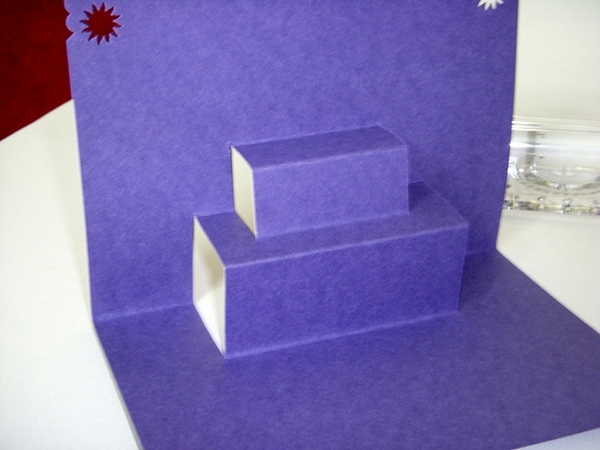
| Pop up cake card Tutorial |
Now you have made the 2nd layer of your pop up cake card.Stop there or go ahead and add one more tier to your pop up cake!
 |
| Pop up cake card tutorial |
In the similar fashion you can make as many layers for your pop up cake as you want.Only take care to make the length of your drop lines smaller than the previous layer's.
 |
| Pop up cake card Tutorial |
This is one of the simplest pop up mechanisms and you can build all sorts of scenes on the steps.
 |
| Pop up cake card Tutorial |
Add candles, flowers, faux icing what not!
 |
| Pop up cake card |
One more tip I would like to share about making a pop up card is to take care while sticking your pop up to your base card.
Most pop ups look more effective stuck on a base card of contrasting color. Apply glue well to all the corners and edges and position the central crease flush on to the base card central crease.
 |
| Pop up cake card Tutorial |
Apply glue on one side at a time as shown.Dont use extra glue as glue seepage can spoil our pop up effect.Apply glue to the other side of the pop up mechanism and fold the base card over on to it.
The golden rules are to apply glue to all edges and corners, apply only a little glue ,test your pop up and then allow enough time for the glue to dry.
 |
| Pop up cake card |
Have fun making a simple pop up cake card. And do tell me how you like this celebration card.
From Itsy Bitsy : White Embossed Card, Flower Punch,Corner Punch, Alpha Beads to write " Celebrate", Plastic Butterfly embellishments