Showing posts with label Quilling. Show all posts

28.2.16

Butterfly Garden Rotating Pen Stand

Altered Pen Stand
         Hi friends one of my crafty resolutions for the year is to pretty up mundane looking or throwaway objects  that are already present in my home .So yes every boring tin can, cardboard box and pen stand is getting a makeover!
Rotating Pen stand
        I love to participate in craft challenges and over the years a few have become definite favorites....one of them is  Mrs A  Butterfly Challenge ! The current theme is Butterflies + Glitter + Grape Color.
        I altered the  rotating pen stand shown above with a subtly glittered butterfly themed papers from DCWV Mariposa stack and added a golden heat embossed water colored purple 3 D rose .Here is the tutorial to make a 3 D Stamped Rose : 3 D Decoupage tutorial 
Heat Embossed Rose
The purple flowers all around are foam flowers and here is the tutorial I used to make them : Daisy tutorial 
Purple Rose
            Also added a few quilled elements [ tear drop shapes and fringed flowers ]to match the creamish brown color of the Mariposa pattern paper.
Heat Embossed Butterfly
        The butterfly shown above is a vellum heat embossed butterfly with a glittery purple center layered on a golden Cheery Lynn  butterfly.  I also used glittery purple foam flowers to form a flat easy to glue base for  several of the foam daisies.
Butterflies
            In the panel above you can also see a simple beaded purple flower I made! The pen stand looks different from different sides but overall it is a butterfly garden!!

Supplies : Dies :  Cheery Lynn  Butterfly , Cheery Lynn  Sunflower , Heartfelt creations Classic Leaf ,  Sizzix- Hero Arts  Stamp- Die Set Flowers and Butterflies 657773 , Provocraft Natural and Texture Border ,Heartfelt creations Botanical Wings   
Stamps : Winnie and Walter In Bloom Elsa's Flora Stamp Set , Sizzix- Hero Arts  Stamp- Die Set Flowers and Butterflies 657773 , Heartfelt Creations Bold Leaf  , Heartfelt creations Botanical Wings 
Papers : DCWV Mariposa

1.12.15

Autumn Flowers Photoframe

Paper Flower tutorial 
    I love making and  altering photo-frames and this frame features simple handmade Paper flowers made using the Spellbinders Rose creations die and glitter balls
Paper Flowers
            The vintage photo is of my husband , his sister and parents on the day he graduated from medical college many years ago!!
Paper Flowers
         The frame base has a deep orange colors . My flowers are a creamish yellow and the petal edges and center inked with a tinge of red. The leaves have several shades of green!
Paper Flowers
The fringed flowers were made using a shiny metallic paper. My husband loves flowers and gardening  so I made this photo-frame especially for him!
Paper Flowers
I hope you like this simple Photoframe with lots of flowers and foliage!
Supplies : Dies : Spellbinders Rose Creations  , Heartfelt creations Classic Leaf
Stamps : Heartfelt creations Leaf
Linking to 
  1. Sparkles Forum Challenge
  2. Simon Says Work It Wednesday Nov
  3. Sweet Stamps Anything But a Card Dec 15

9.9.15

Handmade Burlap Flowers

Burlap Flowers
           I have a definite obsessive style to my crafting ...when I love something I like to keep on experimenting with it...and so you have seen my foam phase, corrugated sheet photo-frame phase ,oval accordion die phase, Sospeso Trasparente phase etc etc. Well now its a Jute [other wise  called Burlap/ Hessian] phase!
Altered Box with Jute Flowers
            Its always fun to alter a mundane object and this time an empty ice cream container got the works!If you have not tasted this flavour of ice cream...you have missed something big time...its Tender Coconut flavour and my its divine!! No I am not associated with the company who manufactures it...just giving a shout out to tickle your sweet tooth!!!
Altered Box
         Stuck pattern paper over the lid of the box and layered an inked PoppyStamps Meso background  die cut over it. Added Burlap flowers and some quilled fringed flowers and Burlap leaves.
Jute Flower
I am in love with autumn colors and couldn't resist adding a yummy orange pear and berries on a golden fence!
Fringed Flower
I cant resist buying leaf dies and punches so you can see leaves made from different dies in this altered box!In case you missed it here is the link to the Burlap/Jute Flower tutorial 
Jute Flowers
Added a hanging bronze lamp from the lattice to light up my autumn garden!
Jute Flowers Stationary Set
And here is how the whole Burlap Flower Stationary set looks- a box, an altered pen stand and a clock!
I hope you enjoy my Jute obsession.....more projects in the pipeline!

Supplies : Dies :Marianne Designs Anja Leaf 3, Marianne Designs Anja Leaf 1,Marianne Designs Fence ,Cheery Lynn  Butterfly ,Cheery Lynn  Grass, PoppyStamps Meso background , Sizzix Bigz Flower with leaves flourish, Provocraft Leaf die, Sizzix Tapered Fringe decorative strip

15.9.14

Teachers Day Gift -Photoframe

Punchcraft flowers 1
Handmade Photoframe
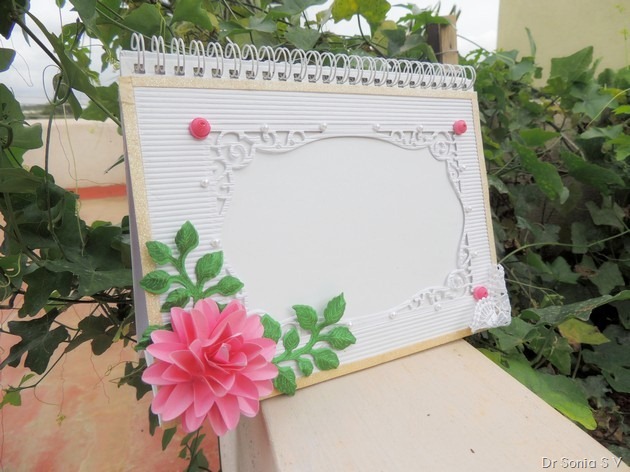
             Dear friends sharing a simple photoframe we made by recycling another desktop calendar for Teacher's day [Tutorials : Photoframe tutorial 1, Photoframe tutorial 2, Photoframe tutorial 3, Easy Picture frame tutorial ].Its a fairly simple frame with just a few die-cuts, a lace fashioned into a heart and some quilling.
Punchcraft flowers 3
Handmade Paper flowers
The large pink flower [made using a Sizzix die and this tutorial : Easy Paper Flower tutorial] was chosen by my kiddo and adding the pink quilled elements on the corners of the frame was also her idea!
Punchcraft flowers 2
Handmade Photoframe
In this post I am also sharing a bit of my crafty happiness with you -the past few days have been super lucky for me in blogland- my  3 D chariot won at the Marianne Dies Challenge, The Roses Photoframe won at Cheery Lynn Dies Challenge, My Fairyland Diorama was top 3 in 4 challenges and my Fairyland Pop up card won at Create something Catchy challenge.
Blogland is also so super encouraging to young crafters and I was so thrilled my daughter's Clay Diorama was top 3 in Brown and Sugar Sea theme challenge and also featured crafter at Anything but a card!
My daughter's Egyptian Mummy was featured at Crafty Gossip Party Ideas and was handpicked winner at A girl who crafts !
And not just the challenge wins and top 3s...I am so thankful that you  my blogger friends leave so many wonderful encouraging comments on every post...So blessed to have such amazing warmhearted blogger pals!
Supplies : Dies : Spellbinders Majestic labels 25,Heartfelt creations Leaf,Sizzix Flower layer 2

4.9.14

Quilled Photoframe Teachers Day Gift

Quilled Photoframe  1
Quilled Photoframe
        Dear friends Thank you so much for the encouraging comments on my first water-coloring attempt in the Baby theme box ! It has really helped to boost my morale !! Every year my daughter and I sit down to make something for her teachers for Teachers day which is celebrated on Sept 5 in India. Last year I was quite overwhelmed as I made more than 10 CD case notebooks and got thoroughly stressed! So this year for teachers day,undertook an easier craft- handmade photoframes !We recycled desktop calendars into easy DIY photoframes [see tutorials : Photoframe tutorial 1, Photoframe tutorial 2, Photoframe tutorial 3, Easy Picture frame tutorial ].
Quilled Photoframe  4
Quilled flowers
          My little girl played an active role in making this particular one. The original base was a dull blue and none of our flowers and embellishments seemed to match it so I gave my ink pad to my kiddo and she randomly inked the blue corrugated paper frame base with purple!I had made these quilled flower buds some time back so just adding some pollens and stamped leaves helped us to quickly make our photoframe.
Quilled Photoframe  5
Quilled Photoframe
For a dash of white to balance all the pink and purple added some lacey hearts with a few pearls to notch up the oomph factor!
Quilled Photoframe  6
Foam roses
The pink roses are made from foam [ you all know how much I adore foam!!] and the leaves are cut from glittery card using the Cheery Lynn  flourish leaf die.The stem is a diamond chain salvaged from a dress[ you  have seen it in Sunflower layout and Fairyland diorama and will be seeing more if it till I strip the whole chain from my dress!! LOL ]
Quilled Photoframe  3
Quilled Photoframe
The pink flower was made my layering several flower layers like in this easy paper flower tutorial 
Quilled Photoframe  2
Quilled Photoframe
           In this side view you can see the photoframe standing on its own. What I have seen is that though we crafters can admire and drool over cards like crazy, non-crafters seems to appreciate gifts with a bit of utility function like a photoframe, a post it note holder etc much more  than cards ! ......Please do share  your experience about this ? 

Supplies- Dies : Heartfelt creations leaf, Marianne fence, Spellbinders lace hearts,Itsy Bitsy scallop daisy, Cheery Lynn  flourish leaf strip, Cheery Lynn butterfly,Sizzix flower layer 2.Stamps: Heartfelt creations leaf
Linking to  Reves 2 scrap Sep[ color combo],Crafting by designs Sep,Emerald Fairies 59 Sep [Springtime]

9.7.14

Swinging Card Tutorial


Swinging Card 8
Swinging Card
      Dear friends this interactive swinging card is my Guest DT post for  Digital Delights  for winning the Petal Power challenge with my Mother’s Day Card.
         Delightful challenges holds a very special place in my heart as I won my first Guest DT post ever [back in 2011] with  this Quilled Sunflower Girl…I was so nervous when I used their digital image [ first time I worked with digis ]  in a Side step pop up card which was my first guest DT post and that card in turn won me a Guest DT at  Crafty JC ! 
        I have done numerous Guest DT posts since then for various websites and craft shops but believe me I still get super nervous as to how a Guest Post will be received!I hope you guys enjoy this Easy to make Swinging card and tutorial
Swinging Card 9
Swinging Card
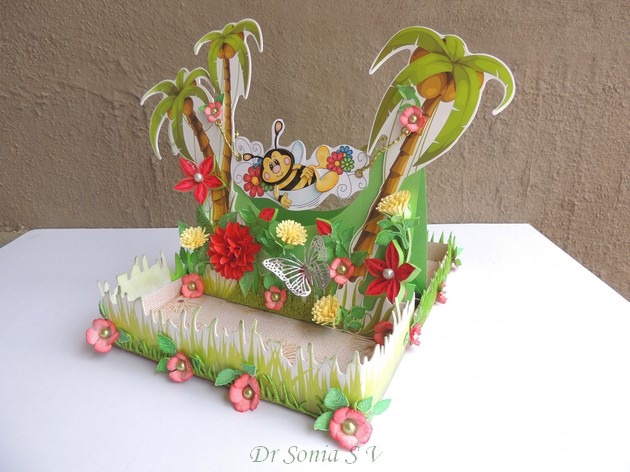
         I used the super cute digital image "Relax Barnaby" from Digital Delights, 3D decoupaged him and suspended his hammock from palm trees in this tropical paradise themed swinging interactive card.
Swinging Card 10
Swinging Card
       My daughter is forever searching for her eraser and pencil sharpener during homework time and I had been intending to make a  tray to hold her stationary...so I placed my interactive tent card on a cardboard box lid dressed up with glitter foam grass and handmade flowers.
Swinging Card 5
Handmade flowers
What is paradise without some flowers so added some quilled flowers and stamped leaves to my tent card.
Swinging Card 6
Handmade flowers
I always make my own flowers and the large red flower is also handmade and here is the tutorial link : Easy Flower tutorial 

Sharing How to make a Swinging Card

Material required
Cardstock - any size will do but I used an A 4 and a 6 x 8 inch piece of card stock
Glue- I used Fevicol MR 
Scissors
Something to cut an aperture
To punch holes- single hole punch  or crop a dile
Twine, thread or ribbon to suspend your image
Optional - Scoring board, Eyelets and eyelet setter / crop a dile

Swinging Card tutorial  1
Swinging Card Tutorial
         On the folded edge of an A 4 card mark a semicircle  using a template [ use anything you have like a plate, lid, circle die,or even a  foam tape like I used here]-- just make sure you leave 1 1/2 - 2 inches on either side so that your card remains sturdy! 
         Cut out a semi circle ,oval, square or rectangle aperture [ the aperture can be any shape you fancy!] on the folded edge cutting through both halves of your A 4 card
Swinging Card tutorial  2
Swinging Card Tutorial
            As an interactive card is going to be played with quite a bit  you need a good sturdy base so that it doesn't topple over! I chose a 6 x 8 inch card [ you can play with measurements] and  folded it in half [ center mountain fold] and then folded up [valley fold]1 inch on either side to get an accordion fold in the shape of a  " W ".
If you have a scoring board :score on the 6 inch side at  1 , 3 and  5 inch marks.
Swinging Card tutorial  3
Swinging Card Tutorial
        The 1 inch folded parts of your accordion folded " W "are your gluing tabs.Apply glue to one gluing tab of the " w " as shown and stick it inside the tent card you had already made.Apply enough glue and pressure as its important to get a good adhesion here.
Swinging Card tutorial  4
Swinging Card Tutorial
          Fold your " W " accordion and apply glue on the other gluing tab and firmly stick the other flap of your tent card onto it. The tent card on which your swinging element is going to be hung is ready!
Swinging Card 2
Swinging Card Tutorial
           On either side of  your aperture ,add decorative elements such as trees, vines ,lattices or whatever element fits in with the theme of your card.You can allow it to jut above the folded edge of your card just dont embellish the top of  your tent card heavily
Swinging Card 7
3 D Decoupaged image
          As a swinging element I 3 D decoupaged the cute honey bee by cutting him and layering using foam dots. Can you see the shiny flower centers and shiny nose and cheeks of the cute bee ? [ courtesy glossy accents] You can choose any swinging style image like a child on a swing  or a  hammock , a bird on a branch etc.Punch holes on either side and attach to the tent card with twine, thread or ribbon. 
Swinging Card 11
Swinging card
       You can actually make the image fit right inside the aperture so that it swings freely to and fro . Since  both my clinic and home printers were acting crazy I had to depend on a printing shop to print  my digital image and I couldn't get my image size a perfect fit but my little bee still swings happily !
Swinging Card  13
Swinging card
Another tip : Do heavily embellish the base of the card like I have done with flowers galore or whatever  you fancy and keep the top relatively simple as otherwise your card will topple over!
You can also decorate both sides of your swinging card like I did in Spinning card tutorial 1 and Spinning card tutorial 2

I hope you like this interactive card which actually doesn't require any fancy tools to make.

Supplies : Spellbinder Classic Leaf ,Spellbinder Rose creations,Cheery Lynn Butterfly,Memory Box fringe, Cheery Lynn Grass,

Linking to  Deep Ocean Challenge Fav 2014 Card
Edited : This card came top 3 in Digi Sketch In the garden theme
Top 3
This swinging card also came Top 3 at BGC Kiddish theme
Beyond Grey Challenges

2.7.14

3 D Wall Decor

Quilling 2
Quilling
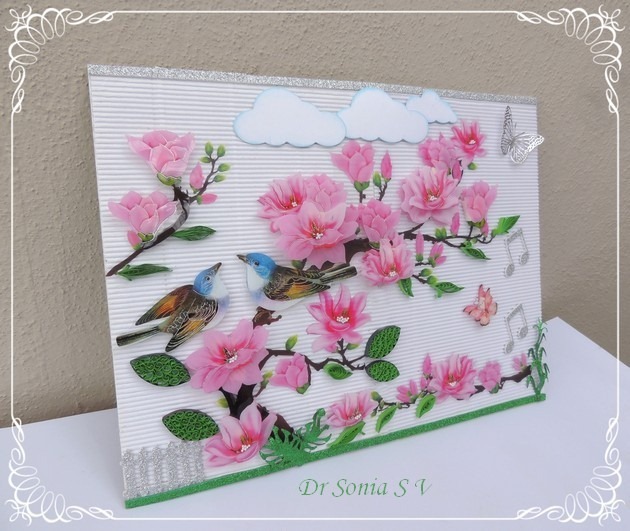
     Dear friends sharing a 3 D wall decor I made for our home using 3 Dimensional stickers  ,die cuts and quilled leaves
Quilling 4
3D Wall art
          I had actually made this as a birthday present for my husband  who loves birds, gardens, music and quilling! Recycled a cardboard box to form the base of my wall art and stuck corrugated paper on it.  If you are a regular reader of my blog you , you must have seen I am a big fan of corrugated paper!- I just love the texture and look of corrugated paper.
Quilling 1
3 D Spring scene
The fence was cut from glitter foam using a die. The shimmery flowers are 3 D wall decor stickers which I further embellished with pearls. Added quilled leaves on the branches
Quilling 5
Home decor
My daughter helped place the clouds and the butterflies on our simple 3 Dimensional wall decor.
Quilling 3
Quilling
         This was a super easy project to make[ especially since I had a ready stash of quilled leaves made earlier!] .The flowers are actually made of multiple thin plastic sheets mounted on sponge and its awesome to see the light reflecting on the stickers and my glittery embellishments.
Though a simple project I hope you like it....
Edited : This project came top 3 at Dragonfly Dreams Anything with wings theme- amongst 183 entries!
Related Posts Plugin for WordPress, Blogger...