Showing posts with label Heat Embossing. Show all posts

3.3.20

Turtle Bookmarks Tutorial


Hi friends I am sharing a sweet but functional project which you can gift to a sweet child in your life .I got the  idea of these Turtle Bookmarks from a You tube Channel called Red Ted Art and put a crafty spin on them

You can make these as simplistic as you want or go to town with all kinds of fun media in your stash
Turtle Bookmarks Tutorial 
Start with a 6 inch square green paper...not too thick but not very thin either.
Turtle Bookmarks Tutorial 
Fold it diagonally into a triangle

Turtle Bookmarks Tutorial 
Fold up both the  corners of the  triangle as shown

Turtle Bookmarks Tutorial 
Unfold these folds

Turtle Bookmarks Tutorial 
Now fold down a triangle in the  upper layer as shown

Turtle Bookmarks Tutorial 
Tuck in one corner of your triangle as shown

Turtle Bookmarks Tutorial 
Tuck in the  other corner and your basic bookmark is ready!

Turtle Bookmarks Tutorial 
Optionally round off the  single layer corner as shown below

Turtle Bookmarks Tutorial 
Your turtle's body will be a triangle which you attach atop this bookmark


I used a mosaic stencil and Distress Inks  to create a mottled design for the  body and legs
Turtle Bookmarks Tutorial


Draw freehand and cut legs for your turtle. You don"t have to be super accurate! Use One leg as a template to cut out the  other leg so that the  legs are fairly symmetrical

Place your bookmark on the  page of a book and see what position you want your legs to be before you stick them inside the  turtle's body


Roughly extend a circle to make your turtle head.


Draw a cute face...I used an old Peachy Keen face stamp I had.


Add some blush on your turtle's cheeks and your turtle corner bookmark is ready!

If you are in a crafty mood you can have some more fun when you make your turtle.
Stencil Tutorial 
Apply Crackle paint through the  stencil as I did here:
Stencil Tutorial 
It dries to give a beautiful design which is perfect for your turtle's shell!
Stencil Tutorial 

Turtle Bookmarks Tutorial 
That subtle crackle is so delightful to look at!
Turtle Bookmarks Tutorial 
You can also use different shades of brown to make the  shell


But it does make the  turtle look more serious!! Hehe

Turtle Bookmark
I achieved another lovely look by using clear Ultra thick embossing powder
Turtle Bookmarks Tutorial 
It gives a glossy wet look which is fabulous !
Turtle Bookmarks Tutorial 

Turtle Bookmarks Tutorial 
You can also use all kinds of mixed media pastes to create fun shell textures.

I hope you liked this simple Tutorial and ideas to create fun Corner Turtle Bookmarks
Supplies : Carabelle Studio Vitrail Stencil from Crafters Corner
Linking to 
2 Crafty Critter Crazies Challenge 36

15.10.18

Flying Unicorn Card

Flying Unicorn Card
Hi friends...sharing a super cute card featuring unicorns flying amongst  puffy clouds!Each unicorn was stamped, heat embossed golden and watercolored with Zig Watercolor Brush Pens and popped up on a multilayered cloudy background created by Distress Ink blending
Quick stamp coloring
My new found technique of using a coordinating die to color the matching stamp was really helpful to quickly sponge in color and highlight the tiny clouds stamped on the bigger clouds!
I am surprised at how cheerful this simple card turned out to be!

Supplies : Dies :  Winnie and Walter Happy Cutaway ,Gina Marie Stitched Cloud Border,Crealies  Crea-Nest-Lies XXL  no. 77
Stamp and Die Set : Hampton Art [Mama Elephant] Over the rainbow Unicorn
Stamps : Hampton Art [Mama Elephant] Over the rainbow Unicorn, Cluster of stars from Winnie and Walter Wishing You, Spiky snowflakes on the Happy from Winnie and Walter Scenery Big Bang Flurries
Linking to
WCMD 2018 Dress Up Die Cuts Challenge with Gayatri- the Happy was stamped with stars/snowflakes 
WCMD 2018  Ink Blending Challenge with Lea- used  Ink blending with  Distress Inks used to create the sky background 
WCMD 2018 Stamp Images Mash Up Challenge with Jessica - used 3 stamps 
WCMD 2018 Coordinating Die Coloring Challenge with Kelly- used the technique to highlight and color the  clouds a darker shade
WCMD 2018 Number Cruncher Challenge with Keren- used  2019 and 4 unicorns

Floral New Year Card

Floral Card
Hi friends sharing a simple floral card in bright and vibrant hues. The Dahlia was  colored with Zig Watercolor Brush Pens  and a background quickly made by stamping and heat embossing leaves from 2 Heartfelt creations  stamp plus die sets.
Quick Background Stamp Coloring
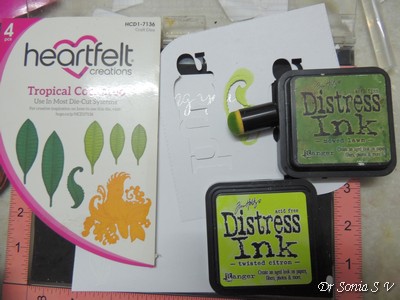
I used the negative die cut aperture to quickly blend in Distress Inks  over the stamped leaves...it was such a gratifying and easy way to quickly make a background !
Quick Background Stamp Coloring
Supplies : Dies :  2019-Crealies Text Dies No 115,Small Banner die-Crealies  Set of 3 No 54,Winnie and Walter In a Word Happy Cutaway
Stamps : Penny Black Sweet Dahlia, Winnie and Walter Wishing You, Leaves from Heartfelt creations  Tropical Cockatoo stamp and Heartfelt creations  Tropical Paradise Stamp
Coloring Media : Zig Watercolor Brush Pens , Distress Inks

Linking to
WCMD 2018 Dress Up Die Cuts Challenge with Gayatri- The Happy is stamped with a leaf stamp from Heartfelt creations  
WCMD 2018  Ink Blending Challenge with Lea- used  Distress Inks  to color and blend in the leaves and around the "wishing you' and on the dahlia stamp
WCMD 2018 Stamp Images Mash Up Challenge with Jessica - used 4 stamps
WCMD 2018 Coordinating Die Coloring Challenge with Kelly- used the coordinating dies of 2 Heartfelt creations  stamp- die sets to help color the stamped leaves

14.10.18

Warm Wishes Card

Warm Wishes Card
 Hi friends...sharing a bright and cheerful Winter Wishes card featuring the adorable Winter Fox stamp from Lawn fawn which I had been hoarding for more than a year now!
Stamp Coloring with Coordinating Die negative
I mixed and matched my stamps to create the card and used the super easy stamp coloring technique using the negative of the coordinating die. I am so thrilled I tried out this technique ...it is so cool, easy and  extremely quick to color stamps using this technique!!!
Stamp Coloring with Coordinating Die negative
Supplies : Dies :  Crealies  Crea-Nest-Lies XXL  no. 77 ,Winnie and Walter Hugs Cutaway, Holly leaves die from Recollections Christmas Noel Stamps and Dies Poinsettia
Stamps :  "Sending" and "warm wishes" from Winnie and Walter Sending you with Evelin T Designs, Holly leaves from Recollections Christmas Noel Stamps and Dies Poinsettia, Lawn Fawn Winter Fox, Berries on the "Hugs" from Winnie and Walter In Bloom Elsa's Flora Stamp Set


11.10.18

Simple Snowglobe Card

Snowglobe Card
Hi friends...sharing yet another simple card which was put together quickly. Created a black and white snowflake background for the cute penguin using tiny stamps from Winnie and Walter
Snowglobe Card
Blended Black soot on the snowglobe base and glittered it with rainbow glitter

Snowglobe Card
 Created a 2018 banner  by blending Seedless Preserve and Spun sugar Distress Inks  and jazzing up with rainbow glitter. Finished off the card by adding purple glittery strips.
Snowglobe Card
I was so tempted to add more elements but then resisted as I really need some easy to mail type of cards this year!

Supplies : Dies :  Crealies  Partz No.32 [banner], Crealies  Cardzz No 08 [ Snowglobe],Crealies Text Dies No 115 [2018]
Stamps : Wild Rose Studio Penguin with Presents, Winnie and Walter Scenery Big Bang  Bling,Winnie and Walter Scenery Big Bang Flurries
Coloring Media : Distress Inks  , Zig Watercolor Brush Pens  

Linking to  
WCMD 2018 Dress Up Die Cuts Challenge with Gayatri- inked and glittered the banner die Inked. Inked and glittered the snowglobe too which is a large die cut.
WCMD 2018 Black and White Backgrounds Challenge with 
WCMD 2018 Clean and Simple (CAS) Challenge with Heather 
WCMD 2018  Ink Blending Challenge with Lea- used black soot Distress Inks  to blend the base of the snowglobe and Distress Inks to blend inside the banner die cut.
WCMD 2018 Stamp Images Mash Up Challenge with Jessica - used 3 stamps


10.10.18

Simple New Year Card


New Year Card
 Hi friends...sharing a super simple New Year card  featuring an adorable Owl family. The background was made by stencilling a Crealies  snowflake stencil on white cardstock and roughly blending using Black soot Distress Ink. Mixed and matched 3 stamps sets and various dies to keep the theme festive + appropriate as a New Year Card.
New Year Card
Added interest to the die-cut " Happy" and "2019" using Distress Inks , Glitter and adding dots using a grey fine-liner pen.

Supplies : Dies :  Sizzix  Alpha Bubbles,Gina Marie Picket Fence,Crealies Xtra No 122,Spellbinders Nested Lacey Pennants,Crealies Crea-Nest-Lies XXL dies no. 76, Happy from Elizabeth Craft Designs Happy New Year
Stamps : Poinsettia from Winnie and Walter In Bloom Elsa's Flora Stamp Set , Wild Rose Studio Owls on Branch, Mini Snowflakes from Crealies  Bits and Pieces No 134
Stencil :
Inks: Black Soot Distress Inks
Glitter : Dress My Craft Rainbow Glitter

Linking to
WCMD 2018 Dress Up Die Cuts Challenge with Gayatri- inked and glittered the banner die Inked, glittered and added inky dots on the Numbers
WCMD 2018 Black and White Backgrounds Challenge with 
WCMD 2018 Clean and Simple (CAS) Challenge with Heather 
WCMD 2018  Ink Blending Challenge with Lea- used black soot Distress Inks  to blend the background and the diecuts
WCMD 2018 Stamp Images Mash Up Challenge with Jessica - used 3 stamps

9.10.18

Stamping and Easy Coloring

Simple Floral Card
Hi friends...my stash of cards has gone very low and I think it is because I  am making really complicated time consuming cards of late . So I thought I will just  have a bit of fun during the WCMD Challenges at Winnie and Walter and make some simple cards.
Stamping
One of the card Challenges is to quickly colour a stamp using it's coordinating  die to cut the shape on paper and color on the stamped image through it. I heat embossed a really old but favourite butterfly stamp from Hero Arts which has a matching Sizzix die
Colouring
I rarely use " black soot" and so it was fun to step out of my comfort zone and ink up black and white butterflies to create the background for my card. I was really surprised at how quick this technique was to color a stamped image!
Creating a background 
The butterflies looked lonely on their own so added dozens of tiny flowers from the Winnie and Walter  Scenery Big Bang Flurries stamp set.
Die cut Embellishing

I used my favourite banner die from Crealies to form a backdrop for the die cut sentiments. The banner was blended with ink and jazzed up with  rainbow glitter!
Embellished Die cut
I am going to use this as a New Year Greeting Card so added the "2019".
Embellished Die cut
I hope you like this simple card.
Supplies : Dies :  Crealies Partz No.32,Crealies Text Dies No 115,Sizzix Framelits Die set 5 with Stamp Butterflies 3 No 657773
Stamps : Sizzix Framelits Die set 5 with Hero Arts Stamp Butterflies 3 No 657773, Winnie and Walter Scenery Big Bang Flurries,Penny Black Sweet Dahlia
Related Posts Plugin for WordPress, Blogger...