|
| Cake Card |
My
Magic Sliding Cake card was so popular I still keep getting requests for a tutorial even though its a design I adapted from the Canon site.
 |
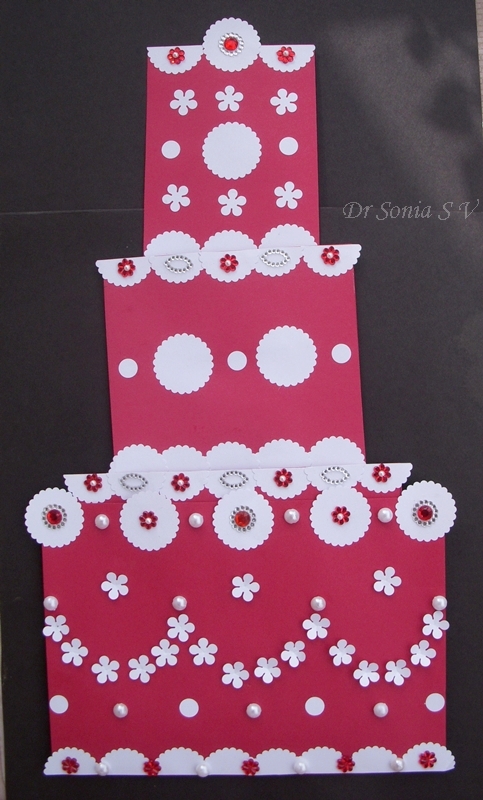
| Slider Cake Card |
This Magic Sliding Cake card has 4 tiers which slide in and out.
 |
| Sliding Cake Card |
Hidden slider mechanisms are attached to all 4 tiers of the Cake card and the layers easily slide up and down.
 |
| Cake Card |
If you want to make that really special card for a special someone this is the one for you!I hope you don't get daunted by the number of photos as I took more step by step photos just to simplify the slider card mechanism as once you understand it you can easily adapt it to any size or shaped card.
Materials Required For the Slider Cake Card
- Thick Card Stock
- Strong Paper to recycle - to make the sleeves of the slider card
- Scissors
- Glue-White Glue
- Double sided Foam tape- makes your life easier but if you don't have it you can make a paper sleeve which will serve the same purpose.Use the tape of small width.
 |
| Slider Cake Card |
How to Make the Sliding Cake card. Rather than giving measurements [ I personally don't like to measure!] I will tell you how to design your own slider card so that you can adapt it to whatever size or shape you want.
Decide how many layers you want on your slider card,the size of your card and your are ready to start.
- Design Your card layers
- Design your slider mechanism
- Conceal your slider mechanism
Design your card layers
Sizes and Measurements
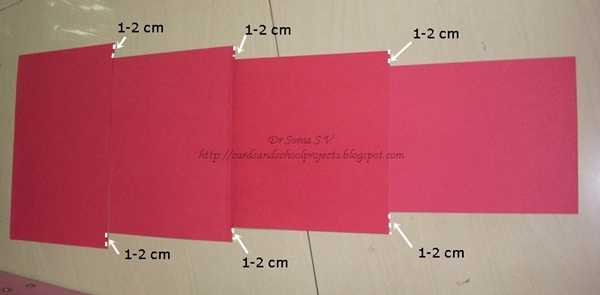
You can make your slider in 2 tiers or more.I made this cake card with 4 layers.Decrease the width of the upper layers by 3-4 cm so that you have enough space on either side of around 1.5 to 2 cm to fit your double sided foam tape or paper sleeve.
Here the lowermost layer is a folded A 4 card
Here the cards are stacked on top of each other to show you that the height is the same and the width keeps decreasing as you go up by 1-2 cm on each side.
 |
| Slider Card Tutorial |
Here the cards are stacked on top of each other to show you the width keeps decreasing as you go up by 1-2 cm on each side.
 |
| Slider Card Tutorial |
If you are someone who doesn't like to design but prefer things ready made here are the measurements I used.For the lowermost layer you can use a folded card or 2 cards[mine is a folded A 4 of width 21 cm ]. The middle 2 layers are 2 cards each of 17cm and 13 cm width.You need only 1 layer for the top most layer and its 9 cm here
 |
| Slider Card Tutorial |
Here you can see the decreasing size in the finished slider cake card.
 |
| Slider Cake Card |
For simplicity I am demonstrating this tutorial with rectangular shaped cake card as its easier to explain but my first
slider cake card was shaped trapezium style - just tweak your design accordingly.
Make the slider mechanism
Use sturdy paper to make your sleeves.The paper should not be too thick but firm .I recycled medication pamphlets as the sleeves are hidden from view.
Make the long slider sleeves: Length:approximately 2 times the height of your card[ later you can reduce it]. Width: Width will be designed in relation to the upper layer to give a gap of 1.5- 2 cm from the ends[shown in white arrows]
Important tip: the paper edges should be smooth with no jagged edges as otherwise your slider will not work smoothly.
 |
| Slider Card Tutorial |
Fold over the sleeve as shown leaving a few millimeters gap at the top and around 1.5 cm gap at the bottom
 |
| Slider Card tutorial |
Place your top layer over the lower card and see if you are happy with the position as this is how it will look once assembled.
 |
| Slider Card Tutorial |
Now make the short slider sleeves- Take a long strip of paper and slide it under your long sleeve as shown
 |
| Slider Card Tutorial |
Fold it over to get a loose fit .Cut off the extra overlapping ends.
 |
| Slider Card Tutorial |
Glue this short sleeve to the lowermost border of your upper layer card
 |
| Slider Card Tutorial |
This is how the short sleeve will look glued in place
 |
| Slider Card Tutorial |
Slide the long sleeve under your glued short sleeve as shown.
 |
| Slider Card Tutorial |
This is how the 2 sleeves look assembled
 |
| Slider Card Tutorial |
Now flip the top layer over and glue the flaps of the long sleeve to the lower card in the position decided earlier while designing the long sleeve. [Here I have glued it at 1.5 cm above the lower border of the lower layer as I wanted my 2nd layer to stick out at the top by the same 1.5 cm.]
 |
| Slider Card Tutorial |
Now your slider is ready! Yes that's it actually! You can stop here or make more layers like I did.
This photo shows me adding the slider to the 2nd layer.The topmost layer is already sliding on the 3rd layer!
 |
| Slider Card Tutorial |
This is the photo of the sliders of all the layers completed.Here my card has 4 layers and 3 slider mechanism.
 |
| Slider Card Tutorial |
Now you need to
Conceal your slider mechanism.Add double sided foam tape or paper sleeves to the 2 edges of the card with your long sleeves as shown.
 |
| Slider Card Tutorial |
Stick the same sized card you had cut earlier.Now you have concealed your long sleeve.Stick double sided tape to the other layers too in the similar fashion.
Tip: If using double sided foam tape run the tape along the whole length uninterrupted as otherwise your sliding mechanism can catch at the edges and not work smoothly.
 |
| Slider Card Tutorial |
Once you have glued the side edges of your bottom layer with double sided foam tape or paper sleeves your slider card is ready and you can embellish it.
You can use a lot of embellishments all over the lowermost layer
 |
| Cake Sliding Card |
But the upper layers can be embellished only at the upper edges which jut out in the closed position as otherwise your slider will not work well.
 |
| Cake Card |
You can use this slider card tutorial and adapt the sizes and shapes to make a sliding cake card, a blooming flower card, a Jack in the box emerging card etc - you can adapt it for so many ideas!
Here is the link to my first
Slider Cake Card
Have fun and do leave me your comments as that is what keeps me going !