Showing posts with label Punchcraft Flowers. Show all posts

18.12.14

Metal Foil Art Card

Metal Foil Art
Hi friends this season rather than making festive cards using paper I find myself experimenting with other media.Have already shared a Glitter Foam card and a Glitter Foam- Thermocol card. This card has metal foil art!
Metal Foil Art
If you are not familiar with metal foil art- its a pretty cool technique and involves scratching a black coated metal sheet with  a knife to create the design.This was my first trial with this craft style and the deer turned out much better than I expected so I had to frame it in a special festive card !
Handmade Flowers
Since the foil art itself was black and silver added stamped leaves and quilled fringed + punchcraft flowers around it for a pop of color!
Metal Foil Art
Framed it in a Spellbinders die and added a Seasons greeting!The silver leaves are the silver roses you see are actually lightweight metal too!
Handmade flowers
I wanted silver to be a prominent element so added silver glitter balls to the flower centers, silver glitter foam die cut scallops and silver liquid pearls on the stamped leaves.
Metal Foil Art
I hope you like my Metal foil art deer bringing you festive cheer!
Supplies : Dies : Spellbinders  Majestic labels 25, Spellbinders decorative labels 8, Spellbinders Rose creations,Spellbinders Asian accents, Heart felt creations leaf,Memory box fringe,  Stamps : Heartfelt creations leaf.Misc: Liquid pearls from Crafters Corner
Edited : this card was Top 3 at Beyond Grey Challenge

18.8.14

Easy Paper Basket Tutorial

Flower Basket tutorial 7
Paper Basket Tutorial
           Hi friends Thank you so much for the supportive comments  on my Felt flowers layout - I hardly scrapbook so each and every feedback was so important to boost my confidence!
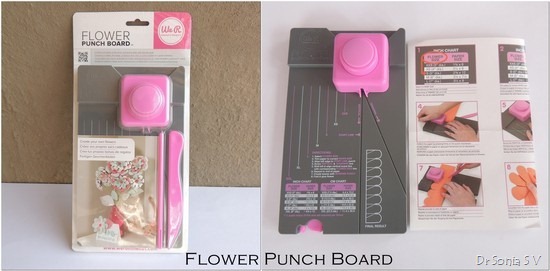
        This month I am reviewing the  Flower punch board for one of my favourite Craft supply stores Crafter’s Corner and I wanted to try out different projects to make with this punchboard
Here are links to 2 projects I had already shared using this new type of Punch board
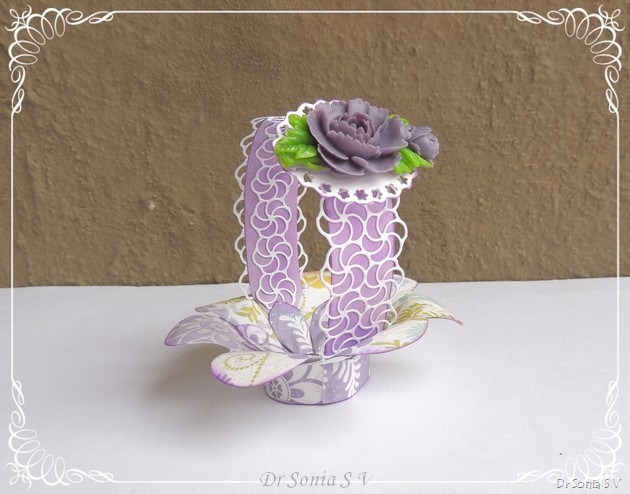
          Some ideas are "accidental" discoveries and when I found that the 7-  petal flowers made with the Flower punch board tend to stand upright , that gave me the idea to make flower baskets with them.
Flower Basket tutorial 5
Paper Basket Tutorial

These Paper Baskets are quick and easy to make and will look good as home decor or party favours. I can just imagine filling up the baskets with little trinkets or candy as return gifts for parties!

How to make easy Flower Baskets

Materials Required
Flower  Punch Board - manufactured by We R Memory Keepers
Flower Punch Board
Glue , Scissors
Pattern Paper /Chart paper and Cardstock
Optional - Ink pad to ink the edges of your flower petals ,Stamps ,Embossing powders to jazz up your paper even more

If you missed the Easy flower making tutorial do read it first to get familiar with the basic steps of how to use the flower punch board .
Flower Basket tutorial
Punch and  fold a  5 inch [S ] and 3 inch [XXS ]flower. The shimmer on the flowers is because I stamped and embossed the paper strips before making them into flowers
Flower Basket tutorial
          Make a 7 petal flower from the  folded strip you made for the 5 inch flower .Gently roll down the flower petals using the shaping tool included in the Flower punch board.Even though the flower can actually stand upright like a basket  you can make it  sturdier  by simply adding a cylindrical base to your flower basket .
Flower Basket tutorial
To make a base : Fold a 7 x 1 1/4 inch paper strip in half lengthwise[ you don't have to exactly follow this measurement!]. Glue the ends of this strip to get a paper ring. 
Flower Basket tutorial
Glue this paper ring base on to the under-surface of the flower.You need to be quite generous with the glue in this step and be patient to let the glue dry while holding the parts!
Flower Basket tutorial
Make a 7 petal 3 inch diameter flower following the Flower punch board tutorial and stick it inside your larger flower. If there is still a gap in the center just add a punched circle to the center.
Flower Basket tutorial
Make a handle using matching card stock - again no hard and fast rules about the measurement [I used 11 x 1 inch strip] and taper the ends as shown in the pictorial above to allow easy gluing into the basket.
Flower Basket tutorial 3
Paper Basket tutorial 
I inserted the tapered ends of the handle under my smaller flower [ better to glue on the handle before you glue on the smaller flower!]
Flower Basket tutorial 2
Flower Basket tutorial 
The picture above shows the Flower basket on its stand. I couldn't resist adding a Resin flower on the handle of my flower basket!
Resin Flower
Adding the resin flower tended to make my basket topple over [Oops!!!]
So salvaged the project by adding a bouquet of flowers to the basket!
Foam flowers Mulberry Flowers
Poked foam flowers [ these are store bought ones but here is the handmade foam rose tutorial link], mulberry flowers and pollens [ these are normal pollens dressed up with floral tape] into play-dough [ instead of floral sponge!!] and added them inside the flower basket.
Flower Basket tutorial 8
Paper Basket Tutorial
Using the same tutorial steps you can make baskets as large as 12 inches in diameter using the flower punch board!
I hope you enjoyed the easy basket tutorial ....do tell me how it is.
Supplies
Flower Punch Board,Embossing : Versamark Watermark , WOW Embossing Powders , Ranger Heat Gun,Dies:Spellbinders Floral Oval ,PoppyStamps Swirly Curl border,Embellishments : Resin Flowers [from Crafters Corner]Paper : DCWV Floral stack
Edited : This Basket tutorial was featured at Monday Handmade Linkup Party--- Thank you Judy

25.7.14

Lever Pop up Card tutorial

Lever Pop up card
         I love making pop up cards as its a combination of science and art at work! If you get the science bit wrong [ ie the precision and measuring part] your pop up won't work and if your artistic sense has deserted you even an utterly clever pop up mechanism will fail to impress!!
       Sharing a lever style pop up card which on opening stands on its own and displays several panels you can literally go to town embellishing! Here is the front of the pop up card with a rectangular window embellished with punchcraft flowers.
Circle Flowers
           Here is the link to the super easy to make Circle flower tutorial .The large red flowers are also made from circles but I used the textured center of a Cheery Lynn Sunflower die to make it.[ Here is a tutorial link to another flower made using Cheery Lynn  Sunflower die: Paper flower tutorial ]
Circle flowers
On opening the card, the central rectangular part swings open like a lever to reveal several pop up panels in an accordion style[ of late I am obsessed with making pop up cards with the accordion mechanism!]
Floral Pop up card
Do allow me to show off the embossed golden Cheery Lynn  butterfly [heat embossing is quite new to me!]
Pop up card
Lots of quilled flowers, stamped leaves and tiny golden butterflies in my pop up butterfly garden!
Garden Pop up Card
This photo shows the pop up mechanism and a glimpse of the inner panel to which I added a floral lattice[ Wild orchid die ]
Lever Pop Up Card

How to make a Lever Pop Up Card

I followed a fantastic tutorial by Laura to make my first lever pop up card and loved the mechanism so much I had to try and make "non rectangular" levers , double levers and use a die cutting machine to cut the levers! [ Dont worry you actually dont need the big shot or cuttle bug to make this pop up card ]
Materials Required

  • Card stock- 2 Identical pieces of cardstock- size doesnt matter you can experiment away! Since I was making a circle lever card I wanted a squarish shape and used 2 cards measuring 11 x 6 inches
  • Adhesive- I use PVA glue fevicol MR
  • Something to mark out a Circle - If you are going to hand cut use a lid/ saucer etc which fits well within your card leaving approximately a 1 inch border .If you are die cutting use a shaped die
  • To Cut - if you are going to cut by hand you need a craft knife and a cutting mat / kitchen board. If you want to be lazy or feel good you are exercising your fancy machine [like me!!]- do bring out your big shot/cuttlebug/grand calibur and your shaped dies [avoid ones with fancy edges-plain  circles, squares ,ovals and rectangles are the best]!
  • Optional - Scoring board- I use the scor pal

Lever Pop up card tutorial 

To decrease page load time I have displayed the tutorial photos small. Just click on the photo to see a particular pictorial photo in a larger view. 

Fold the two 11 x 6 inch cards in half and cut out a circular aperture [ you can try other shapes too!] on the front of one folded card.
Pop up Card tutorial  1
Pop up card tutorial 
Insert the open end of one folded card inside the card with the aperture and mark a semicircle onto the inside card along the edges of your aperture. You need not obsess about measuring- just eyeball it and mark lightly.
Pop up Card tutorial  2
Pop up card tutorial 
On the inner card with the semicircle [ the red marks demonstrate my photo editing and not my drawing skills!!] drop down scorelines from the center of the marked half of the card  to meet the semicircle.
Pop up Card tutorial  3
Pop up card tutorial 
The next step is only if you want to use your die cutting machine! 
For hand cutting folks- its easy- just cut the marked semicircle till the center!
Pop up Card tutorial  4
Pop up card tutorial 
        Align  your die bang on the semicircle and apply tape to temporarily secure your die to the cardstock. Place your die + paper sandwich on your platform-cutting plate and place your top cutting plate over the marked semicircle half of your card to just reach the halfway mark [ see pic above].Roll your handle and you will get a cleanly cut  semicircle  still attached to your card.
Pop up Card tutorial  5
Pop up card tutorial 
Fold over the edge of the card to meet the center as shown in the pictorial photo above
Pop up Card tutorial  6
Pop up card tutorial 
Fold over the other edge to meet the center and your pop up lever mechanism is nearly ready. I experimented and made thing more complicated by cutting apertures and making a lever on the other side too [will share that later!!]
Pop up Card tutorial  7
Pop up card tutorial 
The picture above shows how the 2 cards are going to fit together to make a lever pop up card.
Pop up Card tutorial  8
Pop up card tutorial 
This step needs a bit of care to get your pop up to work. Insert your semicircle into the aperture of your front card and apply glue on the folded inner panel as shown above. While sticking down dont align the outer edges but focus on aligning the edges of the semicircle as shown below!
Pop up Card tutorial  9
Pop up card tutorial 
Apply glue on the other folded panel as shown .
Pop up Card tutorial  10
Pop up card tutorial 
To make sure your pop up will work wonderfully, fold over as shown in the picture  above and stick to the outer card.
Pop up Card tutorial  11
Pop up card tutorial 
Your lever pop up card is done. A little complicated ? Yeah I agree but so rewarding when you can conquer it !!I do urge you to try this lever pop up card!
Lever Pop up card
Supplies : Pattern Paper -DCWV, Dies - Cheery Lynn Butterflies, Cheery Lynn Sunflower,Provo Craft butterfly,Spellbinder Classic Leaf  .Stamps- Heartfelt creations leaf

16.6.14

Paper Flower Romance

Handmade Flowers 1
Paper Flower
         Hi friends its been quite some time since I blogged…I had some renovation work at home,went to my hometown, and had maid servant problems !!Life sure was super hectic!!Now things are settling and I will soon drop by your blogs [don't forget to leave me a comment so that I can stop by].
Sharing a floral shaped card
Handmade Flowers 2
Paper Flowers
            Wanted to make a "romantic" card for a change .Layered 2 pattern papers on card stock and tried stitching for the first time[I am not much of a seamstress so was a bit wary but stitching on paper wasn't as difficult as I had thought!!].Recycled a netting salvaged from my grocery shopping and attached it to my card with glue dots.
Handmade Flowers 3
Handmade flowers
           Added die cut lace hearts and a handmade "porcelain" heart [tutorial:Porcelain Embellishment tutorial ] and finished it off with a chipboard lock and key.Used Distress Ink[Aged Mahogany] on all the layers and embellishments to bring about some colour cohesion [dont know if I have succeeded...I am not much of an ink user!!].The big rose is a punchcraft flower
Handmade Flowers 4
Punchcraft flowers
              Made the punchcraft rose from pink card stock using a Jef punch, inked with distress ink[aged mahogany] and misted with Lindy's spray...love the rather unusual mottled look the ink and mist gave the flower!.Here is the link to the punchcraft rose tutorial .Made the white blooms using the Cheery Lynn Sunflower die and added my favourite stamped- die cut  leaves.Also added a dangling metal heart charm--not quite visible in the side profile pic!
Please do tell me how the card has turned out.

Supplies: Pattern Paper :Various DCWV,Stamps : Heartfelt creations class leaf
Dies:Spellbinder leaf die,Spellbinder lace hearts,Spellbinder Asian accents,Memory box poppy stamps swirl border,CheeryLynn Sunflower,Punches: Jef Mega 5 petal punch,Itsy Bitsy Chipboard lock and key,Netting[ recycled from grocery shopping!],Heart charm-Imaginations,Aged Mahogany Distress Ink
Edited : This card won at Kraftzone [theme pattern paper + dies] and came top 3 at Imaginations [ theme distress inks]

25.3.14

Handmade Flower Bouquet Tutorial

Handmade Flowers 1
Handmade Flower Bouquet
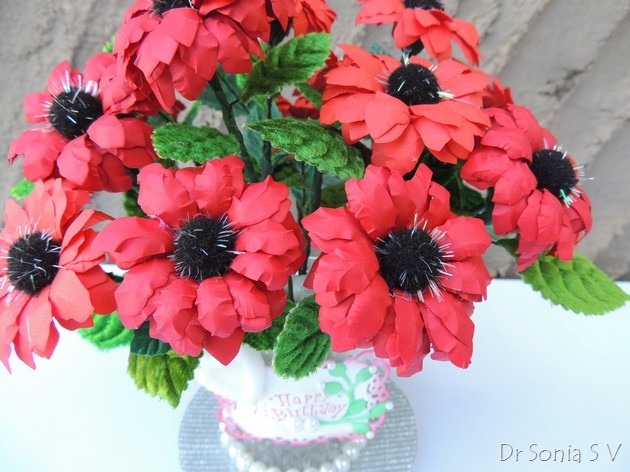
My mother loves flowers and I made this bouquet of handmade flowers for her 67th birthday which we celebrated just a few days back.Red is her favourite colour and I used 2 shades of red punch-craft paper to make this handmade floral bouquet.
Handmade Flowers 2
Porcelain Heart
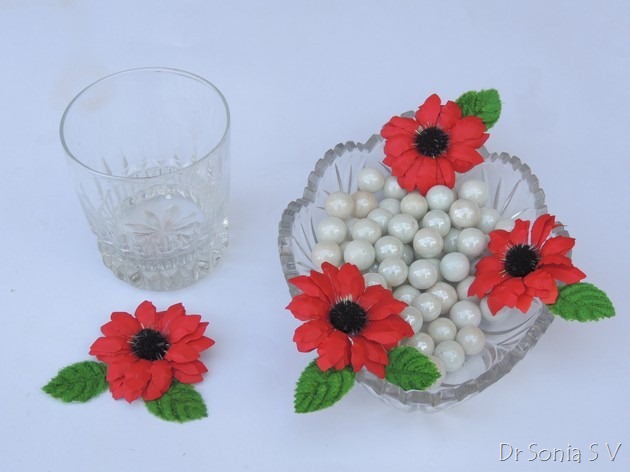
The flower vase is a crystal glass filled with pearly white marbles and dressed up with a garland of pearls.The porcelain-like heart on the tag is handmade [Here is the tutorial: Embellishment tutorial ].

Handmade flower bouquet tutorial

Handmade Flowers 3
Paper flower tutorial 

Materials Required to make the Paper Flowers

Paper – Chart paper or thin punch-craft paper is easiest to shape and layer to make the paper daisy flower in this tutorial .If you use cardstock you will have to spend more energy embossing the petals!
Paper Flowers- Die cut, punch or hand cut paper flowers . I used the Sizzix Bigz Tim Holtz Tattered flowers die and die cut 4 flowers at a time from thin punch-craft paper. I find this a big advantage while using BigZ dies compared to thin dies.Use 3 - 6 cut flowers to make a single paper flower.
Embossing tools – Use any rounded end  object you have – eg rounded end of a pen , clay modelling tool, parchment craft embossing tool, rounded end of a quilling tool or a proper punchcraft embossing tool.
Embossing Pad or Mouse pad –to shape the petals.
Flower Center Suggestions- Pearls, Glitter, Seed Beads,Quilled fringed flower,crepe paper ball or even a  pompom like I have used in this paper flower
Adhesive- White PVA glue [Fevicol MR is my favourite] to stick the flowers and a glue gun to stick the pompom.

Paper Flower tutorial

Handmade Flowers 4
Paper flower tutorial
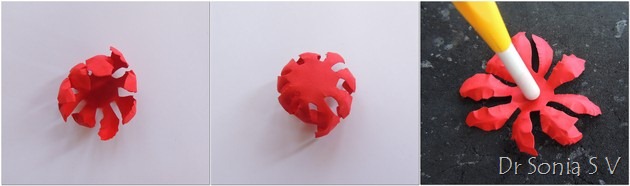
Place the flower on the mouse pad/ embossing pad and run the embossing tool from the tip of the flower petal to the base of the petal.If you emboss your petal from the outside to the inside it tends to curl the maximum!Different diameters of embossing tools will give a slightly different look to your embossed paper flower so do experiment to get the look you love the most!
Handmade Flowers 5
Paper flower tutorial
Invert this cup type flower on the embossing pad and now emboss the center of the flower alone with a circular movement of your embossing tool to get a good cup shaped center.
Handmade Flowers 6
Paper flower tutorial
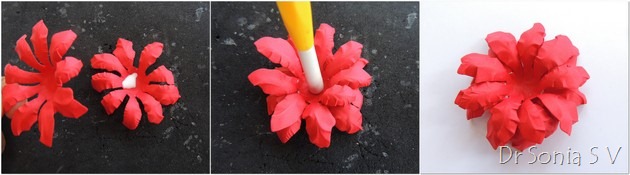
Apply glue only to the center of the flower and stick at least 3 flowers in a staggering manner. Some of the handmade flowers in my bouquet have up to 6 layers of paper flowers
Handmade Flowers 8
Handmade Paper Flowers
I experimented using different objects for the flower centers and found I loved the unique look of the sparkly black pompoms! If you have enough patience you can use regular white glue to stick the pompoms otherwise use the glue gun!!

How to make a handmade flowers bouquet

The paper flowers shown above were so easy to make that in no time I had a whole bunch to assemble into a handmade floral bouquet.To make the flower bouquet you can use
Flower tutorial  1
Handmade flower tutorial 
  1. Stems – options are
    • Metal wires- thicker gauge is preferred so that they can take the weight of your flowers.
    • Wooden skewers like I used in the thermocol rose tutorial .
    • Readymade stem with branches like in the foam rose tutorial .
  2. Floral tape 
  3. Flower calyx
    • If your handmade flower has a flat base like my daisy here you need to make a calyx so that your flower sits prettily on your floral stem.I used 5 mm quilling strips and a slotted quilling tool to make the conical calyx for my paper daisy.
    • If your handmade flower has a pointed base like in my handmade  foam roses  you can insert the stem into the flower base and wrap a cut flower or star shape around it as a calyx.
  4. Leaves – make your own wired leaves like in this Cala lily tutorial  or use ready-made paper or fabric leaves. I have used veined velvet leaves here.

How to make the Flower Calyx

Since many of my blog readers are not into quilling explaining the steps to make a quilled flower calyx.
Flower tutorial  2
Flower Calyx tutorial 
You can use 3 mm , 5mm or even 1cm width paper strips to make your flower calyx. I used a paper strip nearly 17 inches long [formed by gluing 2 quilling strips end to end].
Insert the end of the paper into a slotted quilling tool.[If you dont have one you can simply try rolling the paper strip around the wooden or metal wire you are going to use as your floral stem].Roll the quilling tool and use your fingers to help form the paper coil.
Flower tutorial  3
Flower tutorial 
Apply glue on the end of the paper strip,stick and complete your paper disc.
Flower tutorial  4
Handmade Flower tutorial 
Use a rounded object [I used the other end of my quilling tool] to shape your quilled paper disc into a bell shaped calyx.Just press in your rounded object into the paper disc in a circular movement going inwards from the periphery and you will form a cup shaped paper shape. This is a bit tricky if you are not used to it as you may get tents,volcanoes and mini monster shapes instead of bells and cups!It doesnt really have to be perfect!
Flower tutorial  5
Handmade flower tutorial 
Once you have a fairly decent conical shape insert your metal or wooden skewer into it as shown and push the paper cone right to the tip of your metal/wooden stick.Apply PVA glue or hot glue into the cup and stick your paper flower on it.Apply a bit of glue on your floral tape [always better unless your floral tape is nice and sticky] and wrap around your quilled paper calyx and down the wood/metal stem of your paper flower.
You can keep adding the wired leaves as you wrap the floral tape or add them later.
Handmade Flowers 7
Handmade Flower Bouquet
I didnt have the right flower vase for my handmade paper floral bouquet so made one using a crystal glass [whose siblings had all broken!!] and pearly white marbles.
Handmade Flowers 10
Handmade Flower Bouquet
The sparkling pompoms,the shiny marbles ,the white pearls and the porcelain heart makes my flower bouquet shimmer in the light.
I hope you like this simple handmade flower tutorial .Do tell me how you like it.
Here is the link to more Handmade flower tutorials
Related Posts Plugin for WordPress, Blogger...