 |
| Pop up Card - House |
As promised here is the tutorial to the
House pop up card.
 |
| House pop up card |
When I first started making pop up cards I used templates from the net ,now I find it is so much more fun and rewarding when I design one myself!
For my friends who want to make a quick House Pop up card here is my template.
 |
| House Pop up Card Template |
Just score on the dotted lines and mountain fold.
For those of you who may be crazy like me and want to "
understand the mechanism "and go about it the difficult way, sharing instructions to help you design your own customized House pop up card.
How to design your own House Pop up card
Make the Base of your House
Take a rectangular strip of card.Don't use very thick card stock as your House pop up should be easy to crease and fold.
For people who like measurements- I started off with a card measuring 3.5 x 9.5 inches.
Score your 3.5 x 9.5 inch card lengthwise
0.5 inch.This will help for the tab of your house base.
 |
| Pop up card Tutorial |
Score at 0.5,2.5,5 and 7 inches. This will give you a 0.5 inch width tab , two 2 inch wide sides and two 2.5 inch wide sides for your house. You can play with your measurements however you fancy.
So you have your strip in now divided into tab[ 0.5 inch width], Side A[2 inch wide], Side B[ 2.5 inch wide],Side C[2 inch wide] and Side D[ 2.5 inch wide]
 |
| Pop up card Tutorial |
Easy way to fold your house pop up card is
score sides B and D in the middle as shown
Cut off the lower parts[ below the score line] of parts B and D as shown and slant and cut to form tabs for parts A and C.
 |
| Pop up card Tutorial |
Draw a triangular shape towards the top of parts B and D as shown and horizontal lines meeting as shown on parts A and C.[My measurement was
0.75 inch from the top]
 |
| Pop up card Tutorial |
Cut off the extra parts marked above.Slant and taper cut your tab also and your house pop up base is ready.
 |
| Pop up card Tutorial |
You can mountain fold all the score lines to start with.Then Valley fold the score line in the middle of part B.[You can also mountain fold this if that is the shape of house you like]
 |
| Pop up card Tutorial |
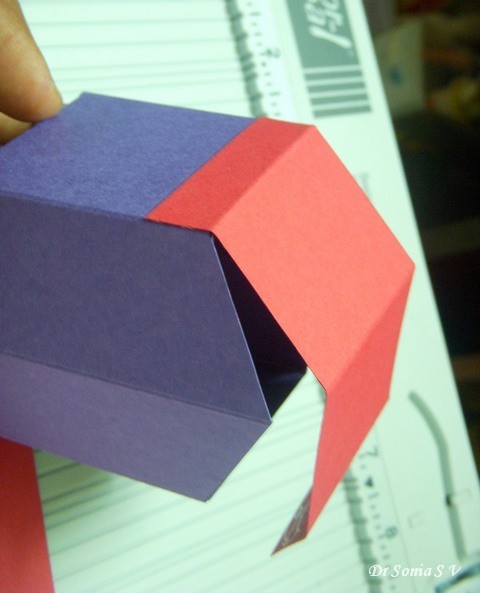
Glue your tab to the inside of part D and your house shape has formed.
Make a roof.
I used rough measuring for this and you can do the same.
If you want a short cut you can follow my measurements which is a
4 x 2 inch card strip scored at
0.5inch,
2 inch and
3.5 inch.
 |
| Pop up card Tutorial |
If you want to go about designing a roof is here is how you do it:
The guide is your roof strip should measure the same height as the width of Parts A and C[mine is 2 inches in height].To design a roof take a 5-6 inch long strip score it in the middle and place it over your house shape. Judge the length you will require. You need to cover the house and have some extra to glue on the house.Cut the rest off.
 |
| Pop up card Tutorial |
Attach your roof tabs to Sides A and C as shown above.
Additional Parts
You can add lots of fun additional pop up parts like an arched door or a chimney like I did.
 |
| House Pop up Card |
To make the arched door cut a shape and give it small tabs on the sides as shown.Fold it along the middle and fold the tabs too.
 |
| Pop up card Tutorial |
Position it over your side B to find a position you like.
Attach one tab on the front of your house making sure the central fold lines of the house and the front of your house[ side B] align.Apply glue on the other tab and fold over your house on to it.
 |
| Pop up card Tutorial |
You can decorate your house before sticking it to your base card.
|
| House Pop up Card |
Open up your house and position it over the base card.Roughly mark the position of your tabs in this position.Fold your house , apply glue to the tabs. Stick one tab to the base card. Fold over the base card and let the other tab find its own position. Wait for the glue to dry well.
 |
| House Pop up card Tutorial |
I added some layers of "snow "cut from photo paper folded and attached in a V shaped manner.
 |
| House Pop up card |
The house pop up card is such a versatile pop up - you can use it for a housewarming card, a moving away card, a Christmas card, a birthday card and what not!
Here are links to more
Pop up Card Tutorials
Do leave me your comments
Edited this tutorial was featured at
If you are on Pinterest you can "
Pin" this tutorial by clicking this button :
Pin It


very cute, thanks for sharing!
ReplyDeleteNati from Brazil
http://natiquill.blogspot.com
Sonia
ReplyDeleteThis is wonderful. Thanks for the template. I love pop up cards.
Myrna
what a beautiful doll house up what a great idea I love you work!
ReplyDeleteGreetings Baukje
Fantastic tutorial! Beautiful winter scene you have created. Love your shadowbox card below, love the origami tree, just perfect, have a wonderful weekend, take careX:)
ReplyDeleteA beautifully clear and simple tutorial. Thanks for sharing it with us. Hugs Mrs A.
ReplyDeleteThis is a wonderful little house! Thanks so much for giving us a detailed tutorial on it! I'm one of those that loves the visual aspect to figure out how to make it all work. Love how you incorporated the house in your card!
ReplyDeletelovely card.so much of hard-work you have put to make tutorials.Thanx for sharing this tutorial.
ReplyDeleteHow many of your pages will I bookmark doctor. This is so lovely , I have a niece visiting me , May be we will try this together.
ReplyDeleteThanks for sharing another great step by step of a wonderful creation.
ReplyDeleteMelissa
"Sunshine HoneyBee"
http://CreatedbySunshineHoneyBee.blogspot.com
Thank you so much dear friends
ReplyDeleteSuganthi -- this is not an ideal pop up for children..for starters try some of the pop ups by Robert Sabuda...his pop ups range from simple to complicated and you will not go wrong!
awesome pop up card sonia...wonderful..
ReplyDeleteThanks for the tutorial Sonia..Hugs Loz
ReplyDeleteits almost like watching a movie :)
ReplyDeletelovely pop-up props..
do visit my blog for blog candy :)
hugs
kalindi
http://craftingaberrigines.blogspot.com/
wow just awesome.... i know u r a pro in pop up cards... love it dear...
ReplyDeleteWhat a fab tutorial, I love that house, so cute!
ReplyDeleteSonia, I am tired of promising a Pop up card! :D I think it's time I made one! That mental block has to go and I think, I could start with this one! :D With such clear instructions and measurements, I think I should be able to do it! I love the bright colours you've used! :)
ReplyDelete^
ReplyDelete/ \
/ \ <----This girls says....
- -
| |
| |
Awesome turorial !!!! Thanks for sharing it....=)
Awesome creation!!
ReplyDeleteGreat creation! What I like most of your blog is, you give away all the secrets behind the creation very generously, I will surely try this out very soon. :)
ReplyDeleteWhat a great pop up card! Thank you for the awesome tutorial as well! :)Amy
ReplyDeleteThank you so much, I'll be attempting this when I return to my studio.
ReplyDeleteI forgot to tell you that I found you at inspire me fridays.
ReplyDeleteThank You so much dear friends. Durga I am so touched by what you have written--for me the fun of blogging is sharing my craft adventures-- I feel each blog post should be of some help to the reader!
ReplyDeletethanks so much for sharing the template and the tutorial. This card is just adorable
ReplyDeleteWonderful pop up card and fabulous tutorial! Hope your weekend is wonderful!
ReplyDeleteSusan
From Sonia To Sonia
ReplyDeleteWow! wonderful creation as always! Great Job!
Love the little house.
-Sony
Sonia-Studio60
Very feminine & beautiful!!! Love the soft feel it flaunts.... :D
ReplyDeleteAsh... :)
Thank You so much dear friends-- Asha Thank You for dropping by !
ReplyDeleteWow, just...wow!! This is incredible!! You have the best tutorials I've seen...you explain everything perfectly and I always feel inspired to try your amazing creations! I LOVE visiting your blog :D
ReplyDeleteLisa
indymermaid.blogspot.com
Wow this so really pretty...... amazing work...
ReplyDeletethanks for linking in.........
www.artistneelima.blogspot.com
oh my goodness your creations never cease to amaze me, love this it must be such fun living with you and your ever creative mind
ReplyDeleteHugs Kate xx
Oh what a fantastic tutorial....you are so very clever.
ReplyDeleteI saw this on MIM, Love it xx Jan
ReplyDeleteFantastic card and tutorial.. Saw this on MIM..Faye
ReplyDeleteIt's official. I'm packing my bags and moving in with you. Hope you have room for 4! :D I love visiting your blog Sonia....such an amazing adventure every single time, but it would be even more fun to see you at work in person. Love the way your brain works and how you figure out these measurements and templates all on your own. Completely creative.
ReplyDeleteThank you so much for linking up with us at Make It Monday!!
Hugs,
Lisa xx
DR SONIA JI ,THE IMPORTANT THING FIRSTLY IS MY SON WANTS THIS CARD.I TOLD HIM I WILL TRY TO MAKE OUT OF GREAT TUTORIAL SHE GAVE.BUT HE WANTS DITTO SAME .LOVELY CARD LOVE IT.SAW ON ''MAKE IT MONDAY''
ReplyDeleteWow this is so so awesome! Thanks for the tutorial. Visiting your blog is such a treat to the eyes!
ReplyDeletehaha I got so excited about looking at your blog, subscribing, following that I forgot to say I saw you on MIM! I have never seen a site SO impressively teaching and willing to put out there the most original templates. Thank you so much for that. Especially when you are very busy. Dr. Sonia...you are a treat. MIM was a wonderful place to find you! Spirited Love Samara
ReplyDeleteThat is a brilliant project and a great tutorial. Saw your project on Make it Monday and had to come over and take a closer look.
ReplyDeleteTFS
Paul
Crafty Blogocks
DT Member for Catch The Bug
P.S. Visit my blog to see my giveaway – I have some Digital Scrapbooking softwear up for grabs, all you have to do is comment on THIS POST HERE .
hi,sonia i like your way of tutorial.such a brilliant presentation.
ReplyDeleteHi Sonia, I'll be featuring you at this week's Inspire Me Fridays party! This is so incredible, thank you for sharing!
ReplyDeleteReally cute. Looked like this one was a lot of fun to make.
ReplyDeletehttp://lorisartsyobsession.blogspot.com/
The card is superb!! :) Thank you sooo much for sharing the template and a detailed tutorial!! :D
ReplyDeleteSuper - thanks so much. Will give it a bash
ReplyDelete