 |
| Tacky Tape Projects |

There are so many situations in which the normal liquid white glue is pretty frustrating to use !For many of these "sticky" scenarios ,double sided adhesive tape and especially the super strong red tacky tape version of it is a fantastic alternative .
Features of Red Tacky tape
Do tell me how it is.

  |
| Red Tacky Tape |
- It is a clear transparent adhesive
- The red plastic lining is easy to peel off and reveals the clear adhesive underneath
- Its available in different sizes - 24mm, 18mm,12mm,6mm and 4mm
- Fast and easy to use
- No drying time- instant adhesive!
- Non messy
- Strong adherence
- Can be used on multiple surfaces
- Heat resistant - yeah I used it to heat emboss too...will show you how later on in the post
- Acid free - for creating scrapbook albums and layouts
Here are 12 different uses of Red tacky tape
- Gluing on Wood
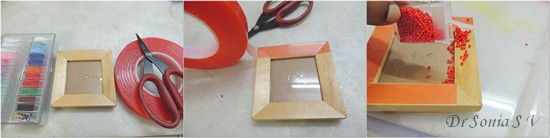
Tacky tape on wood Mod Podge is a very popular glue to adhere paper to wood especially MDF.If you didnt have the patience or time to decoupage with a liquid glue or wanted to avoid the mess, then tacky tape is the answer! I altered a cute wood frame my crafty friend Rupa gave me with seed beads. It was a super simple project....adhered tacky tape on the wooden panels, peeled off the red lining to reveal the clear adhesive layer underneath and dropped seed beads on to it.
The red tape could hold all the seed beads well as you can see from the photo above of the inverted frame but as I wanted a sealant too I gave a coating of Mod Podge!
Beaded frame
Initially I kept the frame simple with just the seed beads and a plastic heart[ also firmly stuck on the red tape and which later I had to pull off with a bit of difficulty!]
Beaded frame
Later on my obsession with Sospeso Transparente got the better of me and so added a few Sospeso blooms to the beaded frame.
Altered frame 
Sospeso Transparente Beaded Photoframe - Gluing Foam
Foam is a super slippery surface to glue and if you want to glue foam to a surface such as a metallic or plastic tin as in this Foam fairy land altered tin, double sided adhesive tape is the best adhesive!
Foam on tin
Here is how my daughter made the Panda penstand .To glue smaller foam pieces to each other or googly eyes to foam,especially when working with children, double sided foam tape and glue dots are awesome adhesives!
Foam Panda Penstand - Gluing on Metal - In the above 2 projects , I used double sided tape to stick foam to a metal tin.To stick paper to metal...liquid glue does work but you need to be super patient and it is rather messy!
I used adhesive tape to stick thick paper to the textured metal tin shown above! Adhesive tape was also useful to stick the lace in the upper and lower borders of this altered tin
Textured metal tin 
Altered tin - Gluing on glass and ceramic - you can use red tacky tape to glue a variety of objects to glass:
- beads, pearls ,sequins,glitter
- paper,wood
- fabric – ribbon , lace
- plastic
- Here is a quick demo on how we altered a glass by sticking beaded, ribbon and a wooden embellishment using red tacky tape and glue dots!
My daughter chose an ordinary glass and seed beads
Beaded glass tutorial
She stuck red tacky tape on the top of the glass...since our glass was not a perfect cylinder there was some wrinkling of the tape but it didnt affect our final project!
Beaded glass tutorial
Peeling the red liner of the tacky tape is so easy my daughter didnt need any help!
Beaded glass tutorial
Just like in the altered beaded frame we just poured beads randomly onto the adhesive tape and pressed them in place.If your hands are dirty and you touch the tape you can loose some of the adhesive property of the tape ! We did add a layer of Mod podge to help seal our beads firmly onto the glass!
Beaded glass tutorial
My daughter loves to use my inkpads and here you can see her using Ranger's Archival Ink to ink some Prima wooden hearts [gifted to her by the generous Priya Sivaraj] to add to her project.I also allowed her to experiment with Clear rock candy crackle paint to create the beautiful crackled hearts!
Inking
I am a big fan of glue dots while crafting with my daughter but it was the first time we got to use the glue dot rolls! They are even easier than the usual glue dots as the glue dots are in a roll and it was easy to stick the embellishment atop a glue dot and peel it right off to stick to a project!
Glue dots
My daughter stuck on the wooden heart on her glass using a glue dot! Next experiment was gluing fabric on glass!
Glued dot adhered wooden heart
If you have ever tried to glue ribbon or lace to glass...you will know how difficult it is with wet glue! It was quick and easy to use tacky tape to stick the red glitter ribbon to our glass!
Beaded glass tutorial 
Beaded pen and glass
- Gluing on Plastic - when I searched online for red tacky tape projects one of the popular crafty uses was to make beaded pens which were supposedly hot selling stuff in craft fairs.
We lined a regular plastic pen with red tacky tape and rolled it in seed beads.Maybe we touched the taped pen too many times and decreased its adhesiveness but for some reason or the other our beads kept falling off the pen and I had to salvage the project with oodles of Modpodge!
Beaded Pen
I stuck on a Sospeso flower on the beaded pen using a glue dot!
Glue dots
For a glue dot to work well as an adhesive the surfaces to be glued should be perfectly flat so it wont work for irregular based flowers and for that reason not all Sospeso flowers will stick with a glue dot!
Sospeso flower with glue dot - Gluing Fabric : Lace, Ribbons to paper, wood, glass ,plastic.So if you want to add a pretty ribbon or lace to your handmade card or box...no more struggling with liquid glue or being frustrated the glue gun gave only a temporary adhesion of the ribbon.I have already shown how we used the red tacky tape to adhere the glittery red ribbon to our glass surface.
- Difficult to glue papers
- Glossy paper surface - If you want to beautify a box like the one shown below which is lined with glossy paper , it is super tricky to stick pattern paper to it using normal white glue as its so smooth and slippery

Altered box - In such situations a double sided adhesive tape is fabulous as its non messy, gives good adhesion, is fast and does not wrinkle!

Altered box
Inked some parts of the beautiful DCWV Mariposa paper and applied crackle paint over it.
Crackle paint 
Crackle paint The foam bow is stuck on to the paper using tacky tape !
Altered Projects - Vellum / parchment - parchment is such a slippery surface to glue and in this floral card ,I embossed parchment so you can imagine it was one tricky surface to glue to my card.I used double sided tape to stick all the layers of this card!

Embossed Vellum Card - Embossed paper - dry embossed paper is tricky to glue because of the texture on its surface and adhesive tape is my go to choice for embossed paper.See examples in the cards above and number 12.
- Handmade Paper
- Corrugated paper
- Glossy Corrugated paper - sticking corrugated paper can be so tricky as such and if its glossy its even more difficult. In this DIY Picture frame tutorial I used double sided foam tape initially
After some days the double sided foam tape proved inadequate and one edge lifted off.
Picture frame
Since the painting was done by my daughter this project was so special to me. I could salvage the frame using tacky tape and its holding up very well!
Adhesion with foam tape
- Glossy Corrugated paper - sticking corrugated paper can be so tricky as such and if its glossy its even more difficult. In this DIY Picture frame tutorial I used double sided foam tape initially
- Glossy paper surface - If you want to beautify a box like the one shown below which is lined with glossy paper , it is super tricky to stick pattern paper to it using normal white glue as its so smooth and slippery
- Sticking Glitter/Sequins/Beads/Craft Sand - because it is so super sticky but non-messy as well..tacky tape is ideal to add bands of glitter , sequins, beads[ as already demonstrated],sand etc to your project quickly and effectively!
- Kids crafts and School Projects - If you have kids you'll know many school projects are a last minute rush job and may require sticking of non paper objects and I find glue dots and adhesive tape indispensable not only to make a project mess free but super quick too! Here is a weighing balancewe made using double sided adhesive tape to stick the paper to the plastic containers to make the scales.

Weighing Balance - Gluing large surfaces such as in scrapbook layouts, albums,recycling crafts,boxes, cards etc with pattern paper.I dont make albums but I have seen its by far the most popular adhesive for crafters who make scrapbook album due to its strong + acid free nature!

Drawer shaped Box - Box making - If you are altering a box or making a box from scratch, you often have to line it and in such cases red tacky tape helps give a neat finish and also makes your job quicker. In the shaped box shown I used double sided adhesive tape to get a strong adhesion.
- Embossing
You can actually take advantage of the heat resistant property of red tacky tape to heat emboss on your projects. The vertical golden column you see on my card was made using embossing powder and red tacky tape. You can completely skip the Versamark /other embossing ink pad!
Heat Embossing
Here is how to make a heat embossed creation: I started with a folded card and stuck red tacky tape on it.
Heat Embossing
Whenever you use tacky tape,run your finger firmly along the tape to get a strong adhesion to the base .
Heat Embossing
Peel off the protective red plastic lining to reveal your tacky tape adhesive and pour embossing powder on the tacky tape.To get the fine embossing in the card I have made, I used Ranger suferfine gold embossing powder.
Heat Embossing
Tap off excess embossing powder.
Heat Embossing
Heat with your embossing heat gun
Heat Embossing
Isn't the heat embossing perfect ? I love it!!
Heat Embossing
As you know sticking textured embossed card/ paper is so difficult and here I used tacky tape to stick the dry embossed " Chandelier" [embossed with a Sizzix folder] to my base card
Heat Embossing
The Joy crafts die cut was also heat embossed with the same super-fine embossing powder and added to the card with 3 D foam tape for a little bit of dimension
Embossed Card
And here is a recap photo of some of my Red Tacky Tape projects made especially for this review
Heat embossed Die cut
Special Points to Keep in mind when using Red Tacky Tape
Red Tacky Tape Projects
 |
| Beaded Pen |
- It is a very strong adhesive so be very sure and accurate when sticking it as you cant stick it and try to remove it and stick it in another place!
- You can use normal scissors to cut it but since its a strong adhesive like foam tape...your cutting will be much easier if you use a nonstick scissors such as the Tim Holtz scissors
- Keep the protective plastic /wax paper covering sheet it is packed with as its a super sticky tape roll and if you store it without its covering, dust and all sorts of particles can stick to it [ personal experience!]
[Ideas and recommendations from crafters : Tejal Mehta Shah, Gopi Shah, Neha Bhatt, Neha Agarwal, Ankita Lunia]
- Use an adhesive remover eraser to remove glue residue on your scissors
- Use sandpaper
- Use thinner[ available in paint/ hardware shops]
- Use Ranger alcohol blending solution
- Use nail polish remover
- Use vaseline or cold cream on your scissors before cutting
- Use versamark on your scissors before cutting
Thank you so much for being with me till the end of this post. I know its a super long post but I wanted to cover as much as I could about this wonderful adhesive with so many possibilities.


