Showing posts with label Toy Making Tutorial. Show all posts

6.4.19

Magical Unicorns DIY Ferris Wheel

Magical Unicorns DIY Ferris Wheel
Hi friends....vacations have started for my daughter and I am so happy to share a special project I made for her...a Giant Ferris Wheel with Magical Unicorns
Magical Unicorns DIY Ferris Wheel
It stands nearly 14inches tall and all the  cute baskets with happy unicorns swing when you rotate the wheels.
Magical Unicorns DIY Ferris Wheel
I made it using chipboard and the  gorgeous Magical Unicorns papers from Dress My Craft .
Magical Unicorns DIY Ferris Wheel
The little baskets are big enough to hold  tiny dolls and you can add little treats and sweets if you use this as a party piece.
Magical Unicorns DIY Ferris Wheel
I made the  beautiful lacy flowers and the  "dream" using Dress My Craft "Flower Sentiment" dies
Magical Unicorns DIY Ferris Wheel
Added tiny ribbon bows, pearl strings and some crystals to complete the  magical theme! The central unicorn is flying over a shaker star filled with crystal beads and pearls!
Magical Unicorns DIY Ferris Wheel
Here are the  parts of the  Ferris Wheel before assembly.
Magical Unicorns DIY Ferris Wheel
And here is a short video Tutorial on how you can make one


Magical Unicorns DIY Ferris Wheel
Hope you liked this handmade gift idea.
Here are the  list of Supplies :from Crafters Corner
Dies :  Dress My Craft Floral Sentiments Faith and Dream,Dress My Craft Floral Sentiments Love, Joy Crafts Lacey Edge
Papers: Dress My Craft Magical Unicorns 12 x 12 , 6 x 6 , and die-cuts , Chipboard
Die Cutting Machine : Crafters Companion Gemini, Sizzix Bigshot
Adhesive : Red Tacky Tape, Dress My Craft Ultimate Craft Glue
Bone Folders : Dress My Craft Teflon Bone Folders,
Punches : Dress My Craft Rounded Tag Punch,
Misc : Bows, Dress My Craft sequins, Dress My Craft Sparkling Dust, Dress My Craft Flower Pearls

1.9.14

Fairyland Tutorial

DIY Fairyland 1
Fairyland Tutorial
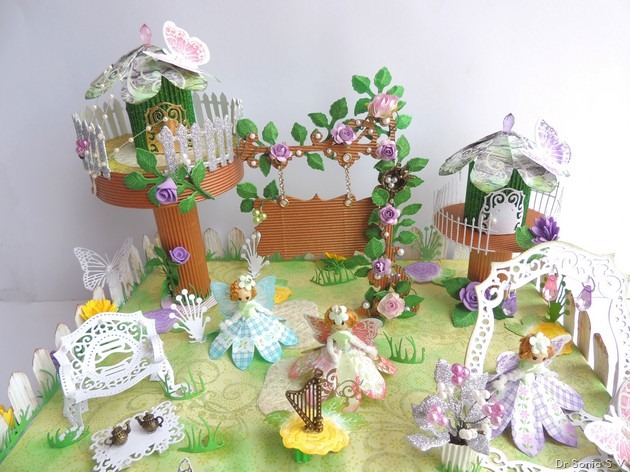
         Dear friends this DIY fairyland is the finale to my flower punch board project series [I have thoroughly enjoyed reviewing the flower punch board for Crafters Corner...Thank you Shalini!].
Can you guess the elements made with the flower punch board ? If you had read my earlier posts  I bet you could !
In case you missed them, here are the posts featuring the flower punch board :
Fairyland tutorial  4
Fairy tutorial 
The fairy home roofs, the fairy dresses and the fence around fairyland were all made with the flower punch board! 
         I built the fairyland on an old cardboard box [recycling!] and lined it with pattern paper which was stamped with flourishes and embossed in clear sparkle embossing powder.To further jazz up the fairy fantasy world , I sponged the pattern paper with dark green ink in patches and added bits of die cut grass all over fairyland.
Fairy Furniture 2
Fairyland Furniture
Made some mini fairy furniture using Spellbinders dies [ the bench is made with the Spellbinders Majestic Labels 25 and the little " teapoy" using the Spellbinders decorative labels 28]
Fairy Furniture 3
Fairyland Tutorial
The little teapots are cute bronze metal charms from Crafters Corner!

Fairy Dress tutorial 

Materials required
  1. Flower Punch Board - alternate is hand cutting but flower punch board makes it super easy as the pleats are all pre-scored and you can make a perfect skirt!
  2. Pattern Paper / Chart paper/ Card stock- you can doodle ,ink or emboss your paper to make super pretty fairy frocks!
  3. Little dolls - you can use different sized dolls even a Barbie! - just change the paper size and punch site accordingly [ eg XXS, XS,S etc on flower punch board] 
  4. Glue
Fairy tutorial 
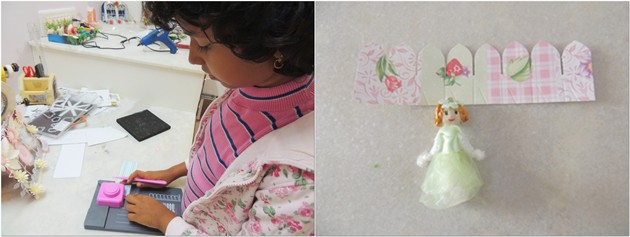
       I had sprained my neck last week and my little girl helped to make this fairyland! Here you can see her using the flower punchboard to make the fairy dresses!We made dresses for these little dolls by punching out a 6 x 1 3/4 inch paper strip as you would for an XXS flower [ see detailed steps here : Easy Flower Making tutorial]
Fairy tutorial  4
Fairy tutorial 
Accordion fold the paper strip and wrap around the little doll's waist.Stick the edges of the last 2 flower petals together and optionally add bits of glue in between the pleats and your fairy dress is ready!
Fairy tutorial  2
Fairy tutorial 
       My daughter's current favourite color is blue and this little blue fairy was made by her. The fairy wings are butterflies stamped and heat embossed on parchment paper and my little girl had a go at parchment craft by embossing on the fairy wings [ See Basic Parchment Craft tutorial ]
Fairy House 3
Fairy tutorial 
This purple fairy has embossed and water-colored fairy wings. I made an arched doorway to fairyland using Spellbinders label 25 dies [same one used to make the fairy furniture] and hung dangling crystals on it. Added a tiny flower pot with magical handmade beaded flowers and silver glitter foam leaves!

Fairy Home tutorial

These fairy houses are super easy to make and by varying the paper strip size you can easily make houses in different sizes
Fairyland 3
Fairy House tutorial 
Make the roofs first 
The roofs for the fairy homes are made the same way like the fairy dresses but I used the next size on the flower punch board and punched out  a 9 x 2 1/4 inch paper strip [as for an XS size flower] . 
Once your paper strip is punched, fold and stick into a conical shape just like in the fairy dress tutorial  to get the fairy house roof. If you want you can add glue on the pleats or let it be for a tiled roof appearance. Add a crystal , bead or flower to close the small gap left at the center of the roof.
Fairy House 1
Fairy house
Make the walls:
         Make any size cylinders using corrugated paper or cardstock and hot glue to your flowery fairy home roofs![Tip : if are making cylinders for any 3 D project corrugated paper is your sure fire choice as its so easy to curve it!]
I wanted to give a  tree-house feel so added the houses atop wood colored corrugated paper discs placed on cylindrical "tree trunks" .
The purple roses on our tree houses are handmade foam roses [ tutorial link  :Foam rose tutorial ]
Fairyland tutorial  2
Fairy land
       Made a faux wooden sign board with roses and pearls twining around it and housing a magical bird nest! The diamond chain was salvaged from an old dress of mine![ you can see it in the Sunflower layout too]
Here are more ideas to jazz up your fairy houses
  • Emboss cardstock using woodgrain or tiles before you make them into cylindrical walls
  • Add lots of glitter
  • Add crystals, pearls and charms
  • Cut out windows and doors and add a tea light inside to light up your fairy house
  • Make your fairy homes into functional boxes by adding a base!

Fence tutorial 

Fairyland tutorial  1
Fairyland Tutorial
Fences are one of my favourite elements to use in creating dioramas [see Beaded Christmas tree diorama] and scenic cards. You could use a fence punch , fence dies or even handcut fences if you have the patience! I used a Marianne fence die around the pink butterfly fairy house and a Memory box fence around the purple house.
Fairy Furniture 1
Foam flowers
The limitation with regular fence punches and dies is that they come in one size only --with the flower punch board you can make any size fence customized for your project!
Flower punch board tutorial  1
Fairy land tutorial 
I punched a paper strip aligning at XS to make the fence for my fairyland. Then embossed the strip  in woodgrain texture [ using a Spellbinders folder] and inked the fence in patches.
Flower punch board tutorial  3
Fence tutorial 
You can use the paper strip as such or cut out individual picket fences like I did for my fairyland!
Fairy House 2
Foam flowers
       Here is the fence with grass and foam flowers with stamped and Heartfelt creations die cut leaves and in the background you can see a cute mini metal harp [ another charm] which I set on an embossed flower table for the little fairies to play!
Fairyland tutorial  3
Handmade Fairyland
The pink, purple and yellow daisy style flowers are all foam flowers made using the Cheery Lynn  Sunflower die [ tutorial link : Daisy tutorial ].Here are links to making some of the beaded flowers in our magical land: Beaded flower tutorial

Phew that was a super long post but I hope you enjoyed your journey through fairyland....do tell me how it is!

Supplies
Flower Making : Flower Punch Board[from Crafters Corner]
Embossing : Versamark Watermark , WOW Embossing Powders, Ranger Heat Gun
Stamps : Hero Arts   Butterfly Stamp, Heartfelt creations bold leaf stamp ,Inque Boutique Monarch
Dies: Cheery Lynn Butterfly,Cheery Lynn  Flourish leaf strip, Cheery Lynn  grass,Cheery Lynn  sunflower,Heartfelt creations leaf ,Memory Box rounded fence ,Memory Box fringe, Marianne Anja Leaves 3 ,Marianne fence, Sizzix BigZ Tim Holtz hanging Sign,Sizzix Butterfly , Spellbinders majestic Labels 25
Papers: DCWV ;Misc tools - Crop a dile Big Bite
Misc Embellishments : Charms [from Crafters Corner]

Edited : this project came top 3 in Crafters Cafe Punches and Dies theme

and was also top pick at Scrapbook Blessings club

And was chosen top 3 at Pile it on Challenge theme Punches
Photobucket

It was also a featured entry at A little red wagon  Girl Power theme challenge


21.7.14

Clay Ocean Diorama

Ocean Diorama 2
Clay ocean diorama
       This ocean diorama with a clay mermaid accompanied by a cute clay pet whale , clay crab and numerous clay sea weeds is my little girl's creation.
Ocean Diorama 12
Clay Crafts
          I was in fact somewhat amused when I got an email from Kores Kool Clay asking if my kiddo would be interested in working with Kores clay!! And here I thought people came to the blog to see my work !! 
        I accepted the offer on behalf of my daughter as we had already worked with Kores clay before and I knew she could easily work with it unlike some super sticky brands of clay which she disliked!
         Well little crafter took her designer job very very seriously and even made me take a video of her making the clay mermaid [but somehow me not too comfy about putting her on you tube...what say friends?]!
Ocean Diorama 13
Clay Mermaid
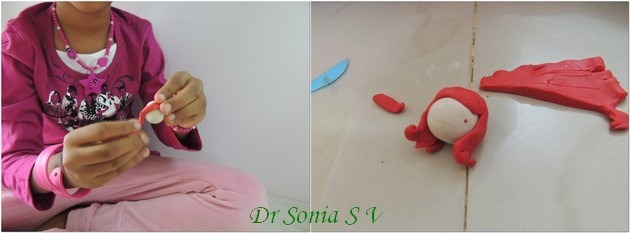
Well here is her mini tutorial in her own words:
1. Make a ball with white clay for the face
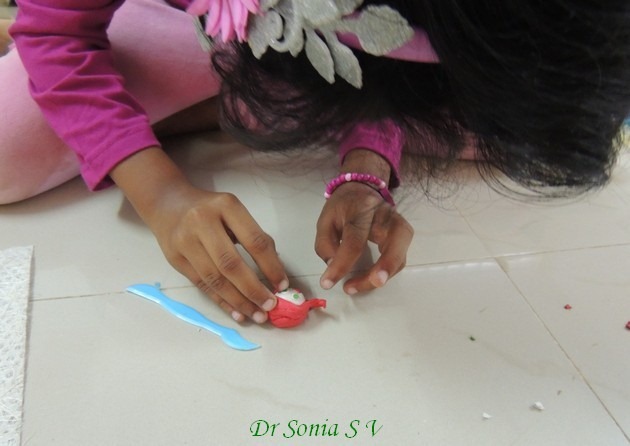
2. To make hair-flatten red clay ball with a vessel - quicker than rolling it out as per the expert! Cut it into strip and stick on head
Ocean Diorama 3
Clay mermaid
3.Make eyes with bits of white, green and black bits of clay
Ocean Diorama 4
Clay Mermaid
Steps 4, 5, 6 are missing as I got a patient's call and by the time I got back the little crafter had already made the mermaid's body !For some reason the mermaid's head disliked the body and resisted pushing,squashing, scolding and even the ultimate crafters' fail-safe of gluing so we decided to skewer her together with a broomstick !! [yeah we crafters have to be a bit brutal at times ,don't we?!]
Ocean Diorama 5
Clay Mermaid
As a final touch mermaid got a sequin flower and can you see the tiny "umbilicus" on the cutie tummy ?!
Clay crafts
My little girl recycled an old cardboard box lid  [by painting it blue] to create a setting for her ocean diorama.
Ocean Diorama 6
Clay Mermaid
We placed little mermaid on a real sea shell sofa and according to my daughter little mermaid had just got back from collecting pearls [you can spy the treasure in her  pink clay basket!].
Ocean Diorama 7
Clay flower
My daughter's big red clay flower perhaps bears no resemblance to any aquatic botanical species ...but then we do have artistic license!! We made the seaweeds from green clay and stuck them atop real sea shells.
Ocean Diorama 9
Clay roses
Most clay brands we get here in India dont have the color pink [ a bit weird!] but Kores clay does have unusual popular colors such as black and pink and I couldn't resist contributing the little pink clay rose buds to the diorama.These easy to make clay roses are just rolled up clay strips.Here is a link to a proper Clay rose tutorial 
Ocean Diorama 10
Clay roses
How do you like my daughter's smiley crab and standing seaweed ? She was so pleased she could make the seaweed stand by curving its shape...ha ha imbibed physics lesson ! The corals in the diorama are treasures we  brought  back from a Malaysian holiday[ Oh I do love that country--- its a holiday haven for nature lovers!]
Ocean Diorama 11
Clay crab
We duplicated the orange and velvet sea sponges from the graphics behind the crab into matching clay sea sponges !
Ocean Diorama 8
Clay crafts
Since I have a crafty little girl I  buy a lot of clay and have tried many different clay brands. What we especially liked about the Kores Kool clay is its not sticky , its easy to mould and shape and wont stick to moulds or cutters. And true to their claim of "never drying"...the clay figures remained the same even after a week in our humid hot Indian climate!
Ocean Diorama 2
Clay ocean diorama
I hope you enjoyed seeing my daughter's ocean diorama ...do spare a moment to comment [ She does read the comments and smile from ear to ear when you praise her !!]
Edited : This Clay ocean diorama came top 3 at Brown and Sugar Sand and sea theme challenge
Add caption
and was featured artist at Anything but a card

18.3.14

How to make a Weighing Balance

Dear friends by now you must be used to occasional weird titled posts from me like “ How to make a Tooth model !!” Well you  guessed right its another school project.
Weighing Balance 1
Weighing balance

               Now my 7 year old [ in 2nd Standard] and is learning about measurements in Maths and had to make a homemade weighing balance.I was sorely tempted to let hubby take over this one as I felt quite challenged but it was so much easier than I thought as my kiddo herself gave me the ideas!!
Weighing Balance 4
Weighing balance
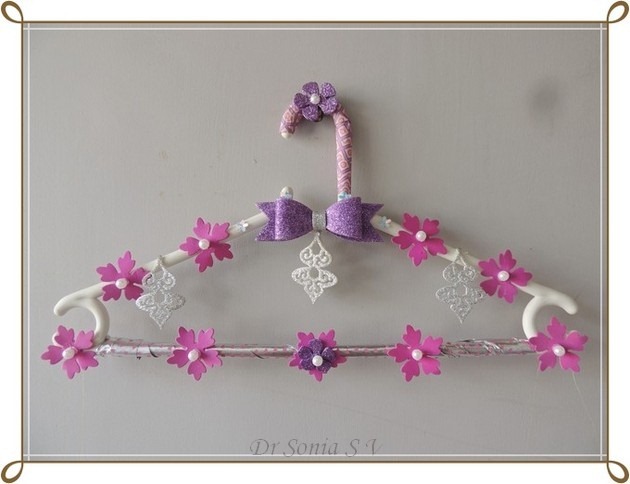
           My kiddo’s school is big on recycling and so we always  try to incorporate recycling into our school projects.We recycled some plastic containers into our “scales”.We punched holes on the plastic containers using  the cropadile big bite and to make the holes nice and strong I set eyelets into the punched holes
Weighing Balance 5
Weighing Balance
              We tied strong kite thread  to holes in the containers and tied it to the ends of the cloth hanger .I found that the easiest way to get the lengths of the scales the same was to adjust the lengths and then tape the threads at the hanger ends.
Weighing Balance 6
Weighing Balance
             We dressed up our weighing balance with ribbon and pattern paper and I even added a glittery foam bow + lots of pink and purple foam flowers.
Weighing Balance 7
Weighing Balance
                These days I tend to use foam more and more for school projects as foam can take a lot of”poking” and “exploring” by little hands and believe me my little one’s friends are experts at that !!
Weighing Balance 2
Weighing Balance
              Sticking paper to plastic is always a challenge and I used double sided tissue tape to stick the pattern paper to the outside of our plastic container scales and just rolled up a pattern paper and inserted it inside the containers as a pretty lining for our home made weighing balance.
Weighing Balance 3
Weighing Balance
And here is my little girl proudly displaying her  utterly girlie homemade weighing balance
Do tell me how you liked our girly weighing balance.
Related Posts Plugin for WordPress, Blogger...