Showing posts with label Beaded Flowers. Show all posts

9.7.16

Crystal Flower Bouquet Tutorial

Crystal Flower Bouquet Tutorial 
         In my city Bangalore ,there is a place called Raja Market where craft supplies are available at wholesale rates. Though one can find amazing and unique crafty gems there I don't go there often as it's situated in a hugely overcrowded bustling market and there is no parking which adds to the woes [I have to leave my car miles away and wait for ages for autos and bribe the ones who bother to stop  with double or triple the usual fare as even auto rickshaw drivers dont like to brave the inevitable traffic congestion there!]
Crystal Flowers
         These beautiful crystal flowers were part  of my recent haul from Raja Market ! And though so beautiful  and gorgeous looking , since I bought from a wholesale shop all the crystal flowers used to make  my bouquet  cost just around 90 rupees...that is just a little over a dollar!
Crystal Flower Bouquet 
These are sooo easy to make and even though you may not be having the same flower shaped beads/ crystal in your stash  hope you can adapt this simple tutorial  .
Crystal Flower Bouquet Tutorial 
Materials Required
  • Flower shaped beads/ crystals
  • Smaller beads/ crystals to go on the center of the flower
  • Wire...the thicker the better. I used 18 G
  • Floral Tape
  • Fabric/Crystal /Other Leaves
        Since my wire was of a thinner gauge I folded a 24 inch strip so that the floral stem would be a little strong. Its  easier to make your bouquet if you have thick wire or you are using a skewer.
Crystal Flower Bouquet Tutorial 

On the folded wire thread the small crystal all the way to the center and twist your wire twice to secure it.
Crystal Flower Bouquet Tutorial 
Thread both the wires with your small crystal at its end through the crystal flower.
Crystal Flower Bouquet Tutorial 
Loop your wire at the base of your crystal flower and tie one or two knots to secure your crystal flower so that it doesn't slip down later on.
Crystal Flower Bouquet Tutorial 
Twist both the wires of your flower and your flower stem is ready! It looks nice and easy but if you are going to be twisting a lot of stems in one go be prepared for some sore fingers!!
Crystal Flower Bouquet Tutorial 
Apply a bit of glue to a floral tape and wrap around your floral stem...its easier to start from below and then roll up to your flower! Add leaves as you go !
Crystal Flower Bouquet Tutorial 
You can add a few crystal flower sprays to your card / scrapbook or mixed media project or add a bunch of crystal flowers to a vase along with a few pearl sprigs for a unique home decor item!
Crystal Flowers
And here is another crystal flower bouquet made with red crystal flowers.
Crystal Flowers 
I didn't have a nice flower vase for it so made one by recycling a plastic container and dressing it up with glitter foam and lace!
Crystal Flower Bouquet Tutorial 
 I added a gorgeous metal filigree butterfly onto a skewer and added it to the crystal flower bouquet so  that it can forever flutter amongst the magical crystal flowers!
Crystal Flower Bouquet 
Here is a closeup of a crystal flower with crystal leaves [  before I completed the bouquet]
Crystal Flower 
And the photo below shows how the bouquet shimmers when the sunlight falls on it [ taken on my hubby's terrace garden]
Crystal Flowers
Hope you liked my easy home decor idea!

28.2.16

Butterfly Garden Rotating Pen Stand

Altered Pen Stand
         Hi friends one of my crafty resolutions for the year is to pretty up mundane looking or throwaway objects  that are already present in my home .So yes every boring tin can, cardboard box and pen stand is getting a makeover!
Rotating Pen stand
        I love to participate in craft challenges and over the years a few have become definite favorites....one of them is  Mrs A  Butterfly Challenge ! The current theme is Butterflies + Glitter + Grape Color.
        I altered the  rotating pen stand shown above with a subtly glittered butterfly themed papers from DCWV Mariposa stack and added a golden heat embossed water colored purple 3 D rose .Here is the tutorial to make a 3 D Stamped Rose : 3 D Decoupage tutorial 
Heat Embossed Rose
The purple flowers all around are foam flowers and here is the tutorial I used to make them : Daisy tutorial 
Purple Rose
            Also added a few quilled elements [ tear drop shapes and fringed flowers ]to match the creamish brown color of the Mariposa pattern paper.
Heat Embossed Butterfly
        The butterfly shown above is a vellum heat embossed butterfly with a glittery purple center layered on a golden Cheery Lynn  butterfly.  I also used glittery purple foam flowers to form a flat easy to glue base for  several of the foam daisies.
Butterflies
            In the panel above you can also see a simple beaded purple flower I made! The pen stand looks different from different sides but overall it is a butterfly garden!!

Supplies : Dies :  Cheery Lynn  Butterfly , Cheery Lynn  Sunflower , Heartfelt creations Classic Leaf ,  Sizzix- Hero Arts  Stamp- Die Set Flowers and Butterflies 657773 , Provocraft Natural and Texture Border ,Heartfelt creations Botanical Wings   
Stamps : Winnie and Walter In Bloom Elsa's Flora Stamp Set , Sizzix- Hero Arts  Stamp- Die Set Flowers and Butterflies 657773 , Heartfelt Creations Bold Leaf  , Heartfelt creations Botanical Wings 
Papers : DCWV Mariposa

2.9.14

Easy Beaded Flower Spray tutorial

Beaded flower tutorial 2
Beaded Flowers Box
       This Baby themed box is my guest DT project for Tuesday Throwdown. I generally shy away from working with digital images as I am not very patient at coloring images but when the super talented Davi invited me to be Guest DT at Tuesday Throwdown and warned me I would have to work with digital images I couldn't turn her down!
Beaded flower tutorial 1
Recycling Craft
        Altered this cardboard box by lining it with pattern paper and layering with die cuts.I colored the cute Robyn Fetish image called "Lucy" with Staedtler watercolors [my first attempt at watercoloring with pencils!!] and added a diamond heart pendant in her hand [the diamond heart was salvaged from a broken earring!]
Beaded flower tutorial 4
Baby theme Box
        Inked and embossed the edges of the wild rose floral frame die cut with clear sparkle embossing powder to give a subtle sparkle.Added a tiny baby foot and a "baby" atop pink flowers on the corners of my box.My daughter wanted to know why I added a baby's foot on the flower..... I told her its a magical baby and was born from a flower !!
Beaded flower tutorial 5
Parchment Bow
       I made a bow from vellum using the lifestyle crafts Bow die and inked it pastel pink. If you love bows be sure to check out my  friend Sindhu's post on some super clever ways to make bows with dies.
Beaded flower tutorial 6
Beaded Flowers
The pink daisy is a handmade foam flower [made by Daisy flower tutorial] you saw aplenty in the fairyland diorama too!
The beaded flowers  you see in this altered box were super easy to make and so sharing this super simple tutorial to make a beaded flower spray
Materials Required
Beaded flower tutorial 13
Beaded Flowers tutorial 
  • Beads - any shape or size you fancy
  • Wire - work with whatever gauge you are comfortable with!
  • Scissors or wire cutter- I used my favourite Tim Holtz scissors
  • Floral tape - in green ,brown or whatever color you fancy [ only recently I came to know that floral tape is available in pink color as well!!]
Beaded flower tutorial 8
Beaded Flowers tutorial 
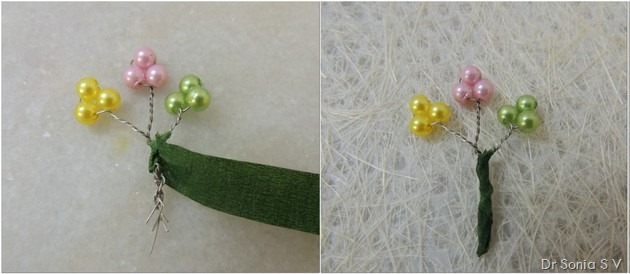
Depending on the size of your beads and the length of the flower branches you want cut a length of wire. I cut 3.5 inches wire to make each beaded flower branch. Its better to cut more wire than you need till you get the hang of it!! Thread 3 beads onto the center of the wire and bend the wire in a gentle U.
Beaded flower tutorial 9
Beaded Flowers tutorial 
Hold the 3 beads in one hand and twist the wires to make a beaded flower branch! Super easy isn't it!!
Beaded flower tutorial 
Make more flower beaded flower branches and cut a length of floral tape as long as your beaded flower stem.
Beaded flower tutorial 10
Beaded Flowers tutorial 
        Twist one flower branch around another and once its fairly tightly twisted add another one.Dont worry about poking wire ends or bumpy bends..you are going to cover all that in floral tape!
Beaded flower tutorial 11
Beaded Flowers tutorial 
      Whoever invented floral tape is a genius!!I just love working with floral tape...it doesn't feel super sticky but sticks to itself so beautifully!...just wrap your floral tape around your beaded flower branches and keep pressing firmly while you roll it around your beaded flower stem.You don't even have to glue the loose ends! And your beaded flower spray is done.
Beaded flower tutorial 7
Beaded Flowers tutorial 
This beaded flower tutorial  is a super easy version ! If you have a bit more time you can try the Beaded flower tutorial  or the Beaded tree tutorial .
Beaded flower tutorial 3
Beaded Flowers tutorial 
I hope you enjoyed this crazily simple tutorial and do bear with me on my first attempt at watercoloring an image [I was super glad baby was a baldy and I didn't need to color hair ...not yet ready for hair days!! Ha Ha]

Supplies:Dies : Spellbinders Majestic Labels 25, Wild rose studio floral frame, Marianne Anja leaves 3,Lifestyle crafts Bow,Couture creations Oval, Cheery Lynn  Sunflower die.Embellishments: Jesse James buttons , Baby bottle charm
Linking to Kraftzone Sep
Edited: this project was winner at Kraftzone Welcome Baby theme
It was also featured at Totally Tutorials

1.9.14

Fairyland Tutorial

DIY Fairyland 1
Fairyland Tutorial
         Dear friends this DIY fairyland is the finale to my flower punch board project series [I have thoroughly enjoyed reviewing the flower punch board for Crafters Corner...Thank you Shalini!].
Can you guess the elements made with the flower punch board ? If you had read my earlier posts  I bet you could !
In case you missed them, here are the posts featuring the flower punch board :
Fairyland tutorial  4
Fairy tutorial 
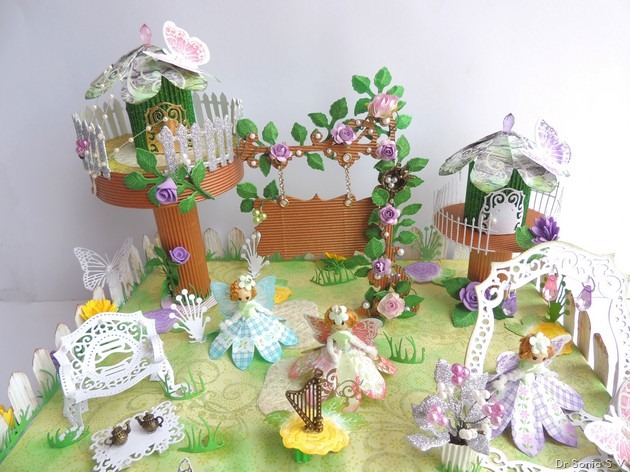
The fairy home roofs, the fairy dresses and the fence around fairyland were all made with the flower punch board! 
         I built the fairyland on an old cardboard box [recycling!] and lined it with pattern paper which was stamped with flourishes and embossed in clear sparkle embossing powder.To further jazz up the fairy fantasy world , I sponged the pattern paper with dark green ink in patches and added bits of die cut grass all over fairyland.
Fairy Furniture 2
Fairyland Furniture
Made some mini fairy furniture using Spellbinders dies [ the bench is made with the Spellbinders Majestic Labels 25 and the little " teapoy" using the Spellbinders decorative labels 28]
Fairy Furniture 3
Fairyland Tutorial
The little teapots are cute bronze metal charms from Crafters Corner!

Fairy Dress tutorial 

Materials required
  1. Flower Punch Board - alternate is hand cutting but flower punch board makes it super easy as the pleats are all pre-scored and you can make a perfect skirt!
  2. Pattern Paper / Chart paper/ Card stock- you can doodle ,ink or emboss your paper to make super pretty fairy frocks!
  3. Little dolls - you can use different sized dolls even a Barbie! - just change the paper size and punch site accordingly [ eg XXS, XS,S etc on flower punch board] 
  4. Glue
Fairy tutorial 
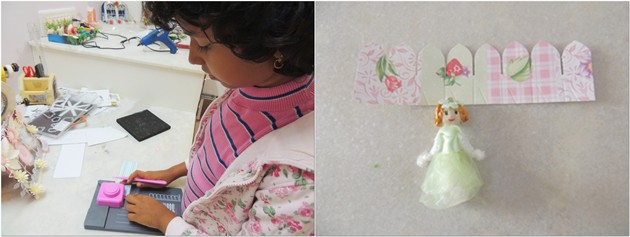
       I had sprained my neck last week and my little girl helped to make this fairyland! Here you can see her using the flower punchboard to make the fairy dresses!We made dresses for these little dolls by punching out a 6 x 1 3/4 inch paper strip as you would for an XXS flower [ see detailed steps here : Easy Flower Making tutorial]
Fairy tutorial  4
Fairy tutorial 
Accordion fold the paper strip and wrap around the little doll's waist.Stick the edges of the last 2 flower petals together and optionally add bits of glue in between the pleats and your fairy dress is ready!
Fairy tutorial  2
Fairy tutorial 
       My daughter's current favourite color is blue and this little blue fairy was made by her. The fairy wings are butterflies stamped and heat embossed on parchment paper and my little girl had a go at parchment craft by embossing on the fairy wings [ See Basic Parchment Craft tutorial ]
Fairy House 3
Fairy tutorial 
This purple fairy has embossed and water-colored fairy wings. I made an arched doorway to fairyland using Spellbinders label 25 dies [same one used to make the fairy furniture] and hung dangling crystals on it. Added a tiny flower pot with magical handmade beaded flowers and silver glitter foam leaves!

Fairy Home tutorial

These fairy houses are super easy to make and by varying the paper strip size you can easily make houses in different sizes
Fairyland 3
Fairy House tutorial 
Make the roofs first 
The roofs for the fairy homes are made the same way like the fairy dresses but I used the next size on the flower punch board and punched out  a 9 x 2 1/4 inch paper strip [as for an XS size flower] . 
Once your paper strip is punched, fold and stick into a conical shape just like in the fairy dress tutorial  to get the fairy house roof. If you want you can add glue on the pleats or let it be for a tiled roof appearance. Add a crystal , bead or flower to close the small gap left at the center of the roof.
Fairy House 1
Fairy house
Make the walls:
         Make any size cylinders using corrugated paper or cardstock and hot glue to your flowery fairy home roofs![Tip : if are making cylinders for any 3 D project corrugated paper is your sure fire choice as its so easy to curve it!]
I wanted to give a  tree-house feel so added the houses atop wood colored corrugated paper discs placed on cylindrical "tree trunks" .
The purple roses on our tree houses are handmade foam roses [ tutorial link  :Foam rose tutorial ]
Fairyland tutorial  2
Fairy land
       Made a faux wooden sign board with roses and pearls twining around it and housing a magical bird nest! The diamond chain was salvaged from an old dress of mine![ you can see it in the Sunflower layout too]
Here are more ideas to jazz up your fairy houses
  • Emboss cardstock using woodgrain or tiles before you make them into cylindrical walls
  • Add lots of glitter
  • Add crystals, pearls and charms
  • Cut out windows and doors and add a tea light inside to light up your fairy house
  • Make your fairy homes into functional boxes by adding a base!

Fence tutorial 

Fairyland tutorial  1
Fairyland Tutorial
Fences are one of my favourite elements to use in creating dioramas [see Beaded Christmas tree diorama] and scenic cards. You could use a fence punch , fence dies or even handcut fences if you have the patience! I used a Marianne fence die around the pink butterfly fairy house and a Memory box fence around the purple house.
Fairy Furniture 1
Foam flowers
The limitation with regular fence punches and dies is that they come in one size only --with the flower punch board you can make any size fence customized for your project!
Flower punch board tutorial  1
Fairy land tutorial 
I punched a paper strip aligning at XS to make the fence for my fairyland. Then embossed the strip  in woodgrain texture [ using a Spellbinders folder] and inked the fence in patches.
Flower punch board tutorial  3
Fence tutorial 
You can use the paper strip as such or cut out individual picket fences like I did for my fairyland!
Fairy House 2
Foam flowers
       Here is the fence with grass and foam flowers with stamped and Heartfelt creations die cut leaves and in the background you can see a cute mini metal harp [ another charm] which I set on an embossed flower table for the little fairies to play!
Fairyland tutorial  3
Handmade Fairyland
The pink, purple and yellow daisy style flowers are all foam flowers made using the Cheery Lynn  Sunflower die [ tutorial link : Daisy tutorial ].Here are links to making some of the beaded flowers in our magical land: Beaded flower tutorial

Phew that was a super long post but I hope you enjoyed your journey through fairyland....do tell me how it is!

Supplies
Flower Making : Flower Punch Board[from Crafters Corner]
Embossing : Versamark Watermark , WOW Embossing Powders, Ranger Heat Gun
Stamps : Hero Arts   Butterfly Stamp, Heartfelt creations bold leaf stamp ,Inque Boutique Monarch
Dies: Cheery Lynn Butterfly,Cheery Lynn  Flourish leaf strip, Cheery Lynn  grass,Cheery Lynn  sunflower,Heartfelt creations leaf ,Memory Box rounded fence ,Memory Box fringe, Marianne Anja Leaves 3 ,Marianne fence, Sizzix BigZ Tim Holtz hanging Sign,Sizzix Butterfly , Spellbinders majestic Labels 25
Papers: DCWV ;Misc tools - Crop a dile Big Bite
Misc Embellishments : Charms [from Crafters Corner]

Edited : this project came top 3 in Crafters Cafe Punches and Dies theme

and was also top pick at Scrapbook Blessings club

And was chosen top 3 at Pile it on Challenge theme Punches
Photobucket

It was also a featured entry at A little red wagon  Girl Power theme challenge


Related Posts Plugin for WordPress, Blogger...